1. పరిచయం
This manual provides comprehensive instructions for the safe and effective use of the C-LOGIC 580 Smart Digital Multimeter. Please read this manual thoroughly before operation and retain it for future reference.
The C-LOGIC 580 is a smart digital multimeter designed for accurate and efficient electrical measurements. Its smart technology allows for automatic recognition of measurement parameters, reducing potential errors for amateur users and saving time for professionals.
2. భద్రతా సమాచారం
Always observe safety precautions when using electrical testing equipment. Failure to do so may result in injury or damage to the device.
- ప్రతి ఫంక్షన్ కోసం పేర్కొన్న గరిష్ట ఇన్పుట్ విలువలను మించకూడదు.
- Ensure the test leads are properly connected and the function switch is in the correct position before making any measurements.
- లైవ్ సర్క్యూట్లతో పనిచేసేటప్పుడు చాలా జాగ్రత్తగా ఉండండి.
- Do not use the multimeter if it appears damaged or if the test leads are compromised.
- Refer to the CAT III 600V and MAX 600V markings on the device for voltagఇ పరిమితులు.
3. ఉత్పత్తి లక్షణాలు
- స్మార్ట్ టెక్నాలజీ: Automatic recognition of measurement parameters.
- Error Reduction: Designed to minimize errors for amateur users.
- సమయం ఆదా: Streamlines measurement processes for professional users.
- డిజిటల్ ప్రదర్శన: Clear and easy-to-read digital readout.
- బహుళ విధులు: Capable of measuring various electrical parameters.
4. ప్యాకేజీ విషయాలు
ప్యాకేజీని తెరిచినప్పుడు అన్ని వస్తువులు ఉన్నాయని మరియు దెబ్బతినకుండా ఉన్నాయని ధృవీకరించండి.
- C-LOGIC 580 Smart Digital Multimeter
- పరీక్ష లీడ్లు (ఎరుపు మరియు నలుపు)
- వినియోగదారు మాన్యువల్
5. సెటప్
5.1 బ్యాటరీ ఇన్స్టాలేషన్
The C-LOGIC 580 is battery powered. Ensure batteries are correctly installed before first use.
- మల్టీమీటర్ వెనుక భాగంలో బ్యాటరీ కంపార్ట్మెంట్ కవర్ను గుర్తించండి.
- బ్యాటరీ కంపార్ట్మెంట్ను తెరవడానికి స్క్రూడ్రైవర్ని ఉపయోగించండి.
- Insert the required batteries, observing the correct polarity (+ and -).
- బ్యాటరీ కంపార్ట్మెంట్ కవర్ను మార్చండి మరియు దాన్ని భద్రపరచండి.
5.2 టెస్ట్ లీడ్లను కనెక్ట్ చేయడం
ఖచ్చితమైన మరియు సురక్షితమైన కొలతలకు పరీక్ష లీడ్ల సరైన కనెక్షన్ చాలా ముఖ్యమైనది.
- "COM" (కామన్) ఇన్పుట్ జాక్లోకి బ్లాక్ టెస్ట్ లీడ్ను చొప్పించండి.
- Insert the red test lead into the "VHz%" input jack for voltage, frequency, and duty cycle measurements.
- కనెక్షన్లు దృఢంగా మరియు సురక్షితంగా ఉన్నాయని నిర్ధారించుకోండి.
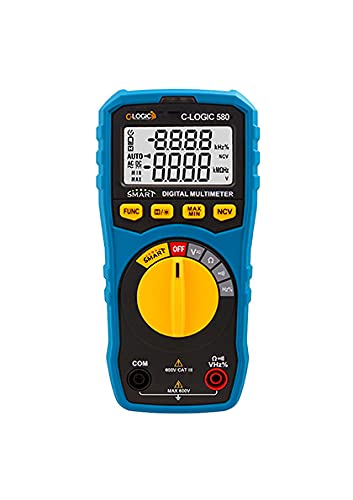
మూర్తి 1: ముందు view of the C-LOGIC 580 Smart Digital Multimeter, showing the display, rotary switch, function buttons, and input jacks (COM and VHz%). The display shows "-8.8.8.8" and "0.0.0.0" with indicators for AUTO, AC/DC, kHz%, NCV, MAX, MIN, and V. The rotary switch is set to OFF. The input jacks are labeled "COM" and "VHz%".
6. ఆపరేటింగ్ సూచనలు
6.1 పవర్ చేయడం ఆన్/ఆఫ్
To power on the multimeter, rotate the central yellow dial from the "OFF" position to any desired measurement function. To power off, rotate the dial back to "OFF".
6.2 Smart Measurement Mode
The C-LOGIC 580 features a smart mode that automatically identifies the type of measurement (e.g., AC voltagఇ, డిసి వాల్యూమ్tage, resistance) when the leads are connected to a circuit. This simplifies operation by eliminating the need to manually select the measurement type.
6.3 ఫంక్షన్ బటన్లు
The multimeter includes several function buttons below the display:
- FUNC: Used to cycle through different measurement modes within a single rotary switch setting (e.g., AC/DC voltage, resistance/continuity).
- (Diode/Continuity): Activates diode test or continuity check.
- గరిష్టం/నిమి: Toggles between maximum and minimum value hold during a measurement.
- NCV: Activates Non-Contact Voltagఇ డిటెక్షన్.
6.4 ప్రాథమిక కొలతలు
వాల్యూమ్tagఇ కొలత (AC/DC):
- Set the rotary switch to the 'V' position.
- Connect the black test lead to the 'COM' jack and the red test lead to the 'VHz%' jack.
- కొలవవలసిన సర్క్యూట్ లేదా కాంపోనెంట్కు సమాంతరంగా పరీక్ష లీడ్లను కనెక్ట్ చేయండి.
- The multimeter will automatically detect AC or DC voltage. Use the FUNC button if manual selection is needed.
నిరోధక కొలత:
- Set the rotary switch to the 'Ω' position.
- Connect the black test lead to the 'COM' jack and the red test lead to the 'VHz%' jack.
- నిరోధకతను కొలిచే ముందు సర్క్యూట్ డీ-ఎనర్జైజ్ చేయబడిందని నిర్ధారించుకోండి.
- కొలవవలసిన భాగం అంతటా పరీక్ష లీడ్లను కనెక్ట్ చేయండి.
కంటిన్యూటీ టెస్ట్:
- Set the rotary switch to the 'Ω' position.
- నొక్కండి (Diode/Continuity) button to select continuity mode.
- Connect the test leads across the circuit or component. A beep indicates continuity.
సంపర్కం కాని సంtage (NCV) గుర్తింపు:
- Set the rotary switch to the 'NCV' position.
- Move the top part of the multimeter near a live conductor. The device will indicate the presence of AC voltagఇ ప్రత్యక్ష పరిచయం లేకుండా.
7. నిర్వహణ
7.1 శుభ్రపరచడం
మల్టీమీటర్ c ని తుడవండిasinప్రకటనతో గ్రాamp cloth and mild detergent. Do not use abrasives or solvents. Ensure the device is dry before storage or use.
7.2 బ్యాటరీ భర్తీ
When the low battery indicator appears on the display, replace the batteries promptly to ensure accurate readings. Follow the battery installation steps in Section 5.1.
7.3 నిల్వ
Store the multimeter in a cool, dry place away from direct sunlight and extreme temperatures. If storing for extended periods, remove the batteries to prevent leakage.
8. ట్రబుల్షూటింగ్
| సమస్య | సాధ్యమైన కారణం | పరిష్కారం |
|---|---|---|
| మల్టీమీటర్ పవర్ ఆన్ చేయదు. | డెడ్ లేదా తప్పుగా ఇన్స్టాల్ చేయబడిన బ్యాటరీలు. | బ్యాటరీ ధ్రువణతను తనిఖీ చేయండి లేదా బ్యాటరీలను మార్చండి. |
| సరికాని రీడింగ్లు. | Incorrect function selected; poor test lead connection; low battery. | Ensure correct function is selected (if not in smart mode); check test lead connections; replace batteries. |
| కంటిన్యుటీ బీప్ లేదు. | Circuit is open; continuity mode not selected. | Verify circuit integrity; press FUNC button to select continuity mode. |
9. స్పెసిఫికేషన్లు
| పరామితి | వివరాలు |
|---|---|
| బ్రాండ్ | సి-లాజిక్ |
| మోడల్ | 580 |
| శక్తి మూలం | బ్యాటరీ ఆధారితమైనది |
| కొలత రకం | మల్టీమీటర్ |
| తయారీదారు | సి-లాజిక్ |
| ASIN | B0967VMK1W |
| UPC | 810053671603 |
| మొదటి తేదీ అందుబాటులో ఉంది | మే 31, 2021 |
10. వారంటీ మరియు మద్దతు
For warranty information or technical support regarding your C-LOGIC 580 Smart Digital Multimeter, please contact C-LOGIC customer service. Refer to the product packaging or the official C-LOGIC webసంప్రదింపు వివరాల కోసం సైట్.
గమనిక: నిర్దిష్ట వారంటీ నిబంధనలు ప్రాంతం మరియు రిటైలర్ను బట్టి మారవచ్చు. దయచేసి మీ కొనుగోలు రుజువును ఉంచుకోండి.


