1. ఉత్పత్తి ముగిసిందిview & ప్యాకేజీ విషయాలు
The Bileeko RV Backup Camera System provides enhanced visibility for safe maneuvering of your vehicle. This system includes a 7-inch LCD monitor and a waterproof rear view camera with night vision capabilities, designed for various vehicles such as cars, trailers, vans, jeeps, and SUVs.
ప్యాకేజీ విషయాలు:
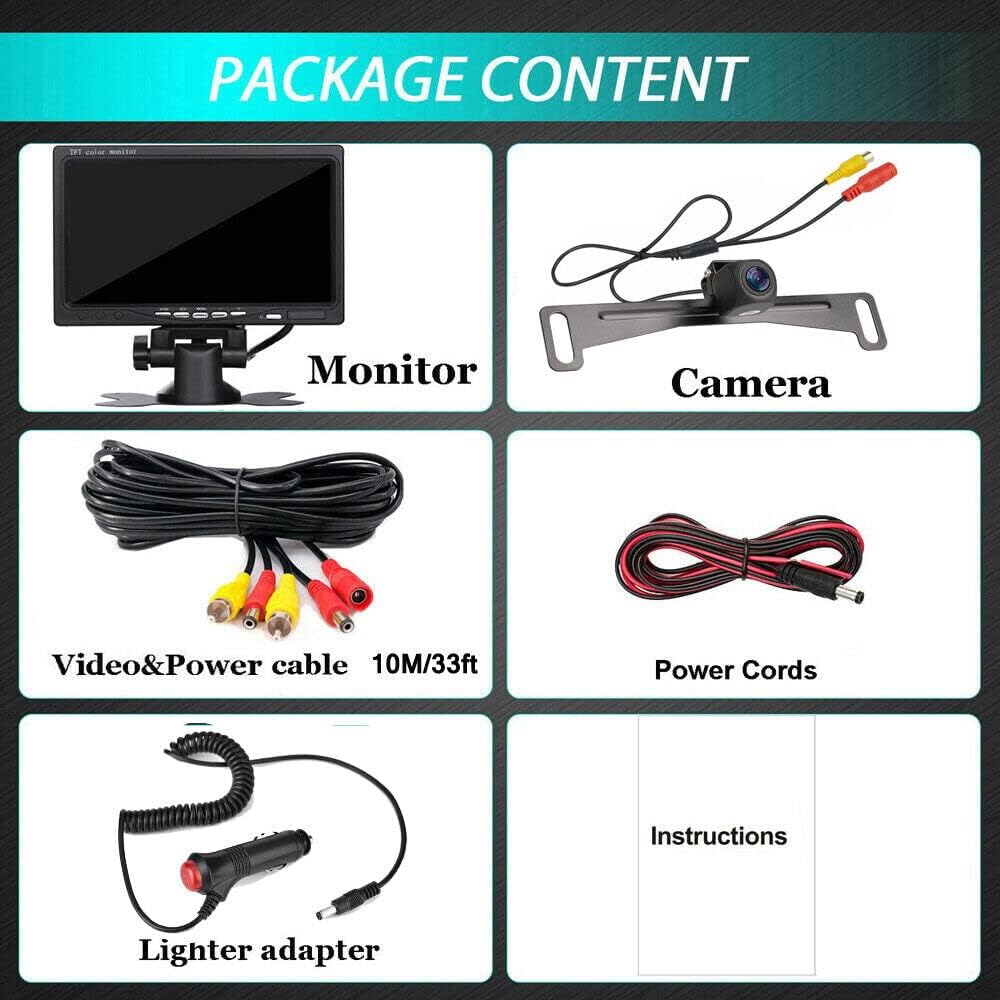
This image displays the complete package contents: the 7-inch LCD monitor, the backup camera, a lighter adapter with on/off switch, a 3.3ft power cable, and a 33ft 2-in-1 video power cable.

ఒక సమగ్రమైన view of the Bileeko RV Backup Camera System, showing the 7-inch monitor, the rear view camera, and the necessary wiring for installation.
- 1 x 7 inch LCD Monitor
- 1 x బ్యాకప్ కెమెరా
- 1 x Lighter adapter with on/off
- 1 x Power Cable 3.3ft
- 1 x Video Power cable 33ft 2 In 1
ముఖ్య లక్షణాలు:

This image highlights the amazing features of the system, such as 12V power supply, HD quality (1080x720 pixels), Color CMOS sensor, 800 TV lines, IP69 waterproof rating, RCA connector, guide lines, NTSC video system, and an ultra-wide 170-degree angle.

An illustration demonstrating the super wide-angle capability of the camera, featuring a 145-degree horizontal angle and a 170-degree diagonal angle, along with waterproof protection, HD quality, and distance guidelines.
- 7-inch HD color LCD monitor.
- IP68 waterproof camera with IR lights for enhanced night vision.
- Supports continuous viewing or reverse-only activation.
- Monitor has a removable pedestal with foam adhesive for flexible mounting.
- Additional cameras can be installed for monitoring multiple positions (front/side/back).
2. సెటప్ & ఇన్స్టాలేషన్
The Bileeko RV Backup Camera System is designed for straightforward installation. Please follow the diagrams and instructions carefully.
సంస్థాపనా రేఖాచిత్రం:
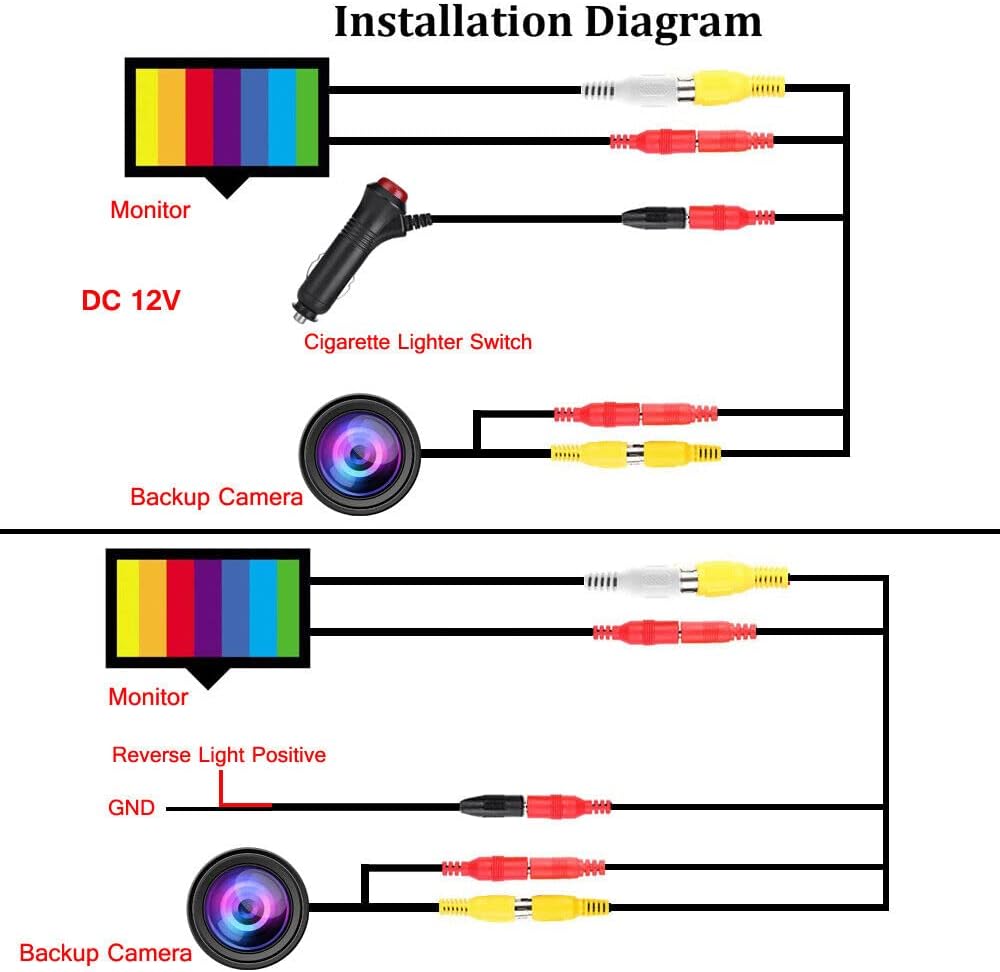
This diagram illustrates two primary wiring methods: one using the cigarette lighter switch for continuous power, and another connecting to the reverse light positive for activation only when the vehicle is in reverse gear.
వైరింగ్ ఎంపికలు:
- నిరంతర Viewing: Connect the monitor and camera power to the included cigarette lighter adapter. This allows the system to be powered on continuously when the vehicle's accessory power is active.
- Reverse-Activated Viewing: Connect the camera's power wire to your vehicle's reverse light positive wire. This will activate the camera and monitor only when the vehicle is shifted into reverse. The monitor can be powered separately or also tied into the reverse light circuit.
Ensure all RCA connectors are securely fastened. The system is ideal for cars, trucks, SUVs, MPVs, or any vehicle where you need a reliable rear view.

A detailed diagram showing the wiring for continuous use, including connections for the monitor, lighter adapter, video wire, and camera, with V1 (2nd camera) and V2 (prioritized) inputs.
3. ఆపరేటింగ్ సూచనలు
Familiarize yourself with the monitor and remote controls for optimal use of your backup camera system.
మానిటర్ నియంత్రణలు:

This image labels the buttons on the 7-inch monitor and the corresponding functions on the remote control. Monitor buttons include AV1/AV2 push button, Screen Switch, Menu button, Volume-, Volume+, Power standby, and Infrared receiver. Remote control buttons include Power, Video (V1/V2 selecting), VOL+ (Increase), Menu (brightness, colors, contrast), Mode (selecting display results), and VOL- (Reduce).
- AV1/AV2 Push Button: Switches between video input sources (if multiple cameras are connected).
- స్క్రీన్ స్విచ్: Toggles display modes or aspect ratios.
- మెనూ బటన్: Accesses the on-screen display (OSD) menu for settings like brightness, color, and contrast.
- వాల్యూమ్ +/-: Adjusts the volume (if audio input is available, though typically not for backup cameras).
- Power Standby: Puts the monitor into standby mode.
- ఇన్ఫ్రారెడ్ రిసీవర్: For use with the included remote control.
రిమోట్ కంట్రోల్ విధులు:
- శక్తి: Switches the power supply on/off.
- VIDEO (V1/V2): Selects between video input V1 and V2.
- VOL+: వాల్యూమ్ పెంచుతుంది.
- మెను: Opens the menu for adjusting brightness, colors, and contrast.
- DIRECTIONS: Selects different display results or viewing మోడ్లు.
- VOL-: Reduces volume.
The camera features include HD quality, CMOS sensor, 170° wide angle, and IP68 waterproof rating. It also offers control for mirror image and guide lines.

This image details the backup camera's specifications: HD resolution, CMOS sensor, 170-degree viewing angle, and IP68 waterproof rating. It also shows options for controlling mirror image and guide lines.
4. నిర్వహణ
Proper maintenance ensures the longevity and optimal performance of your Bileeko RV Backup Camera System.
- శుభ్రపరచడం: ఒక మృదువైన ఉపయోగించండి, డిamp cloth to clean the monitor screen and camera lens. Avoid abrasive cleaners or solvents.
- కెమెరా సంరక్షణ: The camera is IP68 waterproof, but avoid directing high-pressure water jets directly at it. Regularly check for any debris or mud obstructing the lens.
- కేబుల్ కనెక్షన్లు: అన్ని కేబుల్ కనెక్షన్లు సురక్షితంగా ఉన్నాయని మరియు తుప్పు పట్టడం లేదా దెబ్బతినకుండా ఉన్నాయని నిర్ధారించుకోవడానికి కాలానుగుణంగా వాటిని తనిఖీ చేయండి.
- నిల్వ: If the system is not in use for an extended period, store it in a cool, dry place away from direct sunlight and extreme temperatures.
5. ట్రబుల్షూటింగ్
మీ సిస్టమ్తో మీకు సమస్యలు ఎదురైతే, ఈ క్రింది సాధారణ సమస్యలు మరియు పరిష్కారాలను చూడండి:
| సమస్య | సాధ్యమైన కారణం / పరిష్కారం |
|---|---|
| మానిటర్ పై చిత్రం లేదు |
|
| అస్పష్టమైన లేదా వక్రీకరించిన చిత్రం |
|
| No Night Vision |
|
| Monitor Not Turning On |
|
If you experience any problems with installation or operation that are not covered here, please do not hesitate to contact customer support for assistance.
6. స్పెసిఫికేషన్లు
7 inch LCD Monitor:
- ప్రమాణాలు: Meets FCC/CE/RoHS/UL/IP6X standards
- ప్రదర్శన: 7 అంగుళాల LCD మానిటర్
- విద్యుత్ వినియోగం: Ultra-low, to prevent overheating
- సిగ్నల్ ఫార్మాట్: PAL / NTSC (Compatible with all signal formats)
- వాల్యూమ్ రేట్ చేయబడిందిtage: 9V - 35V, 400mA-20A
- ప్రదర్శన సాంకేతికత: LCD
- ఇన్స్టాలేషన్ రకం: డాష్బోర్డ్ మౌంట్, సర్ఫేస్ మౌంట్
వెనుక View కెమెరా:
- ప్రమాణాలు: Meets FCC/CE/RoHS/UL/IP6X standards
- చిత్ర సెన్సార్: 1/3" CMOS
- S/N నిష్పత్తి: Better than 48db
- వీడియో అవుట్పుట్: RCA connector, 1.0vp-p, 75 Ohm
- శక్తి: 9V-14V DC, 400mA-20A
- జలనిరోధిత గ్రేడ్: IP68
- రాత్రి దృష్టి: IR నైట్ విజన్
- ఆప్టికల్ సెన్సార్ టెక్నాలజీ: CMOS
- వీడియో క్యాప్చర్ రిజల్యూషన్: 750
- Viewకోణం: 170 degrees (Ultra Wide Angle)
సాధారణ సిస్టమ్ స్పెసిఫికేషన్లు:
- బ్రాండ్: బిలీకో
- మోడల్ సంఖ్య: BI-7monitorAV-02
- వాల్యూమ్tage: 12 వోల్ట్లు
- అనుకూల పరికరాలు: మానిటర్
- కనెక్టర్ రకం: RCA
7. వారంటీ మరియు మద్దతు
For any inquiries, technical support, or to purchase additional accessories such as longer RCA video cables (20ft/50ft/66ft), please contact Bileeko customer service. Refer to your product packaging or the retailer's webనిర్దిష్ట సంప్రదింపు సమాచారం కోసం సైట్.
While specific warranty details are not provided in this manual, it is recommended to retain your proof of purchase for any warranty claims or support needs.


