పరిచయం
This manual provides detailed instructions for the installation, operation, and maintenance of your Bileeko 4 Split Screen Reversing Camera System. Please read this manual thoroughly before installation and use to ensure proper function and safety.
ప్యాకేజీ విషయాలు
క్రింద జాబితా చేయబడిన అన్ని వస్తువులు మీ ప్యాకేజీలో చేర్చబడ్డాయని ధృవీకరించండి:
- 1 x 7-inch TFT LCD HD Monitor
- 2 x కారు వెనుకview కెమెరాలు
- 2 x 15-meter (33 feet) 4-Pin Aviation Cables
- 1 x Monitor Holder
- 1 x Convert Cable (for power/video input)
- 1 x Outer Frame (for monitor installation)
- 1 x వినియోగదారు మాన్యువల్

చిత్రం 1: ప్యాకేజీ కంటెంట్లు అయిపోయాయిview
స్పెసిఫికేషన్లు
స్పెసిఫికేషన్లను పర్యవేక్షించండి:
- LCD స్క్రీన్: 7 అంగుళాల TFT LCD
- రిజల్యూషన్: 800 (W) x 480 (H) పిక్సెల్లు
- వీడియో ఇన్పుట్: 2-Channel (V1/V2 switchable)
- వీడియో సిస్టమ్: NTSC / PAL auto-switching
- విద్యుత్ వినియోగం: 7W
- విద్యుత్ సరఫరా: DC 12V-24V
కెమెరా స్పెసిఫికేషన్లు:
- శైలి: 4 Pin Aviation Connector
- ఇమేజింగ్ పరికరం: 1/4-inch Color CMOS
- ప్రభావవంతమైన పిక్సెల్లు: 628 x 586 (PAL); 510 x 496 (NTSC)
- లెన్స్ కోణం: 120 degrees (2.8mm) / 92 degrees (3.6mm)
- రాత్రి దృష్టి: 18 IR LED లు
- జలనిరోధిత రేటింగ్: IP69
- విద్యుత్ సరఫరా: DC 12V-24V
- కొలతలు: 60.5 (L) x 27.5 (W) x 31.6 (D) mm (approx.)

Figure 2: Camera Waterproof Rating and Dimensions
కేబుల్ లక్షణాలు:
- రకం: 4-Pin Aviation Cable
- పొడవు: 15 meters (33 feet) per cable
- ఫీచర్లు: Strong anti-interference, stable signal transmission
ఇన్స్టాలేషన్ గైడ్
1. మానిటర్ సంస్థాపన
The 7-inch monitor can be installed on your vehicle's dashboard or integrated into the console using the provided outer frame.
- Attach the monitor to the holder.
- Secure the holder to a suitable flat surface on your dashboard.
- Alternatively, for console integration, fit the monitor into the outer frame and then install it into the vehicle's console opening.

Figure 3: Monitor Console Installation Example
2. కెమెరా ప్లేస్మెంట్
The system includes two cameras. You can install them at different locations on your vehicle (e.g., rear, side) depending on your viewing needs. The cameras are IP69 waterproof and suitable for various vehicle types including trucks, RVs, trailers, and buses.

Figure 4: Camera Installation Diagram and Vehicle Compatibility
3. వైరింగ్ కనెక్షన్లు
The system uses 4-pin aviation cables for stable signal transmission. Follow the wiring diagram carefully.
- మానిటర్ను శక్తివంతం చేయడం: Connect the monitor's red and black wires to a constant 12V-24V power source in your vehicle.
- కనెక్టింగ్ కెమెరాలు:
- Connect each camera to the monitor using the provided 4-pin aviation cables.
- For a camera intended for backup, connect its trigger wire (e.g., blue, green, white, brown for V1-V4 respectively) to the vehicle's reverse light power. This will automatically switch the monitor to that camera's view రివర్స్ చేసినప్పుడు.
- Cameras can also be wired directly to the monitor without a reverse trigger if continuous viewing కావాలి.
- Ensure all connections are secure and waterproof where necessary.

చిత్రం 5: సిస్టమ్ వైరింగ్ రేఖాచిత్రం
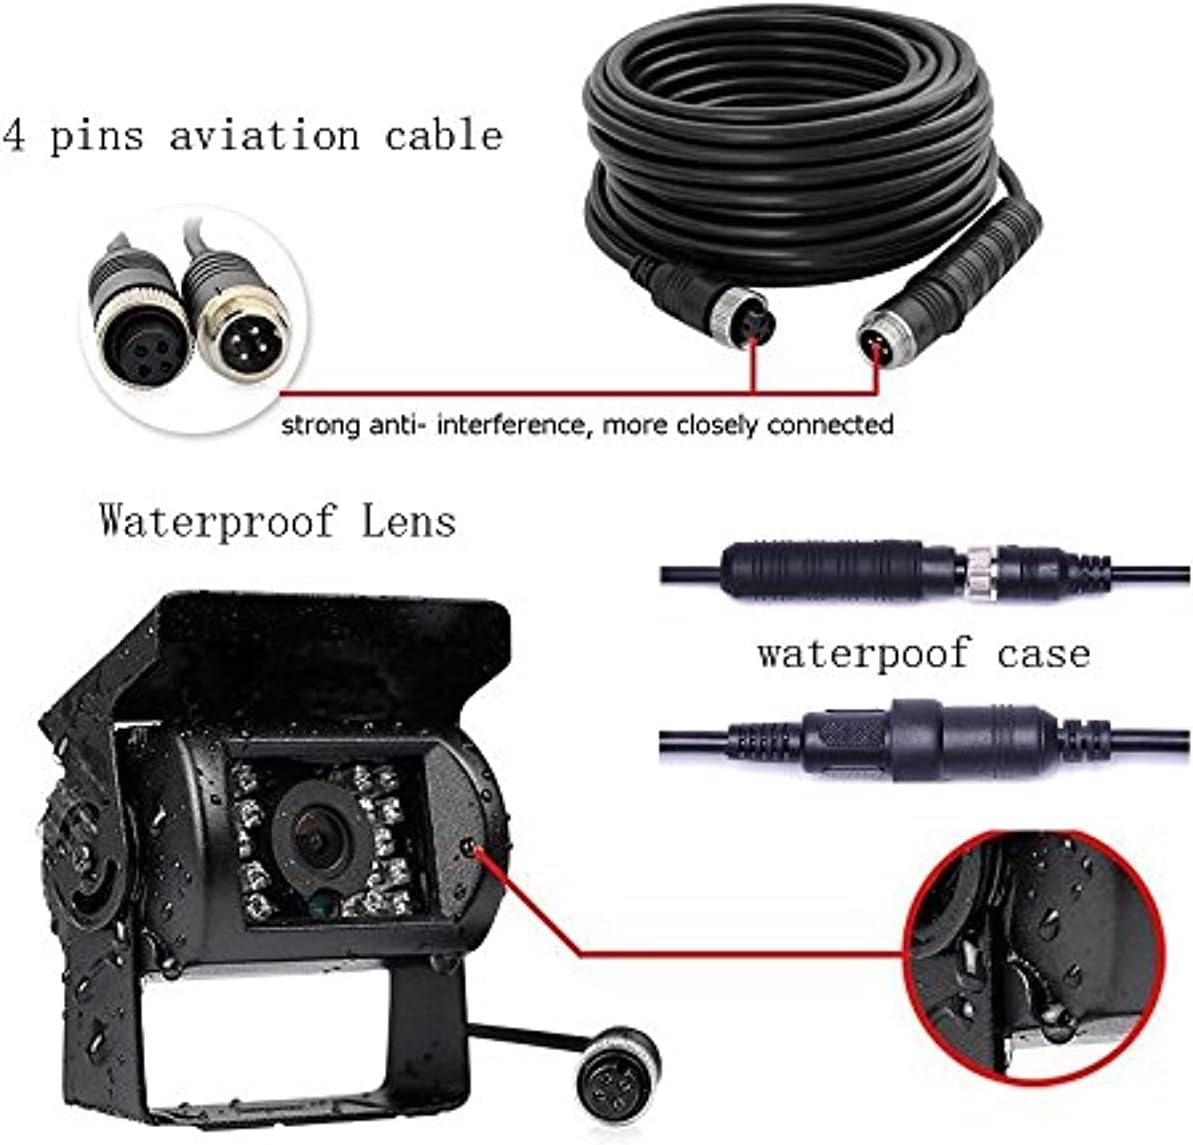
Figure 6: 4-Pin Aviation Cable and Waterproof Camera Lens Detail
ఆపరేటింగ్ సూచనలు
1. పవర్ చేయడం ఆన్/ఆఫ్
Once properly wired, the monitor will power on automatically when the vehicle's ignition is turned on, or when the reverse gear is engaged (if wired with a trigger).
2. Video Input Selection
The monitor supports two video inputs (V1/V2). Use the "V1/V2" button on the monitor or the remote control to switch between camera views. If a reverse trigger is connected, the monitor will automatically switch to the corresponding camera when reversing.

Figure 7: Split Screen Display Example
3. డిస్ప్లే మోడ్లు
The monitor offers various display modes, including single camera view and split-screen views, allowing you to monitor multiple camera feeds simultaneously. Use the mode buttons on the monitor or remote to cycle through available display configurations.

Figure 8: Available Video Display Modes
4. ఇమేజ్ సర్దుబాటు
The monitor allows adjustment of brightness, contrast, and color. You can also rotate the image horizontally and vertically to achieve a mirror or normal display, as needed for your camera orientation.
- Use the menu buttons on the monitor or remote control to access display settings.
- Adjust parameters such as brightness, contrast, and color to your preference.
- Select image rotation options (mirror/normal) if required.
నిర్వహణ
- మానిటర్ శుభ్రం చేయడం: మానిటర్ స్క్రీన్ను శుభ్రం చేయడానికి మృదువైన, పొడి వస్త్రాన్ని ఉపయోగించండి. మొండి మరకల కోసం, కొద్దిగా damp cloth with a mild, non-abrasive cleaner can be used. Avoid excessive moisture.
- కెమెరాలను శుభ్రపరచడం: Periodically clean the camera lenses to ensure a clear view. Use a soft cloth and, if necessary, a mild cleaning solution. The cameras are waterproof (IP69), but avoid high-pressure washing directly on the lens.
- కనెక్షన్లను తనిఖీ చేస్తోంది: Regularly inspect all cable connections for tightness and signs of wear or corrosion, especially the 4-pin aviation connectors, to ensure stable signal transmission.
- పర్యావరణ పరిరక్షణ: While the cameras are designed for outdoor use, extreme temperatures or prolonged direct sunlight can affect component lifespan.
ట్రబుల్షూటింగ్
| సమస్య | సాధ్యమైన కారణం | పరిష్కారం |
|---|---|---|
| మానిటర్ పవర్ ఆన్ చేయదు. | No power supply; loose power connection; faulty fuse. | Check power connections to the monitor. Ensure the vehicle's ignition is on. Verify the fuse in the power line. |
| No image displayed on the monitor. | Loose camera cable connection; incorrect video input selected; faulty camera or cable. | Check all 4-pin aviation cable connections. Ensure the correct video input (V1/V2) is selected. Test with another camera or cable if available. |
| చిత్రం అస్పష్టంగా లేదా వక్రీకరించబడింది. | Dirty camera lens; damaged cable; electromagnetic interference. | Clean the camera lens. Inspect cables for damage. Ensure cables are routed away from strong electrical interference sources. |
| Monitor does not switch to reverse camera automatically. | Reverse trigger wire not connected or incorrectly connected. | Verify the reverse trigger wire is correctly connected to the vehicle's reverse light power source. |
| పేలవమైన రాత్రి దృష్టి పనితీరు. | IR LEDs obstructed or faulty; dirty camera lens. | Ensure the camera lens and IR LEDs are clean and unobstructed. |
వారంటీ మరియు కస్టమర్ మద్దతు
Bileeko is committed to providing 100% customer satisfaction. If you experience any quality problems with this product within 12 months of purchase, please contact our customer service for assistance. We will replace new accessories free of charge to ensure your satisfaction.
For further support or inquiries, please refer to the contact information provided with your purchase or visit the official Bileeko webసైట్.


