1. పరిచయం
This manual provides detailed instructions for the installation, operation, and maintenance of your MOUNTUP Single Monitor Desk Mount, model MU0004-W. Please read this manual thoroughly before installation and retain it for future reference. Proper installation and use will ensure optimal performance and safety.
The MOUNTUP MU0004-W is designed to support a single monitor, offering adjustable positioning for an ergonomic workspace. It features a gas spring arm for smooth height adjustments and versatile movement options.
2. అనుకూలత తనిఖీ
Before proceeding with installation, verify that your monitor and desk meet the following requirements:
- మానిటర్ పరిమాణం: Compatible with most LCD LED flat or curved computer screens up to 32 inches.
- మానిటర్ బరువు: Supports monitors weighing between 4.4 lbs (2 kg) and 17.6 lbs (8 kg).
- వెసా నమూనా: Supports VESA mounting patterns of 75x75mm and 100x100mm. If your monitor has a different VESA pattern, an adapter (not included) may be required.
- డెస్క్ మందం (C-clamp): C-cl కోసంamp installation, your desk thickness must be between 0.39 inches (10mm) and 4.52 inches (115mm).
- Desk Thickness (Grommet): For grommet installation, your desk thickness must be between 0.39 inches (10mm) and 3.15 inches (80mm), and the hole diameter must be between 0.39 inches (10mm) and 2.36 inches (60mm).

చిత్రం 1: సార్వత్రిక అనుకూలత ముగిసిందిview

Figure 2: Detailed Compatibility Checks
ముఖ్యమైన: Do not install this mount on tempered glass table tops.
3. సెటప్ మరియు ఇన్స్టాలేషన్
The MOUNTUP MU0004-W offers two installation methods: C-clamp and Grommet mount. All necessary hardware for both options is included.
3.1. మీ మౌంటు ఎంపికను ఎంచుకోండి

Figure 3: Two Installation Options
3.1.1. సి-క్లోరిన్amp సంస్థాపన
- C-clని అటాచ్ చేయండిamp base to the edge of your desk. Ensure the desk thickness is within 0.39-4.52 inches.
- cl బిగించండిamp securely using the provided knob until the base is stable.

చిత్రం 4: C-Clamp మౌంటు వివరాలు
3.1.2. గ్రోమెట్ మౌంట్ ఇన్స్టాలేషన్
- If your desk has a grommet hole, ensure its diameter is between 0.39-2.36 inches and desk thickness is 0.39-3.15 inches.
- Insert the grommet base through the hole and secure it from underneath the desk using the provided plate and wing nut.

Figure 5: Grommet Mounting Detail
3.2. Attaching the Monitor Arm
- Slide the lower arm onto the installed base pole.
- Attach the upper gas spring arm to the lower arm.
- Secure the VESA plate to the back of your monitor using the appropriate screws and spacers from the hardware kit.
- Carefully slide the monitor (with VESA plate attached) onto the end of the gas spring arm until it clicks into place.
4. ఆపరేటింగ్ మరియు సర్దుబాట్లు
The MOUNTUP MU0004-W offers a full range of motion for optimal viewing సౌకర్యం.

Figure 6: Full Range Motion
4.1. గ్యాస్ స్ప్రింగ్ టెన్షన్ సర్దుబాటు
The gas spring allows for smooth height adjustments. Adjust the tension to match your monitor's weight for effortless movement.
- Hold the arm in a horizontal position.
- Use the provided Allen key to adjust the gas spring tension screw.
- తిరగండి సవ్యదిశలో (-) to reduce tension for lighter monitors (monitor raises up).
- తిరగండి అపసవ్య దిశలో (+) to increase tension for heavier monitors (monitor drops down).
- Adjust gradually, testing the arm's movement after every few turns, until the monitor stays at the desired height without drifting. Note: It may take up to 17 turns for significant adjustment.

Figure 7: Gas Spring Adjustment
4.2. Tilt Angle Adjustment
Adjust the monitor's vertical angle for optimal viewing.
- Loosen the tilting bolt (turn to "-" direction).
- Adjust the monitor to your desired tilt angle (up to +90° and down to -45°).
- Retighten the tilting bolt (turn to "+" direction) to secure the angle.
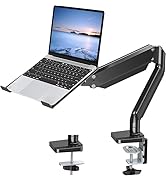
Figure 8: Tilt Angle Adjustment
4.3. Swivel and Rotation
- స్వివెల్: The arm joints allow for 180° swivel, and the VESA plate can swivel 90° left or right.
- భ్రమణం: The VESA plate can rotate 360° for landscape or portrait orientation.
4.4. కేబుల్ నిర్వహణ
Integrated cable management clips help keep your workspace tidy by concealing monitor cables.
- Route your monitor cables through the designated channels on the underside of the arm.
- Secure the cable covers to keep the cables neatly tucked away.

చిత్రం 9: కేబుల్ నిర్వహణ
5. నిర్వహణ
క్రమం తప్పకుండా నిర్వహణ మీ మానిటర్ మౌంట్ యొక్క దీర్ఘాయువు మరియు సురక్షితమైన ఆపరేషన్ను నిర్ధారిస్తుంది.
- శుభ్రపరచడం: మౌంట్ను మృదువైన, d తో తుడవండిamp వస్త్రం. రాపిడి క్లీనర్లు లేదా ద్రావకాలను నివారించండి.
- కాలానుగుణ తనిఖీలు: Periodically check all screws and bolts, especially the clamp/grommet base and VESA plate connections, to ensure they remain tight and secure. Re-tighten if necessary.
- గ్యాస్ స్ప్రింగ్: If the gas spring tension feels off, refer to Section 4.1 for adjustment instructions.
6. ట్రబుల్షూటింగ్
Refer to the following common issues and solutions. For more detailed assistance, please consult the official Troubleshooting Guide (PDF) available on the product page or contact customer support.
- Monitor Sags or Rises Unintentionally:
This indicates incorrect gas spring tension. Refer to Section 4.1 to adjust the gas spring. Increase tension for heavier monitors (turn counter-clockwise) or decrease for lighter monitors (turn clockwise). - Monitor Tilts Downward:
The tilt bolt may not be sufficiently tightened. Loosen the tilt bolt slightly, adjust the monitor to the desired angle, and then firmly re-tighten the tilt bolt as described in Section 4.2. - మౌంట్ అస్థిరంగా అనిపిస్తుంది:
C-cl ఉండేలా చూసుకోండిamp or grommet base is securely fastened to the desk. Check for any wobbling and re-tighten the base screws or clamp knob. Verify that your desk surface is stable and within the specified thickness limits. - Difficulty Moving the Arm:
If the arm is too stiff or too loose, the gas spring tension might need fine-tuning. Refer to Section 4.1. Also, ensure no cables are snagged or obstructing movement.
For further troubleshooting, please refer to the అధికారిక ట్రబుల్షూటింగ్ గైడ్ (PDF).
7. స్పెసిఫికేషన్లు
| ఫీచర్ | స్పెసిఫికేషన్ |
|---|---|
| మోడల్ సంఖ్య | MU0004-W |
| బ్రాండ్ | మౌంట్అప్ |
| మెటీరియల్ | మిశ్రమం ఉక్కు |
| రంగు | తెలుపు |
| అనుకూల మానిటర్ పరిమాణం | 32 అంగుళాల వరకు |
| బరువు సామర్థ్యం | 4.4 - 17.6 పౌండ్లు (2 - 8 కిలోలు) |
| VESA అనుకూలత | 75x75mm, 100x100mm |
| కదలిక రకం | Tilt, Rotate, Swivel, Height Adjust, Full Motion |
| టిల్ట్ యాంగిల్ | +90° నుండి -45° |
| స్వివెల్ యాంగిల్ | 180° (arm joints), 360° (VESA plate) |
| భ్రమణం | 360° |
| Max Height Adjustment | 16.3 అంగుళాలు (41.4 సెం.మీ.) |
| గరిష్ట పొడిగింపు | 19.27 అంగుళాలు (48.9 సెం.మీ.) |
| మౌంటు ఐచ్ఛికాలు | C-clamp, గ్రోమెట్ |
| C-clamp డెస్క్ మందం | 0.39 - 4.52 అంగుళాలు (10 - 115 మిమీ) |
| గ్రోమెట్ డెస్క్ మందం | 0.39 - 3.15 అంగుళాలు (10 - 80 మిమీ) |
| గ్రోమెట్ హోల్ వ్యాసం | 0.39 - 2.36 అంగుళాలు (10 - 60 మిమీ) |
8. వారంటీ మరియు మద్దతు
The MOUNTUP Single Monitor Desk Mount MU0004-W is backed by MOUNTUP's 3-year support. For warranty claims, technical assistance, or any questions regarding your product, please contact MOUNTUP customer service through their official channels or the retailer where the product was purchased.
మీరు కూడా సూచించవచ్చు అధికారిక వినియోగదారు మాన్యువల్ (PDF) అదనపు సమాచారం కోసం.