1. పరిచయం
This manual provides detailed instructions for the installation, operation, maintenance, and troubleshooting of your MACHINIST B660 Gaming Motherboard. This motherboard is designed to support 12th and 13th Generation Intel Core/Pentium/Celeron series processors, offering robust performance for personal computing needs.
2. సెటప్ మరియు ఇన్స్టాలేషన్
Careful installation is crucial for optimal performance and longevity of your motherboard. Please follow these steps:
2.1. మదర్బోర్డ్ ఓవర్view
The MACHINIST B660 motherboard features an ITX form factor (170mm*170mm) with a 10-phase power supply and 8-layer PCB design. It includes various ports and slots for component integration.

Figure 2.1: The MACHINIST B660 Gaming Motherboard alongside its packaging, highlighting its compact design and 'Security Efficient' and 'Diamond Quality' features.

Figure 2.2: Detailed diagram of the B660 Motherboard, showing the layout of components and ports including JBAT, DP, VGA, HDMI, USB 2.0, USB 3.2, 2.5GbE LAN, SFAN, WiFi 6 antenna ports, Audio jacks, PCIe 5.0 X16, 8PIN DC, BUZZER, 4PIN CFAN, DDR4 slots, 24PIN DC, SATA 3.0, and NVMe M.2 slot.
2.2. Processor Installation (LGA 1700 Socket)
This motherboard is equipped with an Intel LGA 1700 socket, compatible with 12th and 13th Generation Intel Core/Pentium/Celeron series processors. Ensure proper alignment and gentle placement of the CPU into the socket.

మూర్తి 2.3: క్లోజ్-అప్ view of the Intel LGA 1700 socket on the motherboard, indicating compatibility with 12th/13th Gen Intel Core/Pentium/Celeron series processors.
2.3. Memory Installation (DDR4)
The motherboard features two DDR4 memory slots, supporting dual-channel, non-ECC unbuffered memory. The maximum capacity is 64GB (32G*2), with effective frequencies ranging from 2133MHz to 3600MHz.
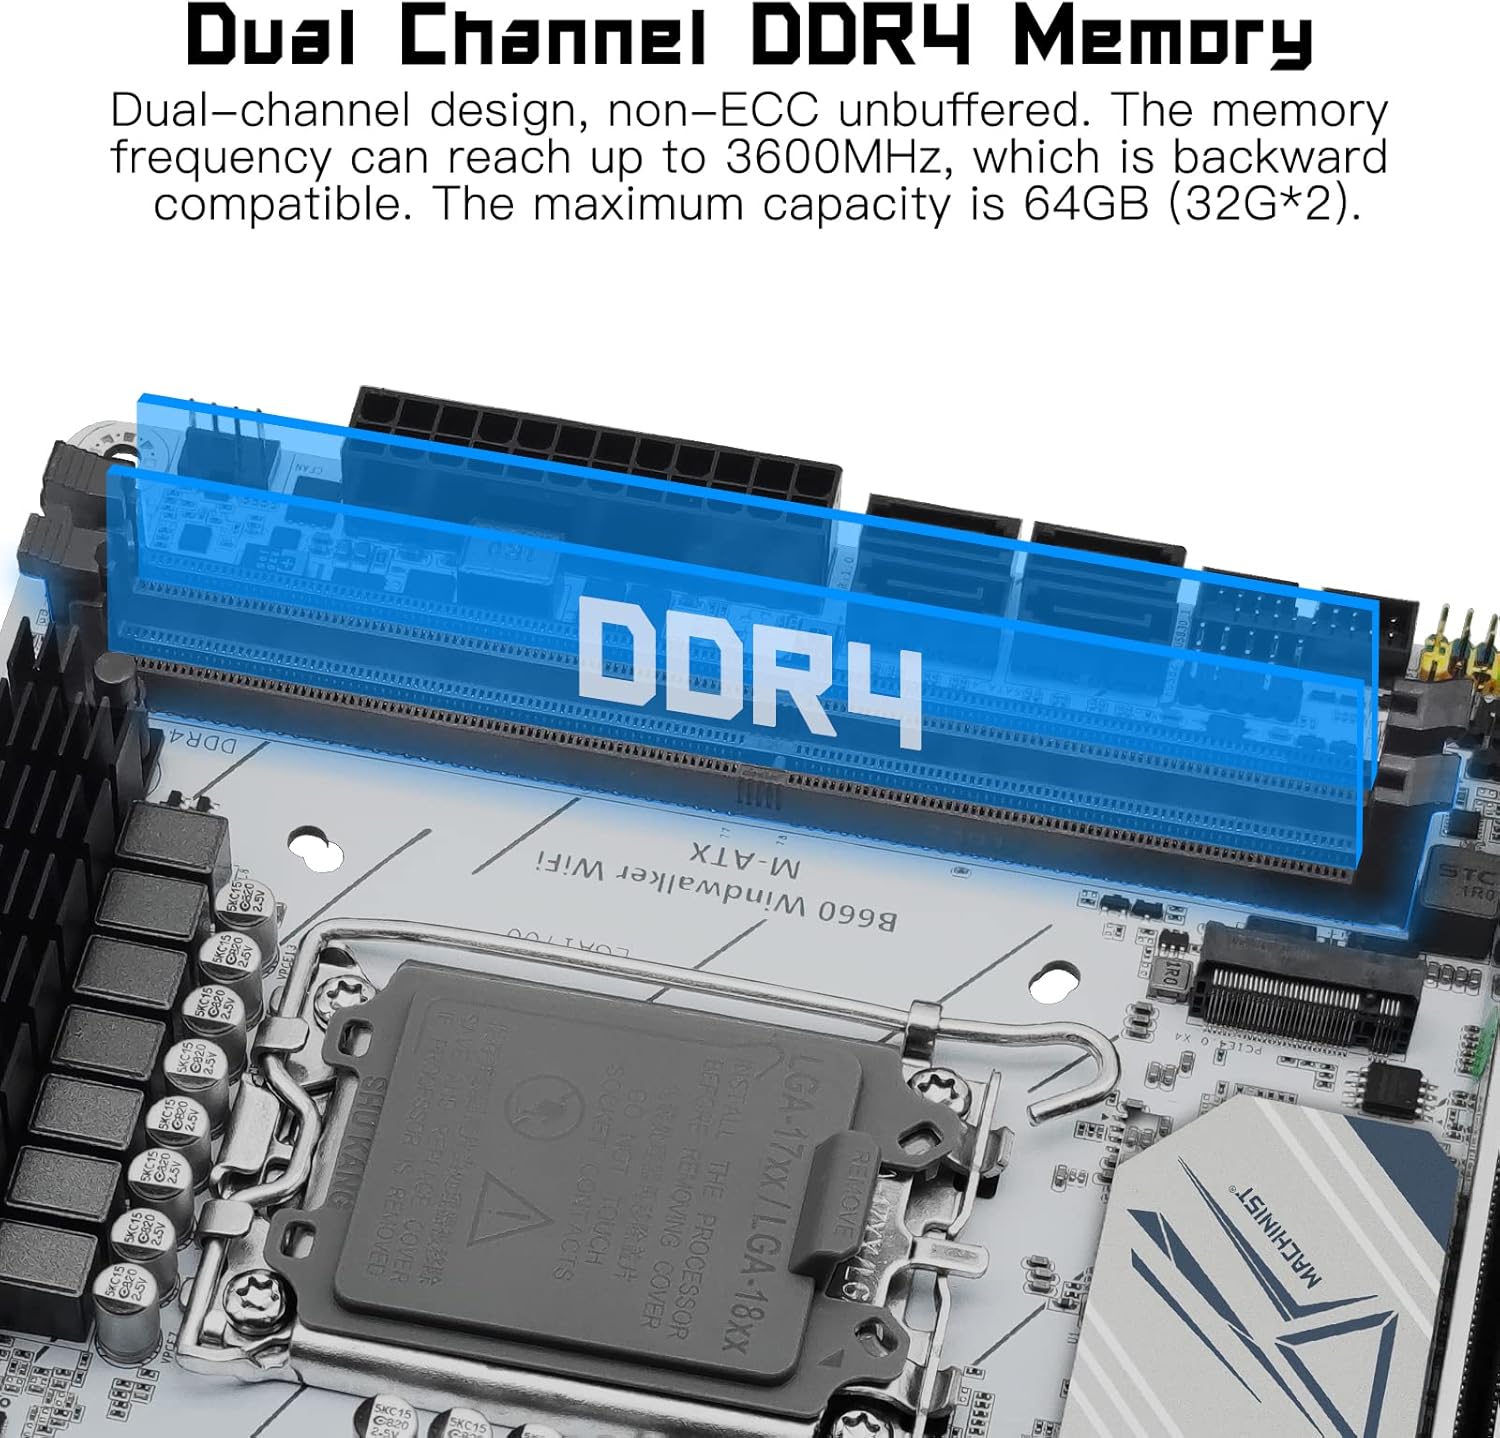
Figure 2.4: Illustration of the dual-channel DDR4 memory slots, highlighting support for up to 64GB (32G*2) with frequencies up to 3600MHz.
2.4. Storage and Expansion Slots
The motherboard includes one NVMe M.2 slot (PCIe 4.0 X4 bandwidth) and a PCIe X16 5.0 slot for graphics cards. The NVMe M.2 slot offers read/write speeds of 7000-7400MB/s, while the PCIe 5.0 X16 slot provides a maximum transmission speed of 64GB/s.

Figure 2.5: Visual representation of the NVMe M.2 (PCIe 4.0 X4) and PCIe 5.0 X16 slots, indicating high-speed data transfer capabilities.

Figure 2.6: A bar chart comparing the transmission speeds of NVMe 4.0 (64Gbps), NVMe 3.0 (32Gbps), SATA 3.0 (6Gbps), and USB 3.1 (5Gbps), illustrating the superior performance of PCIe 4.0 NVMe M.2.
2.5. Power Supply and Connectivity
The motherboard features a 10-phase digital power supply for stable and efficient power delivery. It includes Realtek 2.5GbE LAN for high-speed wired networking and USB 3.1 Gen2 ports for fast data transfer. Multiple integrated display interfaces (HDMI, VGA, DP) are available.
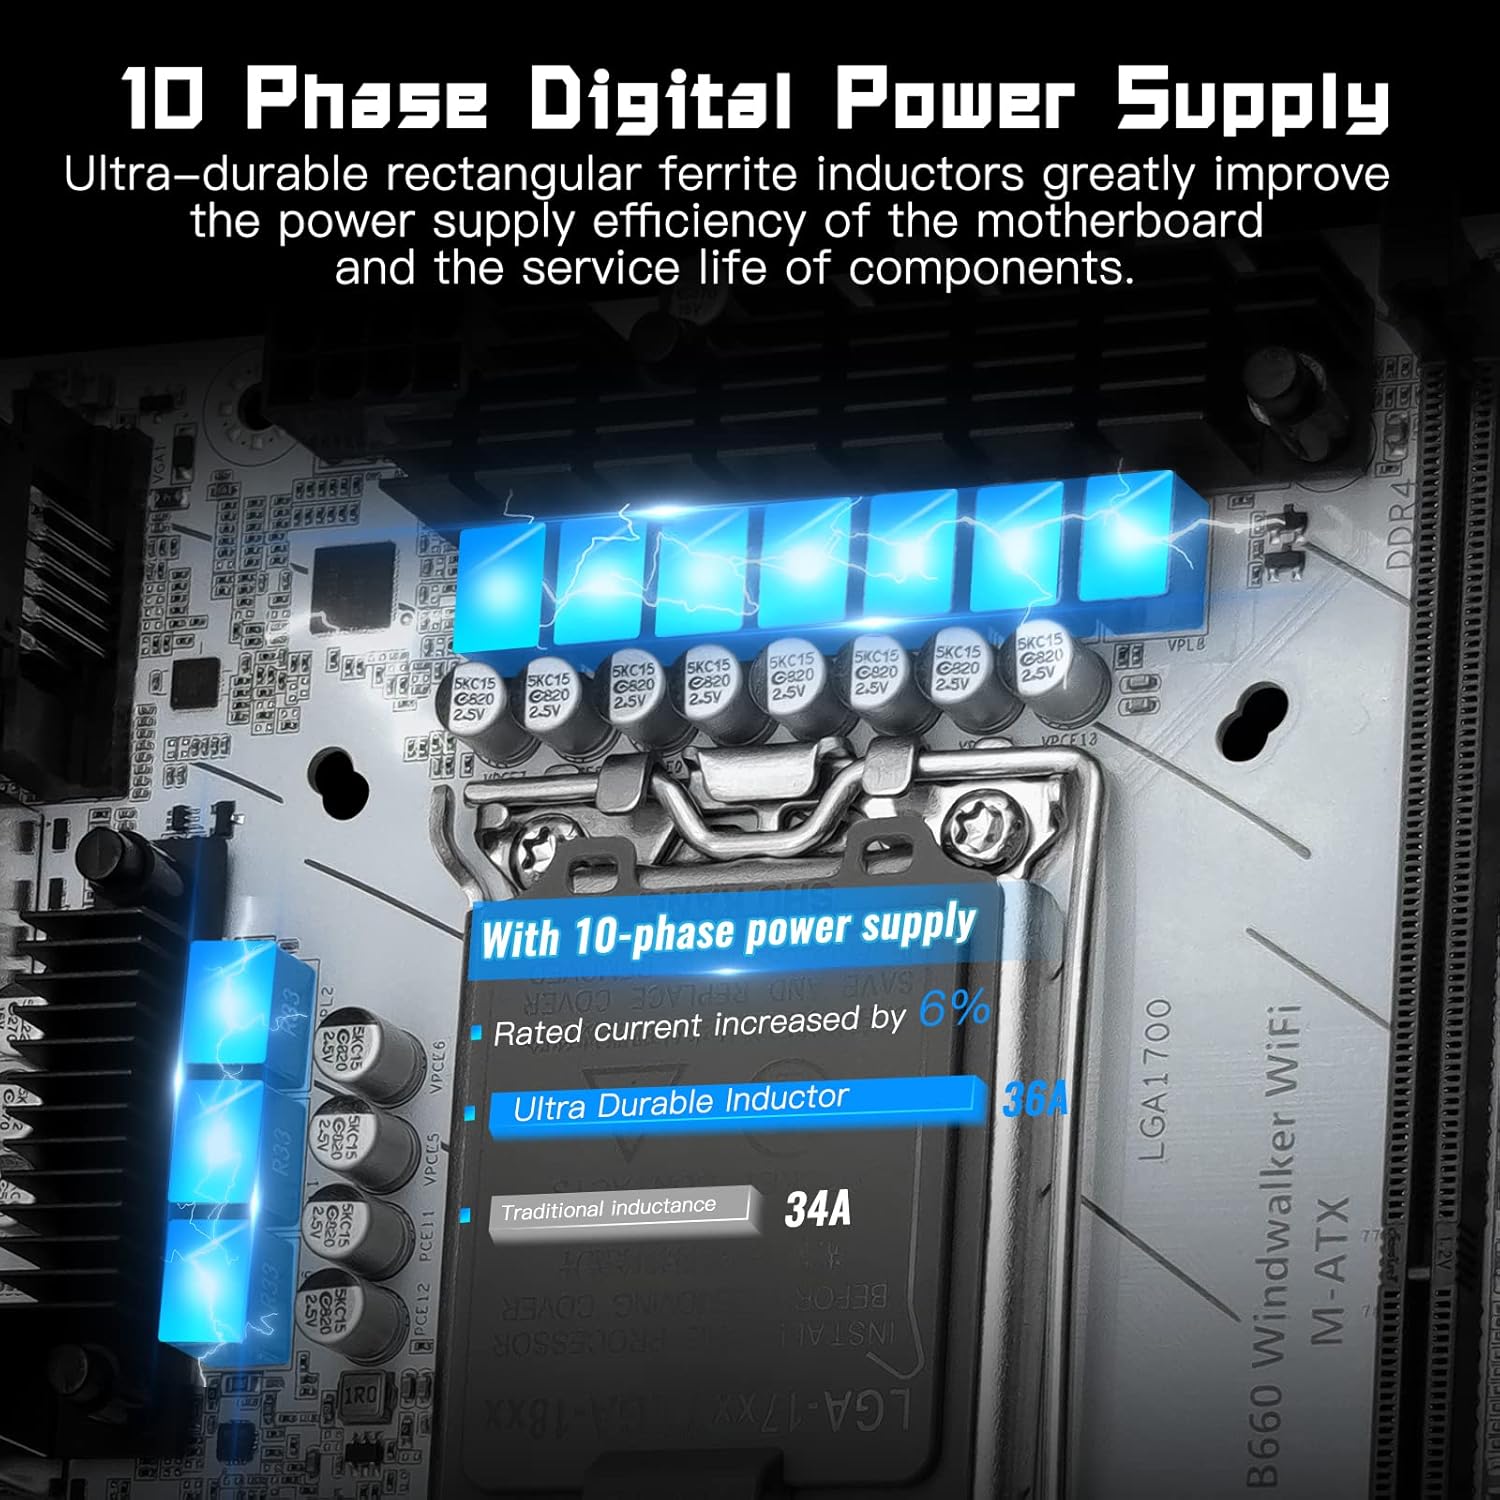
Figure 2.7: Visual representation of the 10-phase digital power supply, indicating enhanced power supply efficiency and component longevity.
Important Note on WiFi: While the motherboard supports WiFi 6, the WiFi plug-in module is not included and must be purchased separately. The motherboard provides the necessary antenna ports for a compatible WiFi module.
Video 2.1: This video demonstrates the installation process for a WiFi module on the B660 motherboard. It shows how to attach the WiFi card and connect the antenna cables to the motherboard's designated ports.
2.6. Entering BIOS
To enter the BIOS settings, continuously press the "Del" key immediately after pressing the power button to start your computer. Do not wait until the startup LOGO screen appears, as it may be too late to access BIOS at that point.
3. మదర్బోర్డ్ను ఆపరేట్ చేయడం
Once all components are installed and connected, power on your system. The motherboard will initiate the boot process. Ensure your operating system is properly installed on a compatible storage device (e.g., NVMe M.2 SSD or SATA SSD/HDD).
3.1 డ్రైవర్ ఇన్స్టాలేషన్
For optimal performance and functionality, install the latest drivers for your motherboard's chipset, LAN, audio, and any other integrated components. Drivers are typically available on the manufacturer's webసైట్.
3.2. డిస్ప్లే అవుట్పుట్
Connect your monitor to one of the available display ports (HDMI, VGA, or DP) on the motherboard's I/O panel. If using a dedicated graphics card, connect your monitor to the graphics card's output ports.
4. నిర్వహణ
క్రమం తప్పకుండా నిర్వహణ మీ మదర్బోర్డు యొక్క దీర్ఘాయువు మరియు స్థిరమైన ఆపరేషన్ను నిర్ధారించడంలో సహాయపడుతుంది.
- దుమ్ము తొలగింపు: కంప్రెస్డ్ ఎయిర్ ఉపయోగించి మదర్బోర్డ్ మరియు భాగాల నుండి కాలానుగుణంగా దుమ్మును శుభ్రం చేయండి. శుభ్రపరిచే ముందు సిస్టమ్ పవర్ ఆఫ్ చేయబడిందని మరియు అన్ప్లగ్ చేయబడిందని నిర్ధారించుకోండి.
- BIOS నవీకరణలు: తయారీదారుని తనిఖీ చేయండి website for BIOS updates. Updating BIOS can improve compatibility, stability, and performance. Follow the provided instructions carefully.
- కేబుల్ నిర్వహణ: Ensure all cables are properly routed and secured to prevent obstruction of airflow and accidental disconnections.
5. ట్రబుల్షూటింగ్
మీ మదర్బోర్డుతో మీకు సమస్యలు ఎదురైతే, ఈ క్రింది సాధారణ ట్రబుల్షూటింగ్ దశలను పరిగణించండి:
- డిస్ప్లే అవుట్పుట్ లేదు:
- అన్ని పవర్ కేబుల్స్ (24-పిన్ ATX, 8-పిన్ CPU) సురక్షితంగా కనెక్ట్ చేయబడ్డాయని నిర్ధారించుకోండి.
- Verify that the monitor cable is correctly connected to the motherboard or graphics card.
- RAM మాడ్యూళ్ళను తిరిగి అమర్చండి. ఒకే ఒక RAM స్టిక్ తో బూట్ చేయడానికి ప్రయత్నించండి.
- If using a dedicated graphics card, ensure it is properly seated in the PCIe slot and has adequate power.
- సిస్టమ్ బూట్ అవ్వడం లేదు:
- Check all internal connections, including CPU, RAM, storage, and power supply cables.
- Clear CMOS (Complementary Metal-Oxide-Semiconductor) by removing the CMOS battery for a few minutes or using the designated jumper (refer to motherboard diagram).
- మీ విద్యుత్ సరఫరా యూనిట్ (PSU) తగినంత విద్యుత్ సరఫరాను కలిగి ఉందని నిర్ధారించుకోండి.tagఅన్ని భాగాలకు e.
- WiFi Not Working:
- Confirm that you have installed a compatible WiFi module (e.g., Intel AX210) in the designated slot.
- Ensure the WiFi antenna cables are correctly connected to the module.
- Install the appropriate drivers for your WiFi module.
- BIOS Language Issue (Chinese):
- If the BIOS interface appears in Chinese, navigate through the settings to find the language option. It is usually found under a 'System' or 'Boot' menu. Look for characters that resemble 'English' or 'Language' to change the setting.
6. స్పెసిఫికేషన్లు
Below are the key specifications for the MACHINIST B660 Gaming Motherboard:
| ఫీచర్ | స్పెసిఫికేషన్ |
|---|---|
| ఉత్పత్తి కొలతలు | 6.69 x 6.69 x 1.5 అంగుళాలు |
| వస్తువు బరువు | 1.5 పౌండ్లు |
| తయారీదారు | మెషినిస్ట్ |
| అంశం మోడల్ సంఖ్య | B660-Windwalker-WIFI |
| బ్యాటరీలు | 1 CR2032 బ్యాటరీలు అవసరం. (చేర్చబడి) |
| CPU సాకెట్ | LGA 1700 |
| అనుకూల పరికరాలు | వ్యక్తిగత కంప్యూటర్ |
| RAM మెమరీ టెక్నాలజీ | DDR4 |
| అనుకూల ప్రాసెసర్లు | Intel Core/Pentium/Celeron (12th/13th Gen) |
| చిప్సెట్ రకం | ఇంటెల్ B660 |
| మెమరీ క్లాక్ స్పీడ్ | 3600 MHz వరకు |
| వేదిక | విండోస్ |
| మోడల్ పేరు | Windwalker |
7. వారంటీ మరియు మద్దతు
For warranty information, technical support, or further assistance, please refer to the official MACHINIST website or contact their customer service. A detailed user manual in PDF format may also be available for download from the product's Amazon page or the manufacturer's support section.


