1. పరిచయం
This manual provides comprehensive instructions for the assembly, operation, and maintenance of your Team Associated RC10B74.2D CE Team Kit. The RC10B74.2D platform is a high-performance 4x4 competition buggy designed for advanced users and competitive racing. This kit requires assembly and the separate purchase of electronics, motor, battery, and other accessories to become a fully functional vehicle.
ఈ కిట్ యొక్క ముఖ్య లక్షణాలు:
- Factory Team molded ring and pinion gear sets for optimized performance.
- Factory Team molded LTC differential gear sets to reduce binding and provide predictable power delivery.
- Factory Team +1 steering block arms for enhanced steering response.
- Lightweight molded gearboxes (front and rear) with multiple diff height options for tuning.
- 13mm big-bore threaded aluminum shocks with machined pistons for superior bump and jump handling.
- Gull wing front suspension arms and a mating shock tower for a lower center of gravity and improved steering predictability.
- Battery hold-down system with inserts for weight bias adjustment and an O-ring style strap with pull tabs.
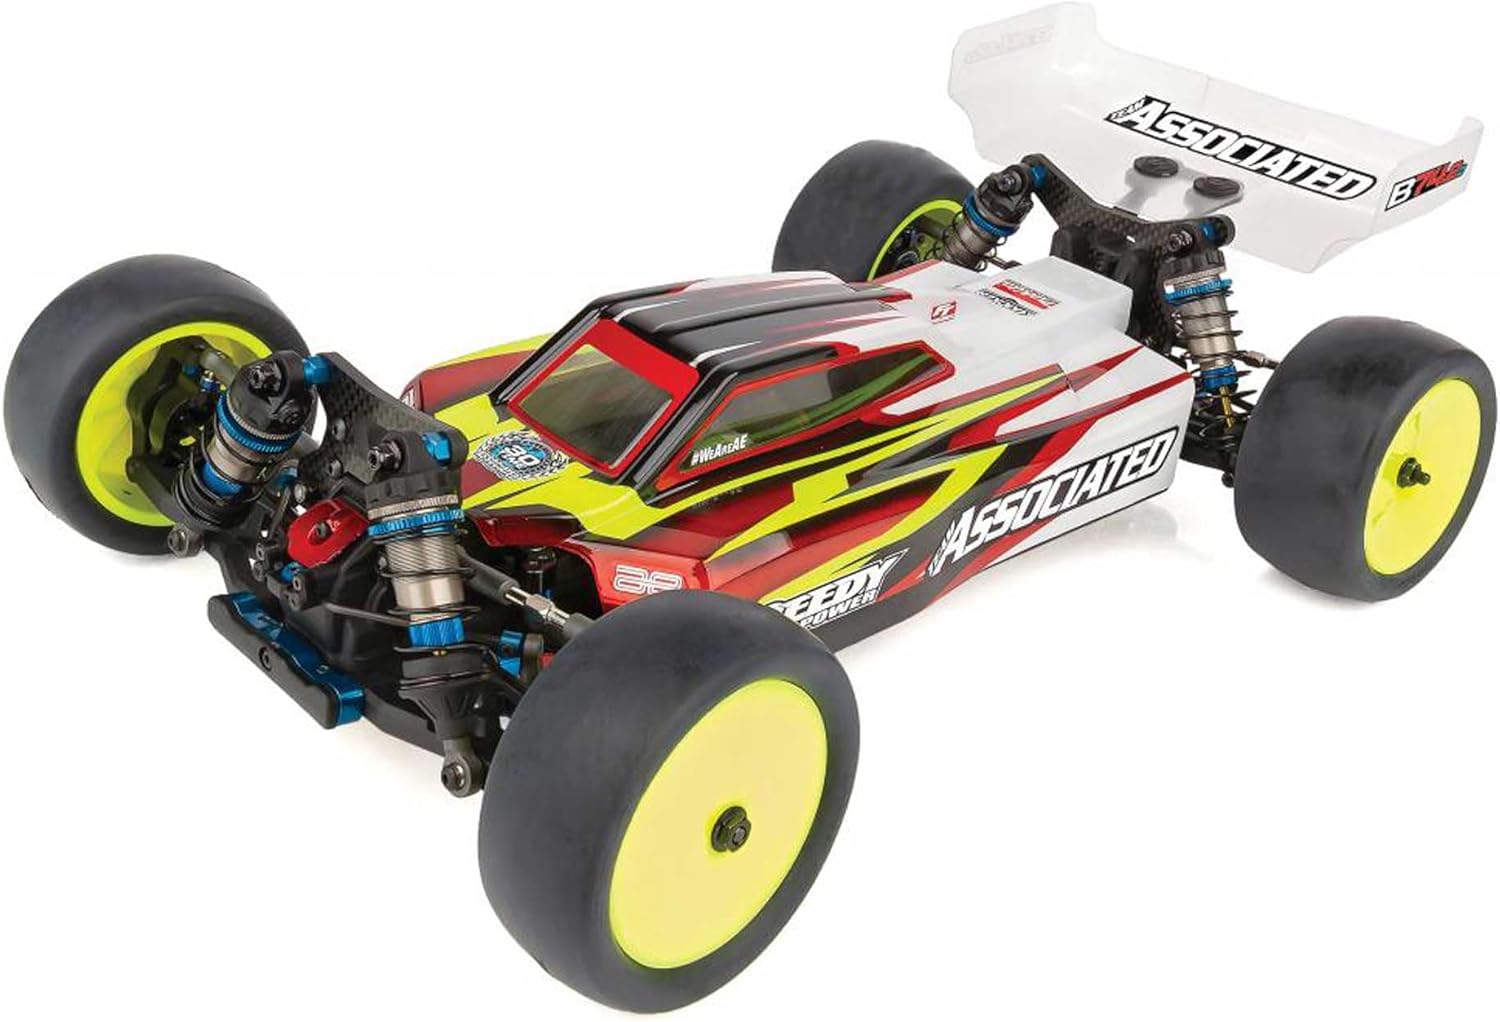
చిత్రం 1.1: మొత్తం మీద view of the Team Associated RC10B74.2D CE Team Kit, showcasing దాని డిజైన్ మరియు భాగాలు.
2. భద్రతా సమాచారం
Operating remote-controlled vehicles requires adherence to safety guidelines to prevent injury and damage. Please read and understand all instructions before assembly and operation.
- పెద్దల పర్యవేక్షణ: This product is recommended for users aged 14 years and older. Adult supervision is advised for younger users.
- కదిలే భాగాలు: Keep hands, hair, and loose clothing away from all moving parts, such as wheels, gears, and drive shafts, to avoid entanglement.
- బ్యాటరీ భద్రత: Always follow the manufacturer's instructions for charging, discharging, and storing LiPo or NiMH batteries. Incorrect handling can lead to fire, explosion, or severe injury. Never leave charging batteries unattended.
- ఎలక్ట్రానిక్స్: Ensure all electronic components are properly insulated and protected from moisture. Water damage can cause malfunctions and short circuits.
- ఆపరేటింగ్ ఎన్విరాన్మెంట్: Operate the vehicle in open areas, away from people, pets, and obstacles. Avoid public roads, crowded spaces, and areas with potential hazards.
- రసాయనాలు: Some components may require lubricants or adhesives. Use these products in a well-ventilated area and follow their respective safety data sheets.
- వేడి: Motors and electronic speed controllers (ESCs) can become very hot during operation. Allow components to cool before handling to prevent burns.
3. అసెంబ్లీ మరియు సెటప్
The RC10B74.2D CE Team Kit requires careful assembly. Refer to the detailed instruction manual included in the kit for step-by-step guidance. The following provides a general overview అసెంబ్లీ ప్రక్రియ యొక్క.
3.1 Differential Assembly
Assemble the front, center, and rear differentials. Ensure proper lubrication with the specified differential fluids. The kit includes Factory Team molded LTC differential gear sets.
3.2 Gearbox Installation
Install the assembled differentials into the lightweight molded gearboxes. Note the two fixed height front gearboxes (0 and +2mm diff height) and the rear gearbox with RC10B6-style inserts (0, +1, +2, +3mm diff height). Select the appropriate diff height for your desired setup.
3.3 Shock Assembly
Assemble the 13mm big-bore threaded aluminum shocks. Fill with the recommended shock oil and ensure smooth operation. The kit includes machined shock pistons.

Image 3.1: The 13mm big-bore threaded aluminum shocks, crucial for suspension performance.
3.4 Suspension and Steering
Attach the gull wing front suspension arms and the mating shock tower. Install the Factory Team +1 steering block arms and connect the steering linkage. Ensure all pivot points move freely.

చిత్రం 3.2: వివరణాత్మకమైనది view of the steering assembly, including the +1 steering block arms.

Image 3.3: Front suspension detail, showing the gull wing arms and shock tower.
3.5 ఎలక్ట్రానిక్స్ ఇన్స్టాలేషన్
Install your chosen motor, electronic speed controller (ESC), steering servo, and receiver. Route wiring neatly and securely. The battery hold-down system uses inserts to adjust weight bias; utilize these for optimal balance.

Image 3.4: Chassis layout with electronics installed, highlighting the battery hold-down system.
3.6 Wheels and Tires
Mount your chosen tires onto the wheels and attach them to the vehicle. Ensure wheel nuts are tightened securely but not overtightened.
3.7 శరీర తయారీ
Trim, paint, and decal the body shell according to your preference. Mount the finished body onto the chassis.
4. ఆపరేటింగ్ సూచనలు
Once assembled and all electronics are installed and configured, your RC10B74.2D is ready for operation.
4.1 Pre-Run Checks
- బ్యాటరీ పూర్తిగా ఛార్జ్ చేయబడిందని మరియు సురక్షితంగా ఇన్స్టాల్ చేయబడిందని నిర్ధారించుకోండి.
- Verify all screws and fasteners are tight.
- Check that the steering and throttle respond correctly to your transmitter inputs.
- Inspect tires for proper inflation and secure mounting.
- Confirm that the radio system is properly bound and functioning.
4.2 Driving Your RC10B74.2D
Start by driving in an open, clear area to familiarize yourself with the vehicle's handling characteristics.
- థొరెటల్ కంట్రోల్: Apply throttle smoothly to avoid wheelspin and maintain control.
- బ్రేకింగ్: Use proportional braking to slow down. Avoid sudden, full braking at high speeds.
- స్టీరింగ్: Practice smooth steering inputs. The +1 steering block arms provide enhanced steering response.
- జంప్స్: Approach jumps with controlled speed. Adjust throttle in the air to control pitch.
4.3 Post-Run Procedure
- Turn off the vehicle's power switch, then turn off the transmitter.
- Disconnect and remove the battery from the vehicle. Allow it to cool before charging or storing.
- Inspect the vehicle for any damage or loose components.
- Clean the vehicle as described in the Maintenance section.
5. నిర్వహణ
Regular maintenance is crucial for the longevity and performance of your RC10B74.2D.
5.1 శుభ్రపరచడం
- After each run, remove dirt, dust, and debris from the chassis, suspension, and drivetrain using a soft brush, compressed air, or a damp గుడ్డ.
- Avoid using water directly on electronics.
5.2 తనిఖీ
- బిగుతు కోసం అన్ని స్క్రూలను క్రమం తప్పకుండా తనిఖీ చేయండి.
- Inspect suspension components (arms, shock shafts, linkages) for bends, cracks, or excessive wear.
- Examine drive shafts, outdrives, and dog bones for wear.
- Check gear mesh between the pinion and spur gear.
- Inspect tires for damage and wear.
5.3 సరళత
- Apply a small amount of appropriate lubricant to moving metal-on-metal parts, such as universal joints and bearings (if not sealed).
- Periodically check and replenish differential fluids and shock oils according to the kit manual and your tuning preferences.
6. ట్రబుల్షూటింగ్
This section addresses common issues you might encounter with your RC10B74.2D.
6.1 Vehicle Not Responding
- బ్యాటరీని తనిఖీ చేయండి: Ensure the vehicle's battery is charged and properly connected.
- ట్రాన్స్మిటర్ బ్యాటరీ: Verify the transmitter batteries are fresh and correctly installed.
- పవర్ స్విచ్లు: Confirm both the vehicle and transmitter power switches are ON.
- బైండింగ్: Re-bind the transmitter and receiver if necessary, following your radio system's instructions.
- వైరింగ్: వదులుగా ఉన్న కనెక్షన్లు లేదా దెబ్బతినడం కోసం అన్ని వైరింగ్లను తనిఖీ చేయండి.
6.2 Poor Handling or Performance
- సస్పెన్షన్: Check shock oil levels, spring tension, and ensure shocks move freely. Inspect suspension arms for damage.
- భేదాలు: Verify differential fluid levels and ensure gears are not binding or worn.
- టైర్లు: Ensure tires are not worn out and are appropriate for the running surface.
- సమలేఖనం: Check toe, camber, and caster settings. Refer to the kit manual for recommended settings.
- వదులుగా ఉండే భాగాలు: Tighten any loose screws on suspension or steering components.
6.3 Motor or ESC Issues
- వేడెక్కడం: Ensure proper motor cooling. Check gear mesh for excessive tightness. Reduce run time or consider a smaller pinion gear.
- శక్తి లేదు: Check motor and ESC connections. Ensure ESC is properly calibrated to the transmitter.
- Cogging/Stuttering: This can indicate a sensor wire issue (for sensored motors), incorrect ESC settings, or a failing motor.
7. స్పెసిఫికేషన్లు
| ఫీచర్ | వివరాలు |
|---|---|
| మోడల్ పేరు | RC10B74.2D CE Team Kit |
| పార్ట్ నంబర్ | ASC90045 |
| బ్రాండ్ | టీమ్ అసోసియేటెడ్ |
| ఉత్పత్తి కొలతలు | 15 x 9 x 5 అంగుళాలు |
| వస్తువు బరువు | 1 పౌండ్ |
| సిఫార్సు చేసిన వయస్సు | 14 నెలలు - 9 సంవత్సరాలు (Note: This age range appears to be a general Amazon categorization. Actual RC kit assembly and operation is typically for ages 14+ due to complexity and small parts.) |
| కిట్ కంటెంట్లు | (1) 1/10 RC10B74.2D CE 4x4 Buggy Team Kit (Electronics, motor, battery, and other accessories sold separately) |
8. వారంటీ మరియు మద్దతు
For specific warranty information and technical support, please refer to the documentation included with your kit or visit the official Team Associated website. Team Associated provides support for their products and can assist with parts, technical questions, and warranty claims.
It is recommended to register your product with Team Associated to ensure you receive updates and support.


