1. పరిచయం
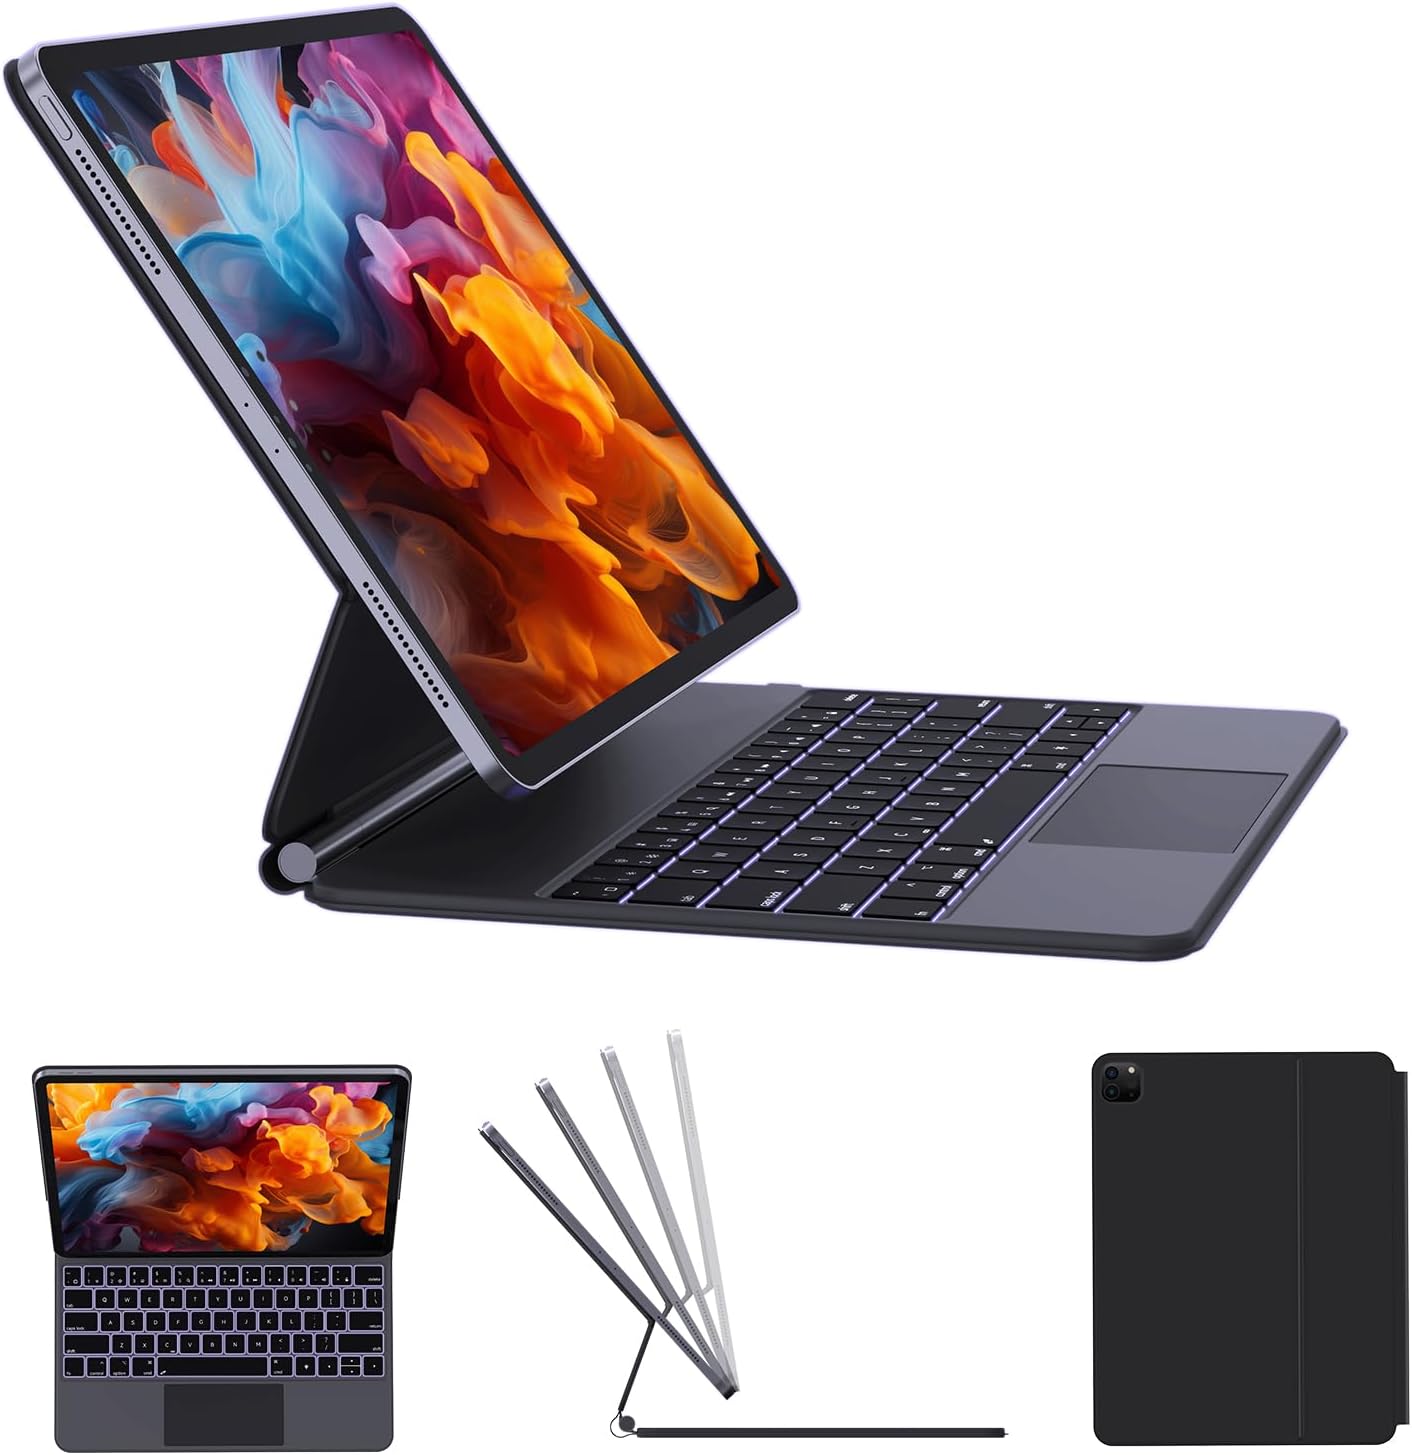
Thank you for choosing the AUSDOM Wireless Magnetic Floating Bluetooth Rechargeable Keyboard Case. This manual provides detailed instructions on how to set up, operate, and maintain your new keyboard case, ensuring you get the most out of its features. This keyboard case is designed to enhance your iPad experience, transforming it into a versatile laptop-like device with a multi-touch trackpad and backlit keys.
2. అనుకూల నమూనాలు
ఈ కీబోర్డ్ కేసు ప్రత్యేకంగా కింది ఐప్యాడ్ మోడల్ల కోసం రూపొందించబడింది:
- iPad Pro 12.9-inch (6th Gen): A2436, A2437, A2764, A2766
- iPad Pro 12.9-inch (5th Gen): A2378, A2379, A2461, A2462
- iPad Pro 12.9-inch (4th Gen): A2229, A2069, A2232, A2233
- iPad Pro 12.9-inch (3rd Gen): A1876, A1895, A1983, A2014
- iPad Air 13-inch (M2): A2898, A2899, A2900
Please verify your iPad's model number on the back of the device to ensure compatibility.

3. పెట్టెలో ఏముంది
అన్బాక్సింగ్ తర్వాత, దయచేసి ఈ క్రింది అన్ని అంశాలు ఉన్నాయని నిర్ధారించుకోండి:
- 1 x AUSDOM Maykey12.9 Wireless Keyboard Case
- 1 x USB-C ఛార్జింగ్ కేబుల్
- 1 x వినియోగదారు మాన్యువల్
4. సెటప్ గైడ్
4.1 మీ ఐప్యాడ్ను అటాచ్ చేయడం
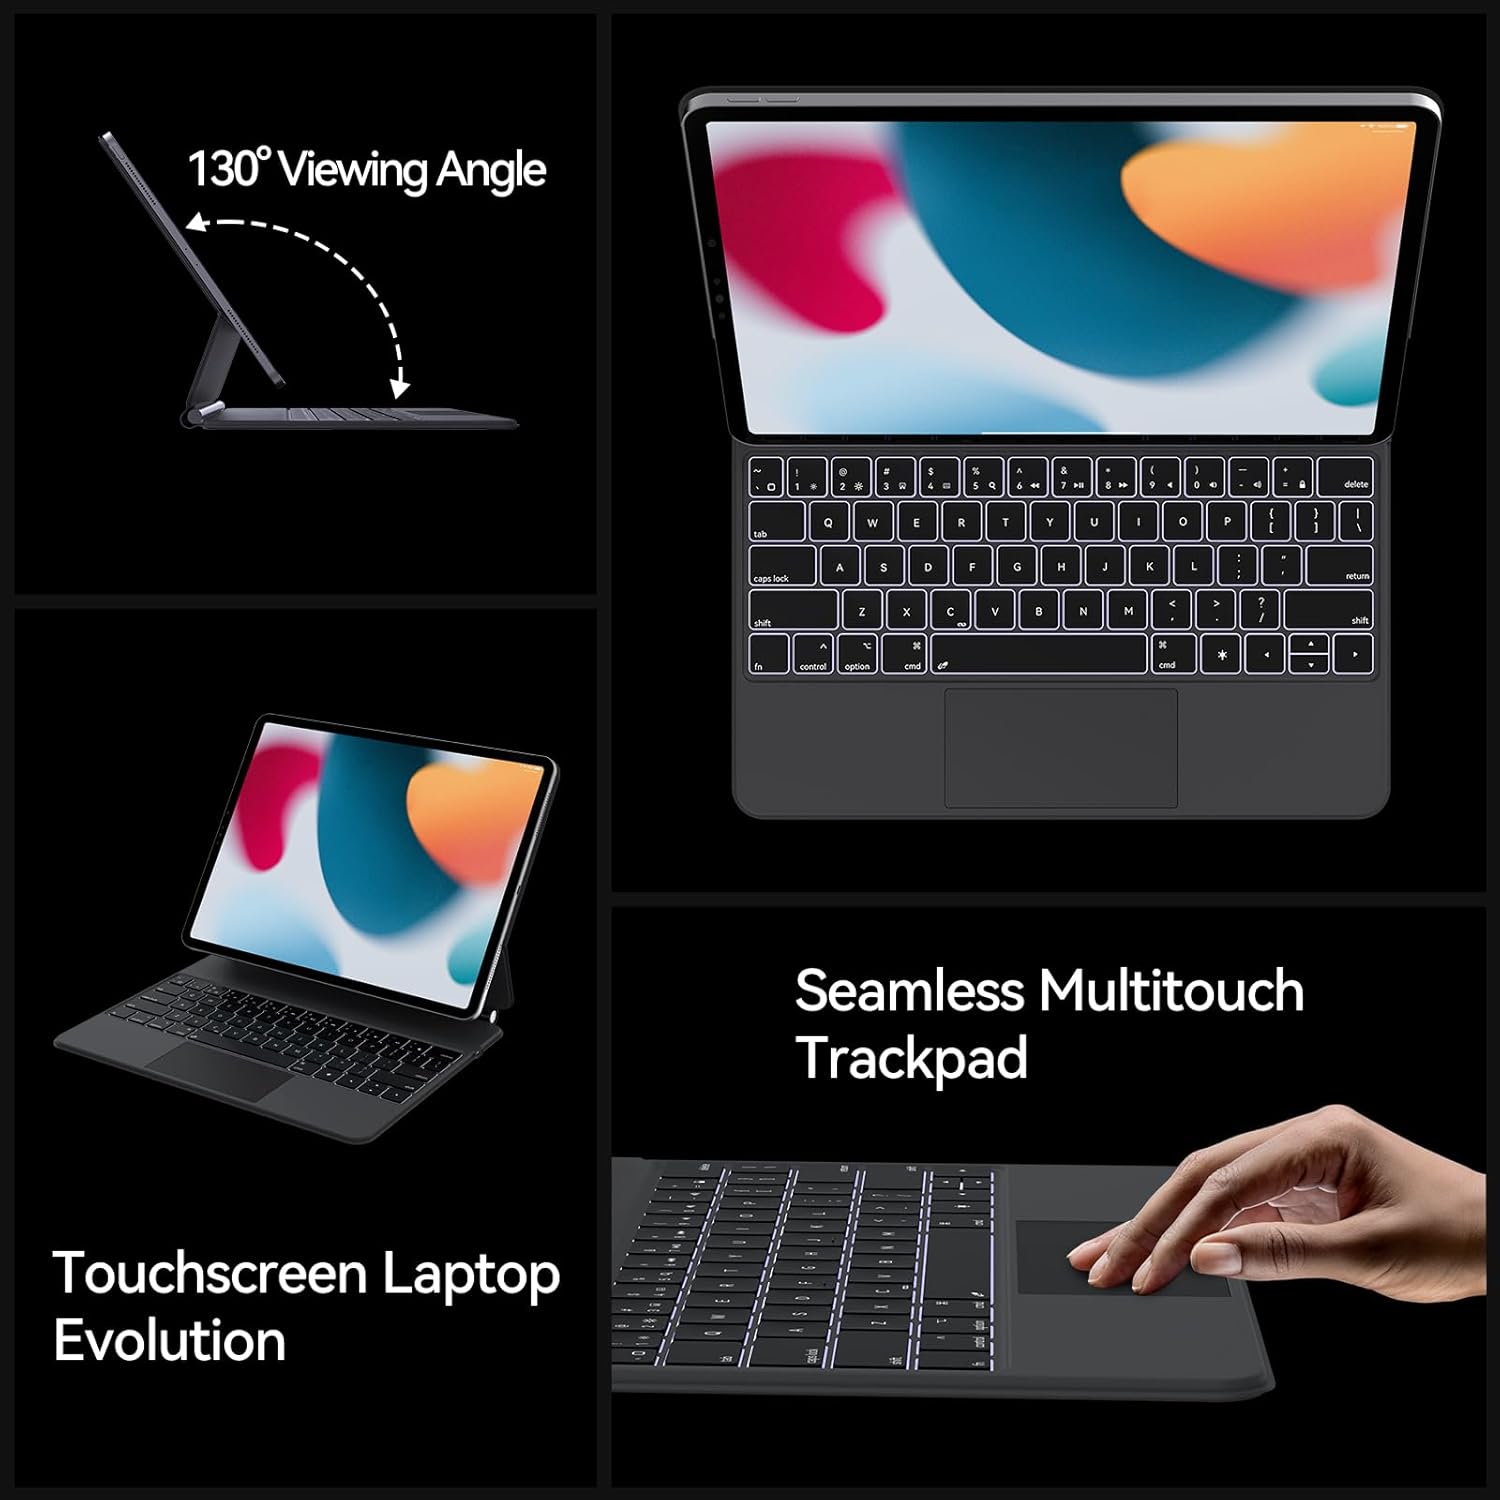
The keyboard case features an easy-set magnetic floating stand for secure and stable attachment of your iPad. Simply align your iPad with the magnetic back panel of the case. The strong magnets will automatically snap your iPad into place, transforming it into a laptop-like setup. The stand allows for a 130° viewing angle, ideal for various tasks.

4.2 బ్లూటూత్ కనెక్షన్
Follow these steps to connect your keyboard case to your iPad via Bluetooth:
- Ensure your keyboard case is charged (refer to Section 6 for charging instructions).
- Open the keyboard case. The keyboard will automatically power on and enter pairing mode.
- మీ ఐప్యాడ్లో, ఇక్కడికి వెళ్లండి సెట్టింగ్లు > బ్లూటూత్.
- బ్లూటూత్ ఆన్ చేయండి.
- Look for "AUSDOM Keyboard" or a similar name in the "Other Devices" list and tap on it to connect.
- Once connected, the Bluetooth indicator light on the keyboard will turn off, and your iPad will show the keyboard as "Connected."
5. ఆపరేటింగ్ సూచనలు
5.1 Multi-Touch Trackpad
The integrated multi-touch trackpad allows for precise navigation and gesture control, similar to a laptop. You can perform various actions:
- స్వైప్: Navigate through content.
- నొక్కండి: అంశాలను ఎంచుకోండి లేదా ఫంక్షన్లను సక్రియం చేయండి.
- చిటికెడు: Zoom in/out on photos or web పేజీలు.
- స్క్రోల్: Move through documents or web పేజీలు.
- యాప్లను మార్చండి: Use multi-finger gestures to switch between open applications.
Note: To turn on/off the trackpad function, press the "fn" + "Space" keys simultaneously.
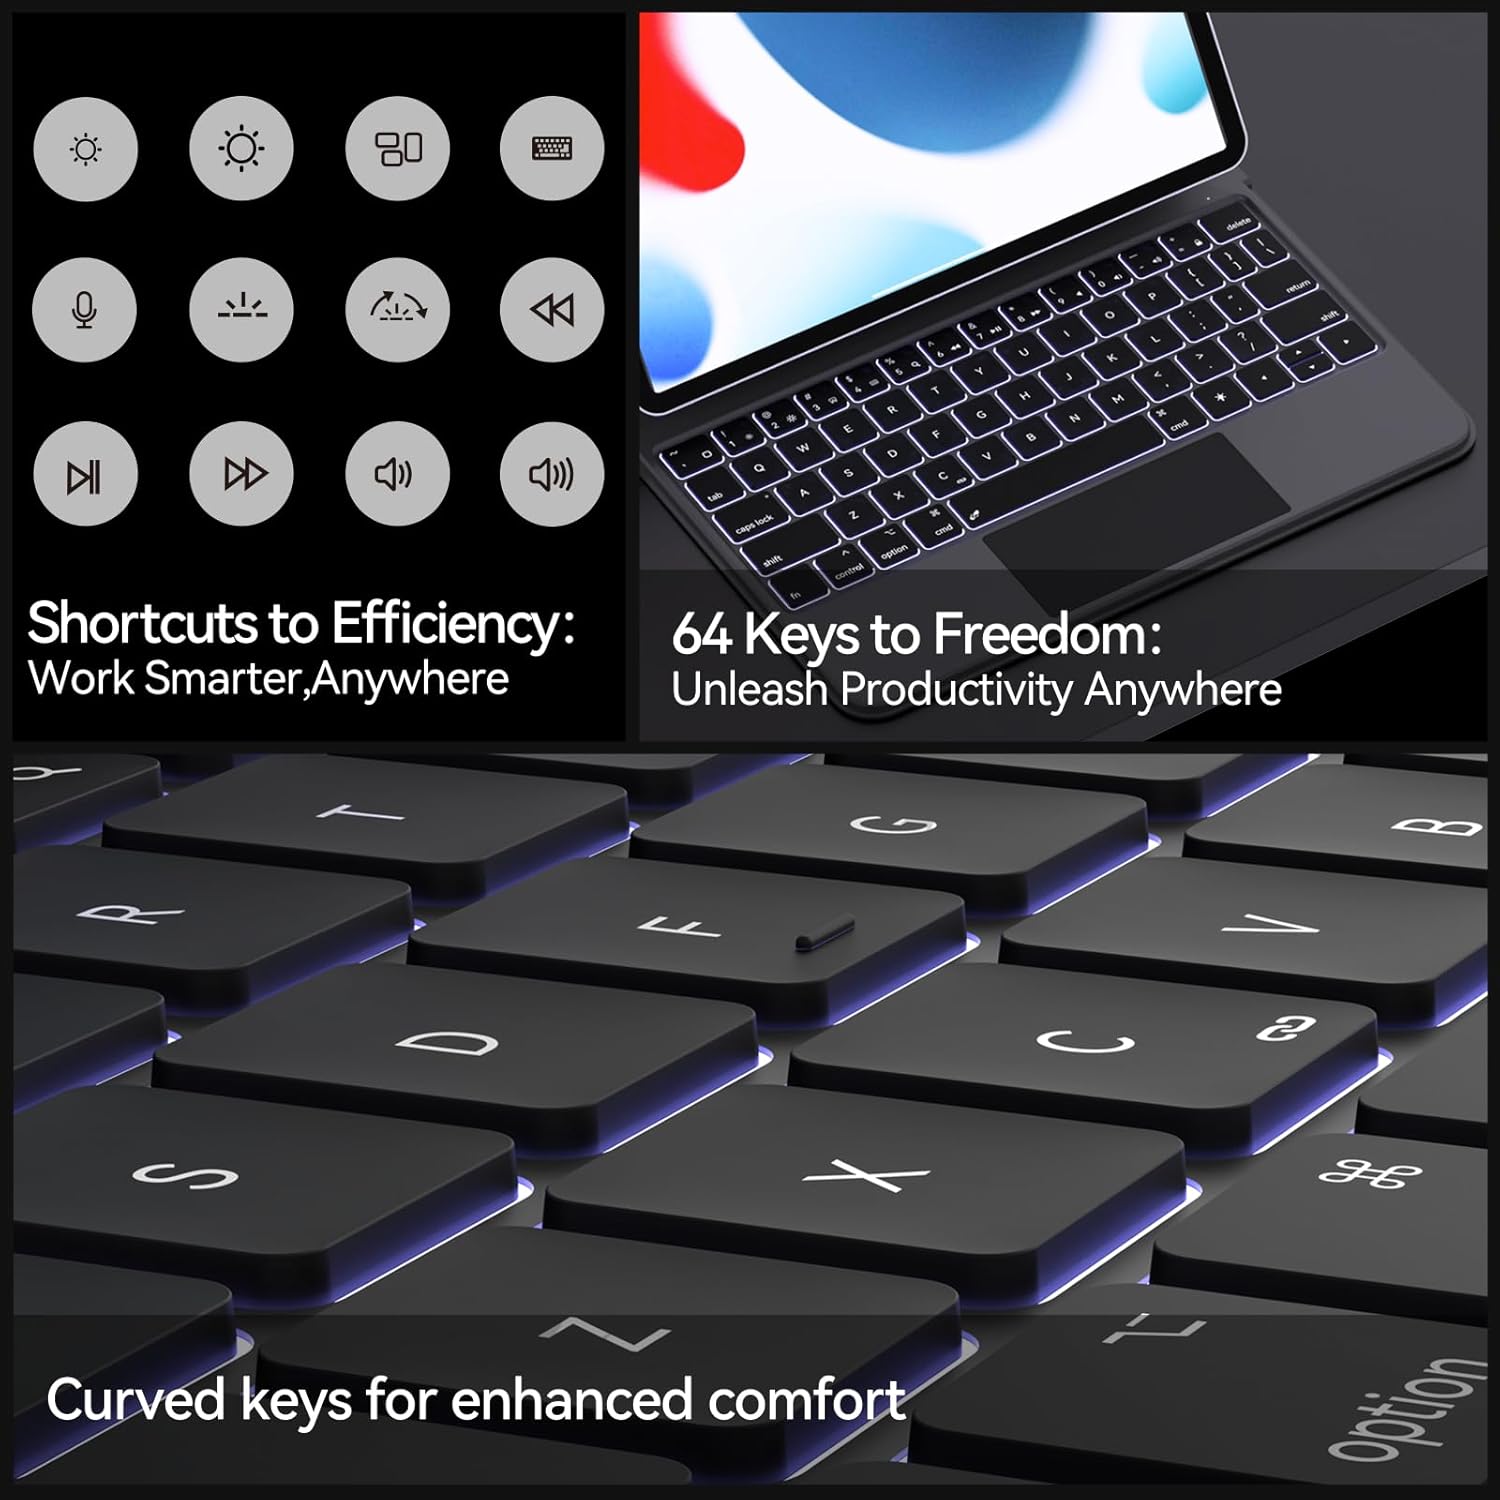
5.2 షార్ట్కట్ కీలు
The keyboard features a full set of multifunctional shortcut keys that can be used in combination with the "fn" key to quickly access common iPad functions, such as media control, volume adjustment, and screen brightness.

5.3 బ్యాక్లైట్ సర్దుబాటు
The keyboard features an adjustable 3-level backlight. Use the dedicated backlight key (often represented by a light bulb icon) or a function key combination to cycle through the brightness levels or turn the backlight off.
6. ఛార్జింగ్ మరియు బ్యాటరీ లైఫ్
The keyboard case is equipped with a built-in rechargeable battery. Use the provided USB-C charging cable to charge the device.
- ఛార్జింగ్: Connect the USB-C cable to the keyboard's charging port and a power source (e.g., computer USB port, wall adapter). The charging indicator light will illuminate.
- బ్యాటరీ లైఫ్: A full charge provides approximately 3 months of working time with the backlight off, and up to 12 months of standby time.

7. నిర్వహణ మరియు సంరక్షణ
To ensure the longevity and optimal performance of your keyboard case, follow these care instructions:
- కీబోర్డ్ కేసును ద్రవాలు మరియు తీవ్రమైన ఉష్ణోగ్రతల నుండి దూరంగా ఉంచండి.
- మృదువైన, డితో ఉపరితలాన్ని శుభ్రం చేయండిamp వస్త్రం. కఠినమైన రసాయనాలు లేదా రాపిడి పదార్థాలను ఉపయోగించడం మానుకోండి.
- When not in use, close the case to protect both the keyboard and your iPad.
- చల్లని, పొడి ప్రదేశంలో నిల్వ చేయండి.
8. ట్రబుల్షూటింగ్
- కీబోర్డ్ బ్లూటూత్ ద్వారా కనెక్ట్ కావడం లేదు:
- కీబోర్డ్ ఛార్జ్ అయ్యిందని నిర్ధారించుకోండి.
- Make sure Bluetooth is enabled on your iPad.
- Forget the device in your iPad's Bluetooth settings and try pairing again.
- Restart both your iPad and the keyboard case.
- ట్రాక్ప్యాడ్ స్పందించడం లేదు:
- Ensure the trackpad is enabled by pressing "fn" + "Space".
- Check if the keyboard is properly connected via Bluetooth.
- కీబోర్డ్ మరియు ఐప్యాడ్ను పునఃప్రారంభించండి.
- కీలు స్పందించడం లేదు:
- బ్యాటరీ స్థాయిని తనిఖీ చేయండి మరియు అవసరమైతే ఛార్జ్ చేయండి.
- Ensure the keyboard is securely connected to the iPad.
- కీల చుట్టూ ఉన్న చెత్తను శుభ్రం చేయండి.
9. ఉత్పత్తి లక్షణాలు
| ఫీచర్ | స్పెసిఫికేషన్ |
|---|---|
| ఉత్పత్తి కొలతలు | 11.2 x 9 x 0.69 అంగుళాలు |
| వస్తువు బరువు | 1.76 పౌండ్లు |
| కనెక్టివిటీ టెక్నాలజీ | బ్లూటూత్ |
| కీబోర్డ్ వివరణ | బహుళ ఫంక్షనల్ |
| ప్రత్యేక లక్షణాలు | Backlit, Low-Profile Key, Portable, Rechargeable, Trackpad |
| బ్యాటరీ రకం | 1 లిథియం పాలిమర్ బ్యాటరీ (చేర్చబడింది) |
| కీల సంఖ్య | 64 |
| కీబోర్డ్ బ్యాక్లైటింగ్ | Single Color, 3-level adjustable |
10. వారంటీ మరియు కస్టమర్ మద్దతు
AUSDOM products come with a standard manufacturer's warranty. For specific warranty details, claims, or technical support, please refer to the warranty card included with your product or visit the official AUSDOM website. You can also contact our customer support team through the contact information provided on our webసైట్ లేదా మీ కొనుగోలు వేదిక.


