పరిచయం
This manual provides comprehensive instructions for the installation, operation, maintenance, and troubleshooting of your suevery 24-inch Curved Gaming Monitor (Model: SV240QC). Please read this manual thoroughly before using the product to ensure proper functionality and to maximize your viewing అనుభవం. భవిష్యత్తు సూచన కోసం ఈ మాన్యువల్ని ఉంచండి.
ఉత్పత్తి లక్షణాలు
- Immersive Curved Display: The 24-inch 3000R curved screen is designed to match the natural curvature of the human eye, providing an immersive visual experience. This is complemented by a Full HD (1920x1080) resolution, drawing users into the content.
- Ultra-Smooth Motion: An ultra-high 180Hz refresh rate combined with an ultra-fast 1ms (GTG) gray-to-gray response time, enhanced by FreeSync technology, effectively eliminates screen tearing, stuttering, and ghosting. This ensures seamless transitions in fast-paced games.
- Accurate Color Reproduction: With 100% sRGB color space coverage and precise reproduction of 16.7 million colors, the VA panel delivers excellent contrast and color layering. This results in vivid and realistic visuals for both gaming and multimedia.
- Flexible Connectivity and Installation: Equipped with DisplayPort (DP) and High-Definition Multimedia Interface (HDMI) ports, the monitor can easily connect to PCs, gaming consoles, laptops, and other devices. It supports VESA wall mounting, allowing for flexible placement in various environments.

Image: The suevery 24-inch Curved Gaming Monitor, showcasing దాని సొగసైన డిజైన్ మరియు వంపుతిరిగిన స్క్రీన్.
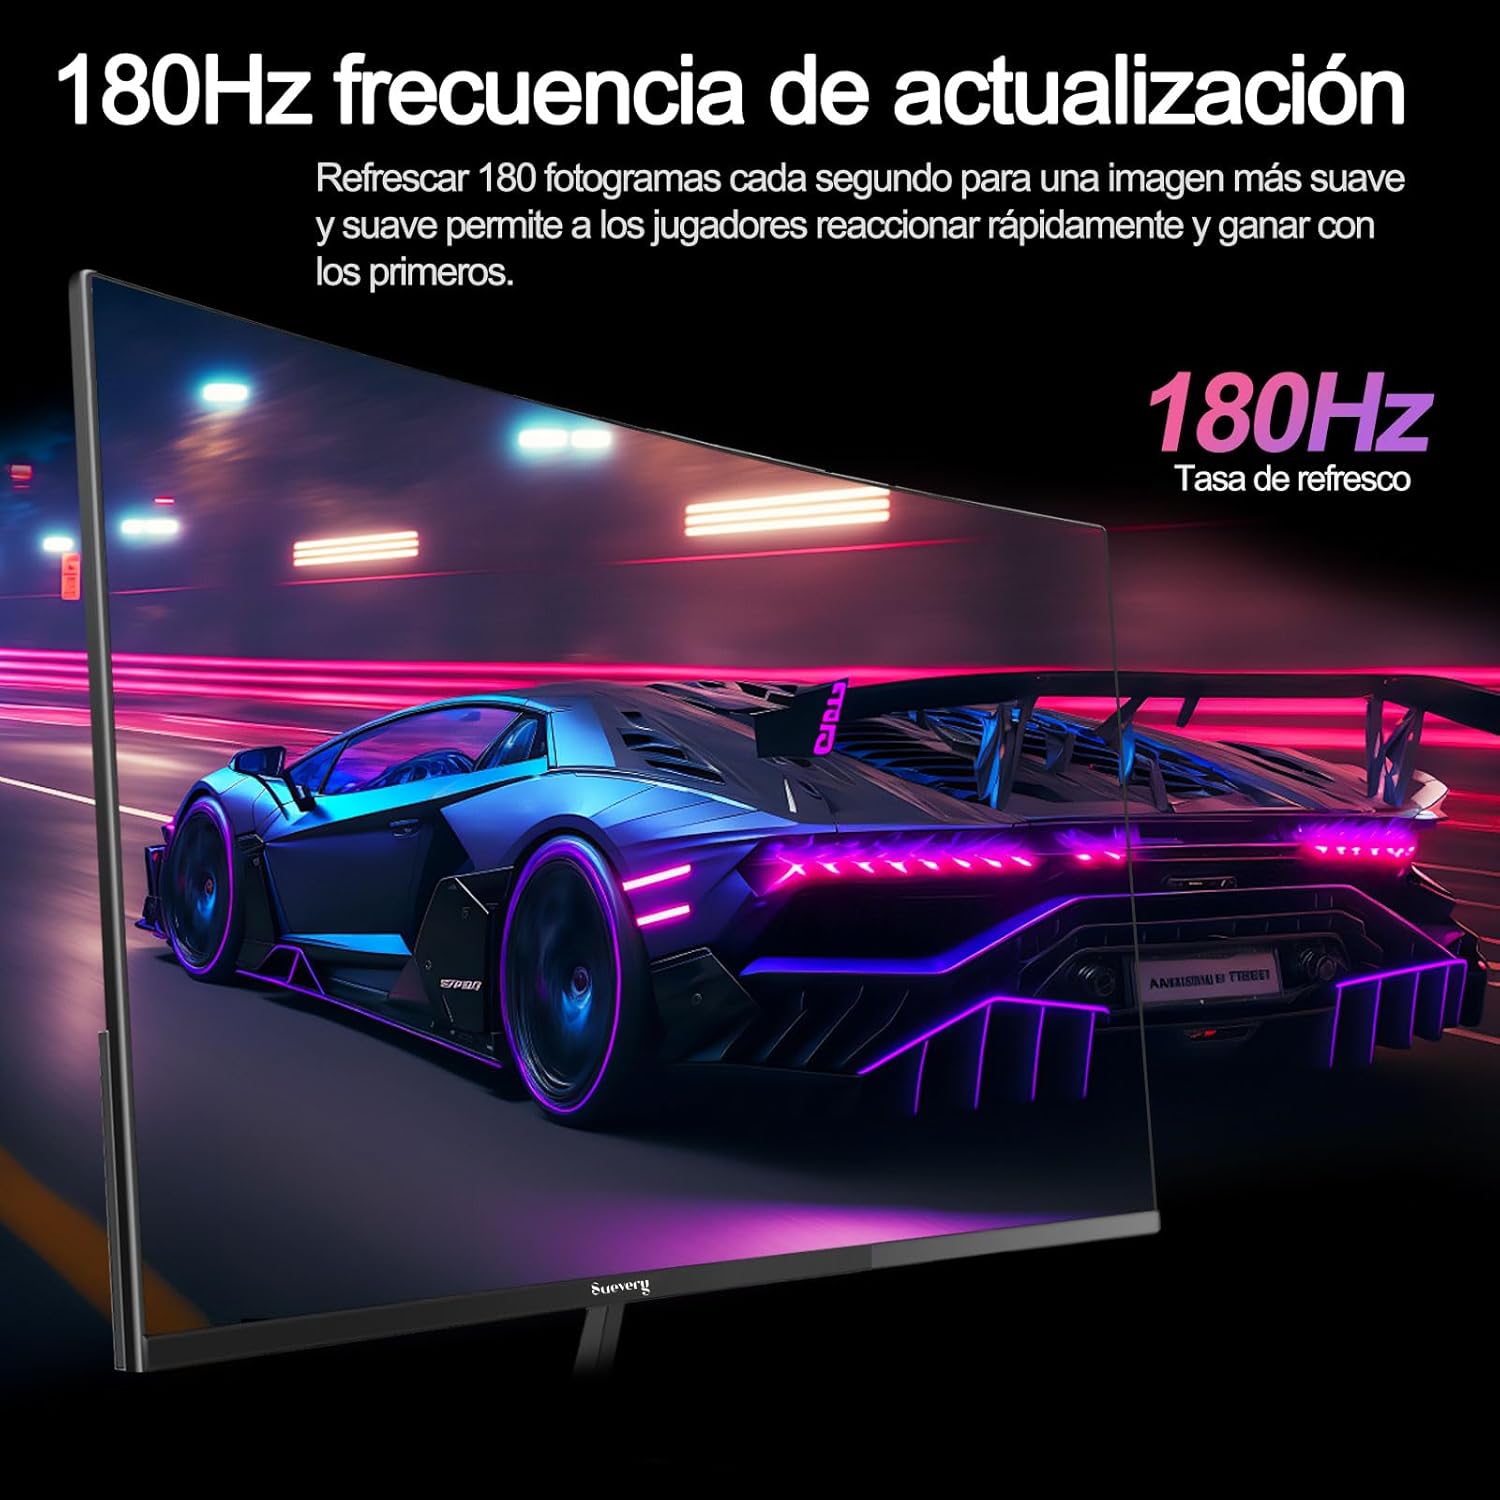
Image: A visual representation highlighting the 180Hz refresh rate, illustrating smooth motion in a racing game scene.

Image: An illustration demonstrating the monitor's wide color gamut (100% sRGB), 3000:1 contrast ratio, and 16.7 million colors for vibrant visuals.

Image: A split-screen comparison showing the visual difference with FreeSync OFF (screen tearing) and FreeSync ON (smooth image) during gameplay.
సెటప్ సూచనలు
1. అన్ప్యాకింగ్ మరియు అసెంబ్లీ
- ప్యాకేజింగ్ నుండి అన్ని భాగాలను జాగ్రత్తగా తొలగించండి.
- గీతలు పడకుండా ఉండటానికి మానిటర్ ప్యానెల్ను మృదువైన, శుభ్రమైన ఉపరితలంపై ముఖం క్రిందికి ఉంచండి.
- Attach the stand base to the stand neck, securing it with the provided screws.
- Attach the assembled stand to the back of the monitor panel. Ensure it clicks securely into place or is fastened with screws as per the design.
- Alternatively, for VESA mounting, remove the stand and attach a VESA-compatible mount (75x75mm) to the monitor's rear panel.
2. కేబుల్స్ కనెక్ట్
Refer to the diagram below for port locations.

Image: A diagram illustrating the monitor's rear panel, showing the HDMI, DisplayPort (DP), USB (if applicable), and power input ports, along with VESA mount dimensions (75x75mm).
- పవర్ కనెక్షన్: Connect the power adapter to the monitor's power input port, then plug the power cable into a wall outlet.
- వీడియో కనెక్షన్: Connect one end of an HDMI or DisplayPort cable to the corresponding port on your monitor and the other end to your computer's graphics card or other video source. For optimal performance, especially at 180Hz, a DisplayPort connection is recommended.
- Audio (if applicable): If your monitor has a 3.5mm audio output, you can connect external speakers or headphones.
3. ప్రారంభ పవర్ ఆన్
- మానిటర్లోని పవర్ బటన్ను నొక్కండి. పవర్ ఇండికేటర్ లైట్ వెలుగుతూ ఉండాలి.
- Turn on your connected computer or video source.
- మానిటర్ స్వయంచాలకంగా ఇన్పుట్ సిగ్నల్ను గుర్తించాలి. లేకపోతే, మీరు ఆన్-స్క్రీన్ డిస్ప్లే (OSD) మెనుని ఉపయోగించి ఇన్పుట్ సోర్స్ను మాన్యువల్గా ఎంచుకోవలసి ఉంటుంది.
ఆపరేటింగ్ సూచనలు
1. పవర్ ఆన్/ఆఫ్
Press the power button, usually located on the back or bottom of the monitor, to turn the monitor on or off.
2. ఆన్-స్క్రీన్ డిస్ప్లే (OSD) మెనూ
The OSD menu allows you to adjust various monitor settings. Access the OSD menu using the joystick or buttons typically found on the back or bottom of the monitor.
- నావిగేషన్: Use the joystick or directional buttons to navigate through the menu options.
- ఎంపిక: Press the joystick or a dedicated button to select an option or confirm a setting.
- నిష్క్రమించు: Use the designated 'Exit' button or move the joystick in a specific direction to close the OSD menu.
3. సెట్టింగులను సర్దుబాటు చేయడం
మీరు సర్దుబాటు చేయగల కీలక సెట్టింగ్లలో ఇవి ఉన్నాయి:
- ప్రకాశం/కాంట్రాస్ట్: Adjust these to suit your viewపర్యావరణం.
- రంగు సెట్టింగ్లు: Modify color temperature, gamma, and individual RGB values.
- ఇన్పుట్ మూలం: HDMI మరియు DisplayPort ఇన్పుట్ల మధ్య మాన్యువల్గా ఎంచుకోండి.
- రిఫ్రెష్ రేట్: Ensure your operating system and graphics card settings are configured to utilize the monitor's 180Hz refresh rate.
- FreeSync: Enable FreeSync in the OSD menu and in your graphics card control panel for tear-free gaming.
- చిత్ర మోడ్: Select from preset modes (e.g., Standard, Game, Movie) or customize your own.
నిర్వహణ
1. స్క్రీన్ను శుభ్రపరచడం
- మానిటర్ను ఆఫ్ చేసి, పవర్ కార్డ్ను అన్ప్లగ్ చేయండి.
- మృదువైన, మెత్తని వస్త్రంతో స్క్రీన్ను సున్నితంగా తుడవండి.
- మొండి గుర్తులకు, తేలికగా dampనీటితో లేదా ప్రత్యేక స్క్రీన్ క్లీనర్తో వస్త్రాన్ని తుడవండి (స్క్రీన్పై నేరుగా స్ప్రే చేయవద్దు).
- Avoid using harsh chemicals, abrasive cleaners, or alcohol-based solutions.
2. సాధారణ సంరక్షణ
- మానిటర్ను ప్రత్యక్ష సూర్యకాంతి, అధిక వేడి మరియు తేమ నుండి దూరంగా ఉంచండి.
- మానిటర్ చుట్టూ తగినంత వెంటిలేషన్ ఉండేలా చూసుకోండి.
- మానిటర్ లేదా దాని కేబుల్స్పై బరువైన వస్తువులను ఉంచడం మానుకోండి.
ట్రబుల్షూటింగ్
మీ మానిటర్తో మీరు సమస్యలను ఎదుర్కొంటే, దయచేసి ఈ క్రింది సాధారణ సమస్యలు మరియు పరిష్కారాలను చూడండి:
| సమస్య | సాధ్యమైన పరిష్కారం |
|---|---|
| తెరపై చిత్రం లేదు | Ensure the power cable is securely connected and the monitor is turned on. Verify the video cable (HDMI/DP) is properly connected to both the monitor and the computer. Check if the correct input source is selected in the OSD menu. |
| చిత్రం మిణుకుమిణుకుమంటోంది లేదా అస్థిరంగా ఉంది | Check the video cable connection. Ensure your graphics card drivers are up to date. Verify the refresh rate setting in your operating system is set correctly (e.g., 180Hz). Enable FreeSync if supported by your graphics card. |
| రంగులు తప్పుగా కనిపిస్తున్నాయి | Adjust color settings (brightness, contrast, color temperature) in the OSD menu. Reset the monitor to factory default settings. |
| మానిటర్ ఆన్ అవ్వడం లేదు | Check the power cable and adapter connections. Try plugging the monitor into a different power outlet. |
ఈ పరిష్కారాలను ప్రయత్నించిన తర్వాత కూడా సమస్య కొనసాగితే, దయచేసి కస్టమర్ మద్దతును సంప్రదించండి.
స్పెసిఫికేషన్లు
| ఫీచర్ | స్పెసిఫికేషన్ |
|---|---|
| బ్రాండ్ | దావా |
| మోడల్ సంఖ్య | SV240QC |
| స్క్రీన్ పరిమాణం | 24 అంగుళాలు |
| డిస్ప్లే రిజల్యూషన్ | 1920 x 1080 (పూర్తి HD) |
| రిఫ్రెష్ రేట్ | 180Hz |
| ప్రతిస్పందన సమయం | 1 ఎంఎస్ (జిటిజి) |
| వక్రత | 3000R |
| రంగు స్వరసప్తకం | 100% sRGB |
| ప్యానెల్ రకం | VA |
| కారక నిష్పత్తి | 16:9 |
| కనెక్టివిటీ | 1x HDMI, 1x డిస్ప్లేపోర్ట్ (DP) |
| VESA మౌంట్ అనుకూలత | 75x75mm |
| ఉత్పత్తి కొలతలు | 59 x 39 x 11 సెం.మీ (స్టాండ్తో) |
| బరువు | 3.5 కిలోలు |
వారంటీ మరియు మద్దతు
వారంటీ సమాచారం
suevery provides a 12 నెలల వారంటీ for this monitor, covering manufacturing defects and malfunctions under normal use. Please retain your proof of purchase for warranty claims.
కస్టమర్ మద్దతు
If you encounter any damage, failure, or missing parts, or require technical assistance, please do not hesitate to contact suevery customer service. Our support team is available to assist you with any product-related inquiries.
For support, please refer to the contact information provided on the suevery official webసైట్ లేదా మీ కొనుగోలు వేదిక.