1. ఉత్పత్తి ముగిసిందిview
The Matbip P4 Wireless Controller is designed to enhance your gaming experience across multiple platforms. It features advanced functionalities such as rapid fire, dual vibration, a 6-axis gyro sensor, and a high-precision touchpad. With its ergonomic design and long-lasting battery, it provides comfortable and uninterrupted gameplay.

చిత్రం 1.1: ముందు view of the Matbip P4 Wireless Controller.

చిత్రం 1.2: ముగిసిందిview of the multifunctional P4 Wireless Controller.
2. సెటప్ మరియు అనుకూలత
2.1 అనుకూల నమూనాలు
The P4 wireless controller is compatible with a range of devices, including:
- PlayStation 3 (P3)
- PlayStation 4 (P4)
- PlayStation 4 Pro (P4 Pro)
- PlayStation 4 Slim (P4 Slim)
- PC (Windows 7/8/10)
It is also applicable to various P4 system software versions. When connected to a computer with a USB cable, it can be used as a wired controller.
2.2 ప్రారంభ జత చేయడం
For P4 Connection:
- To initially pair the controller with your P4 console, connect it using a USB cable.
- The light bar on the controller will blink slowly and then turn solid, indicating that pairing is complete.
- After this initial wired pairing, you can disconnect the USB cable. In wireless mode, simply press the హోమ్ button to automatically pair with the console.
PC కనెక్షన్ కోసం:
- To pair with a PC, press and hold the controller's షేర్ చేయండి బటన్.
- ఇంకా పట్టుకొని ఉండగా షేర్ చేయండి బటన్, నొక్కండి హోమ్ బటన్.
- The light bar will flash rapidly. At this point, you can release the buttons and search for the controller via Bluetooth on your PC.
- Once connected, in wireless mode, pressing the హోమ్ button will automatically pair the controller.
The communication distance with P4, P3, and PC is up to 10 meters, and up to four controllers can be used simultaneously.

Image 2.1: Wireless operation range and compatible devices.
3. ఆపరేటింగ్ సూచనలు
3.1 Controller Layout and Basic Functions
The controller features a standard layout with highly responsive buttons and precise analog sticks for optimal control.

చిత్రం 3.1: వివరణాత్మకమైనది view of controller buttons and sticks.
3.2 Turbo Rapid Fire Function
The controller supports a rapid fire (Turbo) function with adjustable speeds. This feature allows for continuous input of a button press, which can be advantagకొన్ని ఆటలలో.
- Adjustable speeds: 8 shots/second, 12 shots/second, 20 shots/second.
- To activate and adjust: Press and hold the షేర్ చేయండి button, then move the right analog stick up or down to cycle through the Turbo speeds.
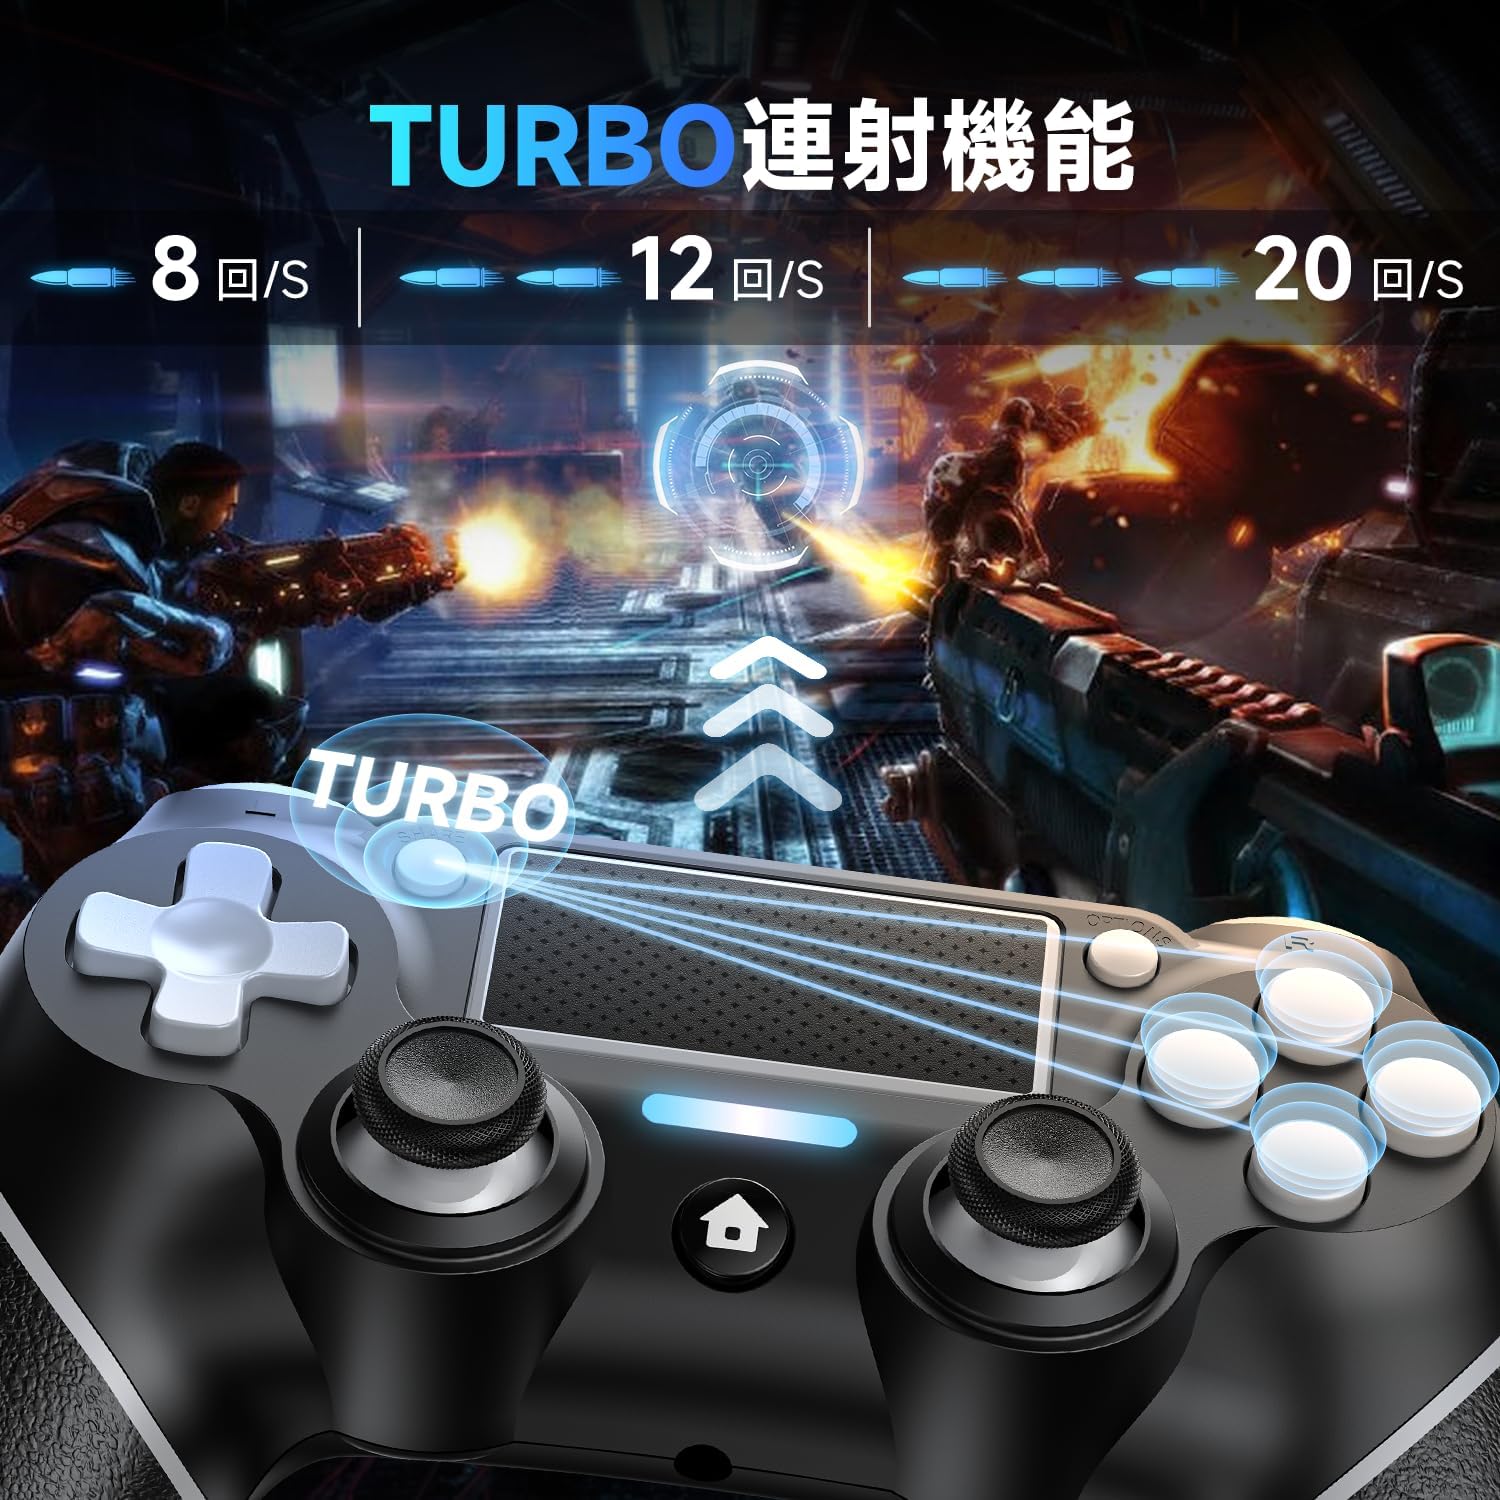
Image 3.2: Visual representation of the Turbo rapid fire function.

Image 3.3: Illustration of the 3-stage Turbo function adjustment.
3.3 Dual Vibration Function
Equipped with vibration motors, the controller provides immersive haptic feedback, reacting instantly to in-game events such as impacts or explosions. This enhances the realism of your gaming experience.

Image 3.4: Depiction of the powerful dual vibration function.
3.4 6-యాక్సిస్ గైరో సెన్సార్
The integrated 6-axis gyro sensor allows for precise motion control, enabling intuitive interactions in games that support motion sensing. This includes:
- Directional control recognition
- ఫీల్డ్ view movement recognition
- Target aiming recognition
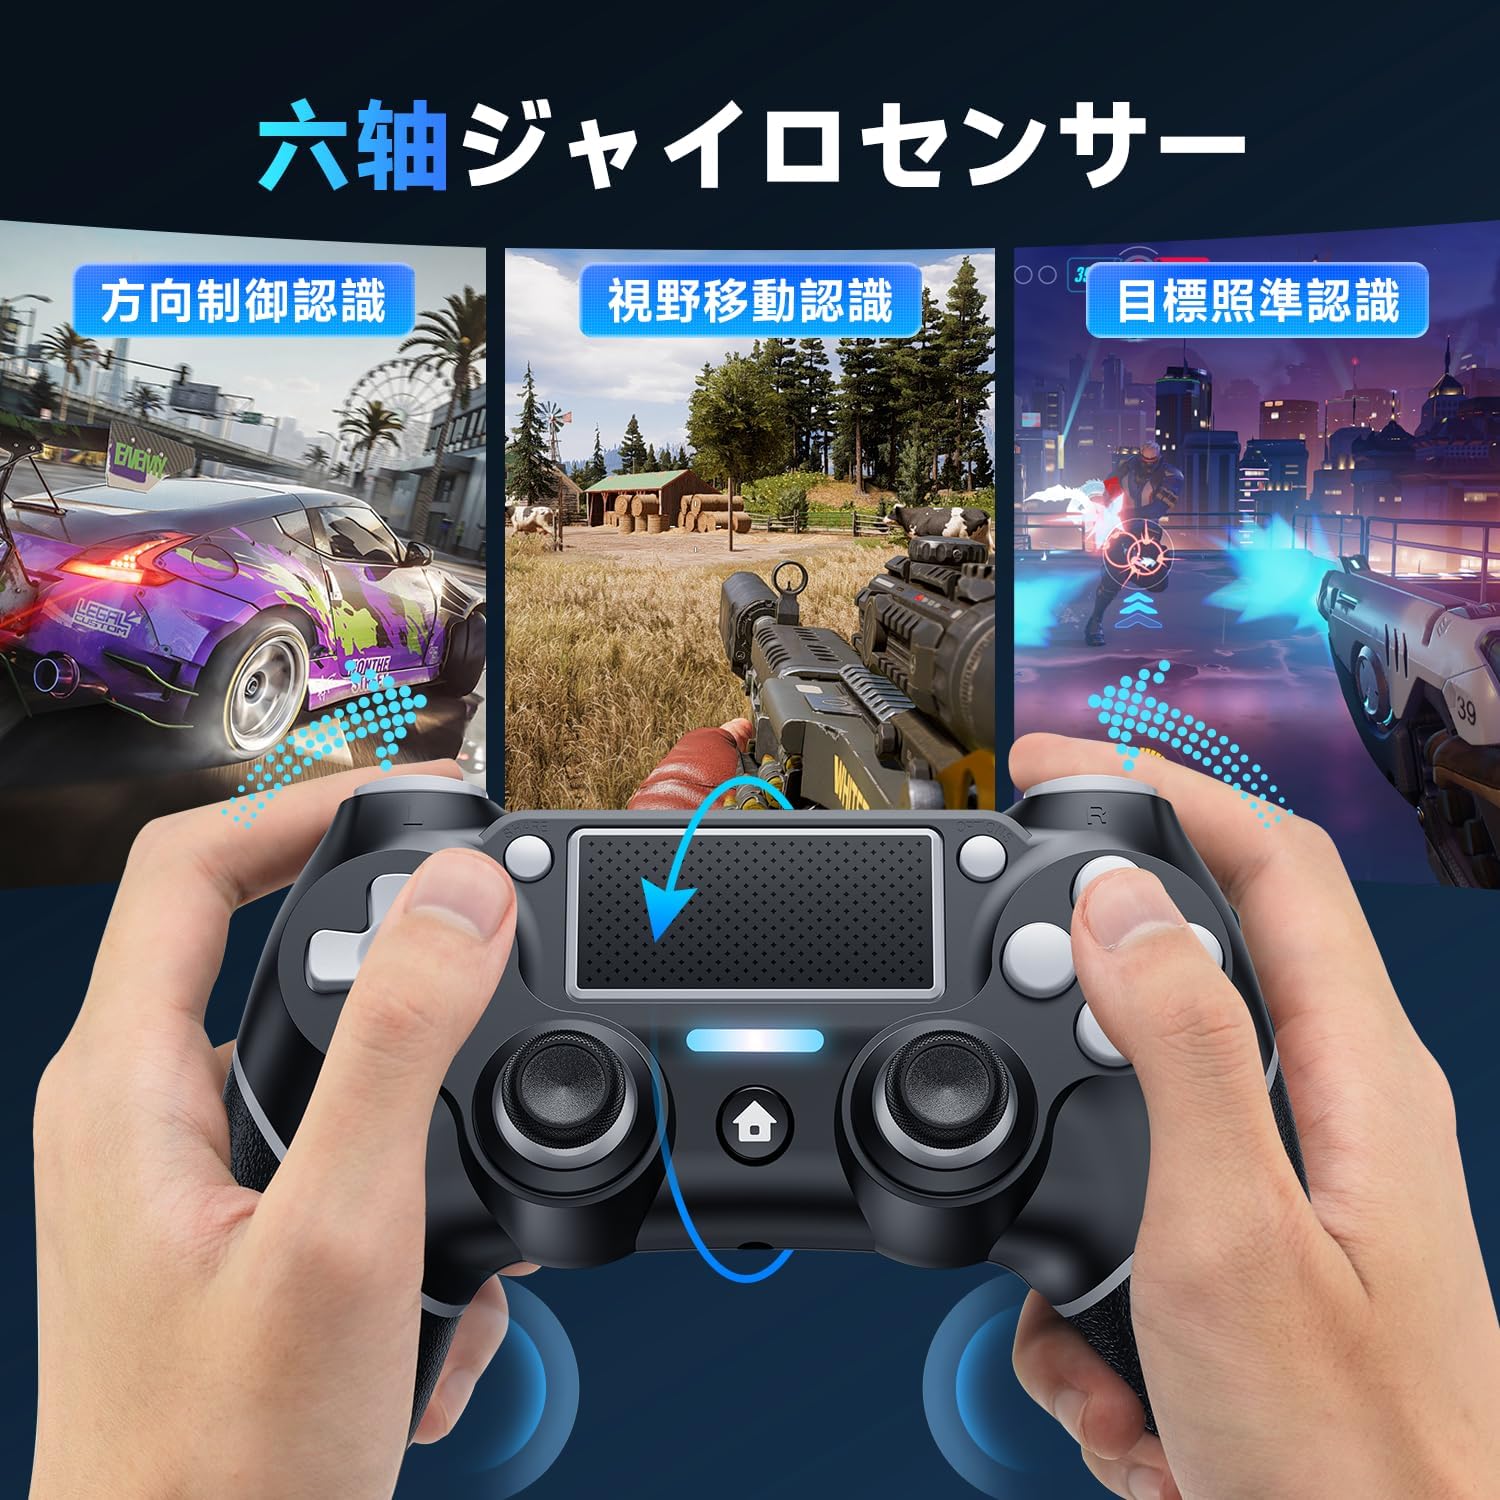
చిత్రం 3.5: ఉదాamples of 6-axis gyro sensor applications in games.

Image 3.6: Visualizing the 6-axis gyro sensor's smooth and fast motion detection.
3.5 High-Precision Touchpad
The integrated touchpad offers additional input methods for compatible games, supporting various gestures for enhanced control.
- Drag gestures
- Slide gestures
- Multi-touch input

Image 3.7: User interacting with the high-precision touchpad.

చిత్రం 3.8: ఉదాamples of touchpad functions including drag, slide, and multi-touch.
3.6 3.5mm హెడ్ఫోన్ జాక్
A 3.5mm headphone jack is provided, allowing you to connect your gaming headset directly to the controller for immersive audio and communication. Please note that this product does not include a built-in speaker.

Image 3.9: Close-up of the 3.5mm headphone jack.

Image 3.10: Location of the 3.5mm headphone jack, Share button, and Reset button.
4. బ్యాటరీ మరియు ఛార్జింగ్
The controller is equipped with a 1000mAh large-capacity rechargeable battery, providing extended gaming sessions.
- A single full charge allows for over 10 hours of continuous gameplay.
- The controller features a low voltage warning function, eliminating the need to constantly check the battery level on your gaming console. This prevents interruptions to your gaming experience due to low power.

Image 4.1: Battery capacity, charging time, and usage time details.
5. నిర్వహణ
To ensure the longevity and optimal performance of your Matbip P4 Wireless Controller, follow these general maintenance guidelines:
- కంట్రోలర్ను మృదువైన, పొడి గుడ్డతో తుడిచి శుభ్రంగా ఉంచండి.
- నియంత్రికను తీవ్రమైన ఉష్ణోగ్రతలు, తేమ లేదా ప్రత్యక్ష సూర్యకాంతికి గురిచేయకుండా ఉండండి.
- Do not drop or subject the controller to strong impacts.
- నష్టం జరగకుండా ఉండటానికి కంట్రోలర్ను ఉపయోగంలో లేనప్పుడు సురక్షితమైన స్థలంలో నిల్వ చేయండి.
6. ట్రబుల్షూటింగ్
6.1 కనెక్షన్ సమస్యలు
If you experience difficulty connecting the controller, try the following:
- కంట్రోలర్ తగినంతగా ఛార్జ్ చేయబడిందని నిర్ధారించుకోండి.
- Verify that Bluetooth is enabled on your console or PC.
- Try re-pairing the controller following the instructions in Section 2.2.
6.2 కంట్రోలర్ను రీసెట్ చేయడం
If the controller becomes unresponsive or exhibits unusual behavior, a reset may resolve the issue.
- Locate the small 2mm reset hole on the back of the controller.
- Using a thin, pointed object (like a straightened paperclip or a needle), gently press the reset button inside the hole.
- Hold the button for a few seconds, then release.
- Attempt to reconnect the controller.
Image 6.1: Location of the reset button on the back of the controller.
7. స్పెసిఫికేషన్లు
| ఫీచర్ | వివరాలు |
|---|---|
| మోడల్ సంఖ్య | AB1 |
| కనెక్టివిటీ | Wireless Bluetooth, Wired (USB) |
| బ్యాటరీ కెపాసిటీ | 1000mAh |
| నిరంతర ఆట సమయం | Over 10 hours (on full charge) |
| కమ్యూనికేషన్ దూరం | 10మీ వరకు |
| కొలతలు (ప్యాకేజీ) | 17.2 x 11.7 x 7.1 సెం.మీ |
| బరువు (ప్యాకేజీ) | 310 గ్రా |
| వయస్సు పరిధి | అన్ని వయసుల వారు |
| విడుదల తేదీ | సెప్టెంబర్ 28, 2024 |
| ధృవపత్రాలు | TELEC, CE, FCC, RED, ROHS |
8. వారంటీ మరియు మద్దతు
Matbip is committed to providing high-quality products and excellent customer service. We strictly manage the manufacturing and processing of our products, adhering to various certification standards from components to the final product.
- నాణ్యత హామీ: Each product has a unique code, verified by us before shipment.
- ఒక సంవత్సరం వారంటీ: ఉత్పత్తి ఒక సంవత్సరం వారంటీతో వస్తుంది.
- Defect Replacement: In case of initial defects or malfunctions, a new product will be resent without requiring the return of the original item.
- 30-రోజుల ఉచిత వాపసులు: 30 రోజుల ఉచిత రిటర్న్ పాలసీని ఆస్వాదించండి.
- Unlimited Customer Support: We offer unlimited customer support to assist you with any inquiries or issues.

Image 8.1: Product certifications ensuring quality and safety.


