LAUNCH Original Adapter for DBSCar VII and SmartLink C VCI Connector User Manual
1. ఓవర్view
The LAUNCH Original Adapter is a replacement connector designed to facilitate communication between your LAUNCH diagnostic tool and a vehicle's OBD2 port. This adapter converts a DR15 male connection from your DBSCar VII or SmartLink C VCI Device Cable to a standard OBD2 16-pin male connector. It is constructed from zinc-plated copper to ensure reliable and corrosion-resistant connections.
ముఖ్యమైన గమనిక: This product is solely a connector and does not possess any diagnostic functions on its own. It requires a compatible LAUNCH diagnostic device for operation. Please confirm your specific device model before purchase to ensure compatibility.
2. ఉత్పత్తి భాగాలు
ప్యాకేజీలో ఈ క్రింది అంశం ఉంటుంది:
- 1 x DR15 Male to OBD2 16 Pin Male Replacement Adapter
2.1 అడాప్టర్ Views

చిత్రం 1: ముందు మరియు వెనుక views of the LAUNCH adapter, highlighting both connector types.

మూర్తి 2: వివరంగా view of the 3-Row DR15 Male Connector.

మూర్తి 3: వివరంగా view of the OBD2 16-Pin Male Connector.
3. అనుకూలత
This diagnostic adapter is specifically designed for use with DBSCar VII (DBSCar 7) or SmartLink C Device Cables from LAUNCH. It is compatible with a wide range of LAUNCH X431 diagnostic scanners, including but not limited to:
- CRP919XBT
- CRP919EBT
- CRP919MAX
- PRO3 ACE
- PROS V/V+5.0
- PRO3S+ V5.0
- PRO TT Elite
- PRO Dyno
- X431 V+ HD
- PRO 5
- PAD VII
- PAD V
Ensure your diagnostic device utilizes a DBSCar VII or SmartLink C Device Cable for proper connection with this adapter.
4. సెటప్ & కనెక్షన్
Follow these steps to properly connect the adapter for diagnostic use:
- Connect to VCI Device: Plug the DR15 male end of the adapter into the corresponding DR15 female port on your LAUNCH DBSCar VII or SmartLink C VCI Device Cable. Ensure a secure and firm connection.
- వాహనానికి కనెక్ట్ చేయండి: Locate your vehicle's OBD2 diagnostic port (typically found under the dashboard on the driver's side). Plug the OBD2 16-pin male end of the adapter into the vehicle's OBD2 port.
- కనెక్షన్ని ధృవీకరించండి: Once both ends are connected, ensure all connections are snug. The adapter is now ready to facilitate communication between your diagnostic tool and the vehicle.
4.1 కనెక్షన్ రేఖాచిత్రాలు
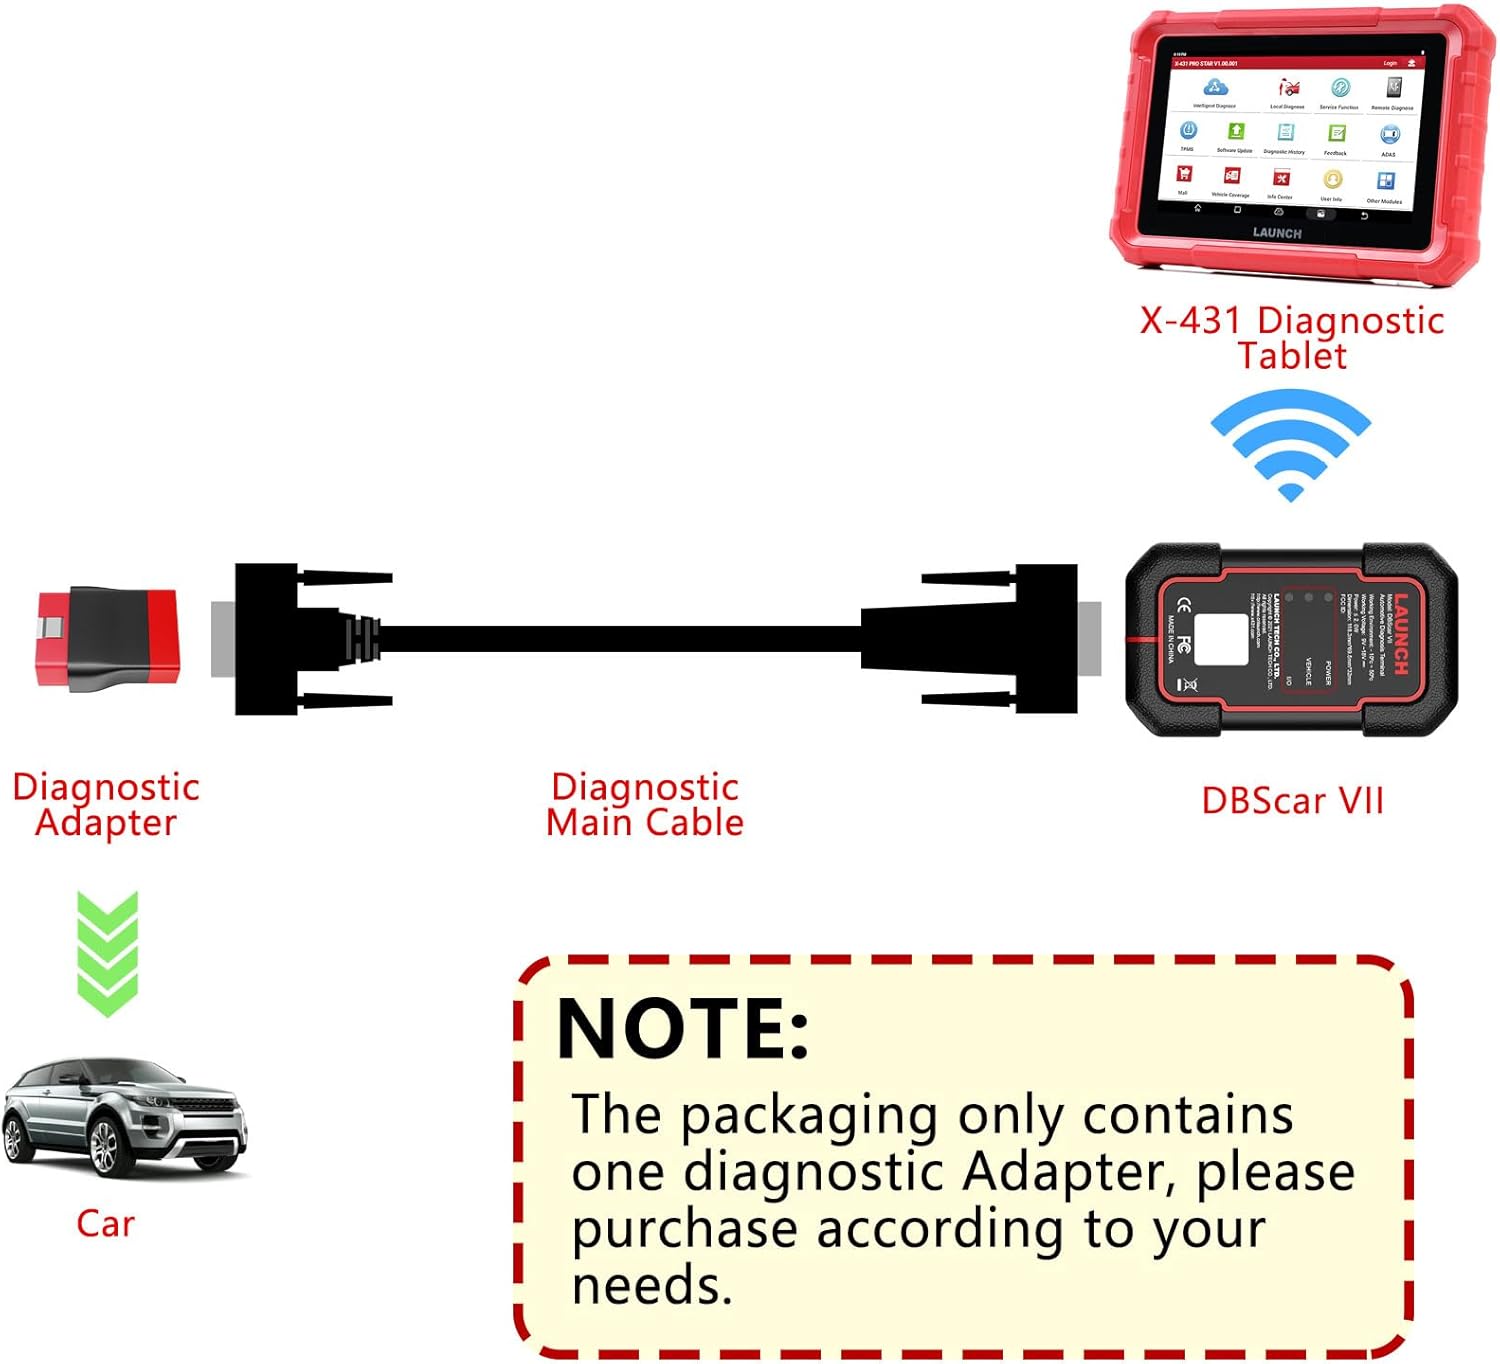
Figure 4: Connection diagram for DBSCar VII with the diagnostic adapter.

Figure 5: Connection diagram for SmartLink C with the diagnostic adapter.
5. ఆపరేటింగ్ సూచనలు
The LAUNCH Original Adapter serves as a passive connector. Its primary function is to establish a physical link between your LAUNCH diagnostic tool and the vehicle. All diagnostic operations, data reading, and fault code analysis are performed directly through your compatible LAUNCH diagnostic scanner.
Refer to the user manual of your specific LAUNCH diagnostic tool (e.g., X431 CRP919EBT, PRO3 ACE, PAD VII) for detailed instructions on how to perform vehicle diagnostics, access functions, and interpret results.
6. నిర్వహణ
To ensure the longevity and optimal performance of your adapter, follow these maintenance guidelines:
- శుభ్రపరచడం: Regularly wipe the adapter's exterior with a soft, dry cloth. Avoid using harsh chemicals or abrasive materials that could damage the zinc-plated copper finish.
- నిల్వ: Store the adapter in a clean, dry environment away from extreme temperatures, direct sunlight, and moisture. Keep it protected from physical impact to prevent damage to the connectors.
- తనిఖీ: Periodically inspect the connectors for any signs of wear, corrosion, or damage. Ensure the pins are straight and free from debris. The zinc-plated copper construction is designed to resist corrosion and oxidation, but proper care is still recommended.
7. ట్రబుల్షూటింగ్
If you encounter issues while using the adapter, consider the following:
- కనెక్షన్ లేదు: Ensure both the DR15 and OBD2 connections are fully seated and secure. A loose connection can prevent communication.
- అననుకూల పరికరం: Verify that your LAUNCH diagnostic tool uses a DBSCar VII or SmartLink C Device Cable. This adapter is not universally compatible with all LAUNCH products.
- భౌతిక నష్టం: Inspect the adapter for any visible signs of damage to the cable or connectors. If damaged, replace the adapter.
- Adapter Size Mismatch: Some users have reported issues with the adapter not fitting certain DBScan VII cables, describing it as 'too small'. Always confirm your device model and connector type before purchasing to avoid compatibility problems.
For further assistance, refer to the troubleshooting section of your LAUNCH diagnostic tool's manual or contact LAUNCH customer support.
8. స్పెసిఫికేషన్లు
| ఫీచర్ | స్పెసిఫికేషన్ |
|---|---|
| అంశం మోడల్ సంఖ్య | Adapter for DBSCar VII |
| ప్యాకేజీ కొలతలు | 4.29 x 2.48 x 1.42 అంగుళాలు |
| వస్తువు బరువు | 2.46 ఔన్సులు |
| తయారీదారు | ప్రారంభించు |
| కనెక్టర్ రకం | DR15 Male to OBD2 16-Pin Male |
| ముగింపు రకం | జింక్ |
| రంగు | ఎరుపు |
| ASIN | B0D8PPVD5D |
| మొదటి తేదీ అందుబాటులో ఉంది | జూలై 3, 2024 |
9. వారంటీ & సపోర్ట్
This LAUNCH Original Adapter comes with a 2 సంవత్సరాల వారంటీ from the date of purchase. This warranty covers manufacturing defects and ensures the product meets quality standards.
For any questions, technical assistance, or warranty claims, please feel free to contact LAUNCH customer support. Refer to your product packaging or the official LAUNCH webఅత్యంత తాజా సంప్రదింపు సమాచారం కోసం సైట్.


