1. పరిచయం
This manual provides detailed instructions for the installation, operation, and maintenance of your YEEHUNG 12.3 Inch Linux Car Touch Display Screen. Please read this manual thoroughly before installation and use to ensure proper functionality and to avoid damage.
The display screen integrates advanced features such as CarPlay, Android Auto, and Mirror Link, enhancing your in-car entertainment and navigation experience while retaining original vehicle functionalities.
2. ఉత్పత్తి ముగిసిందిview మరియు ఫీచర్లు
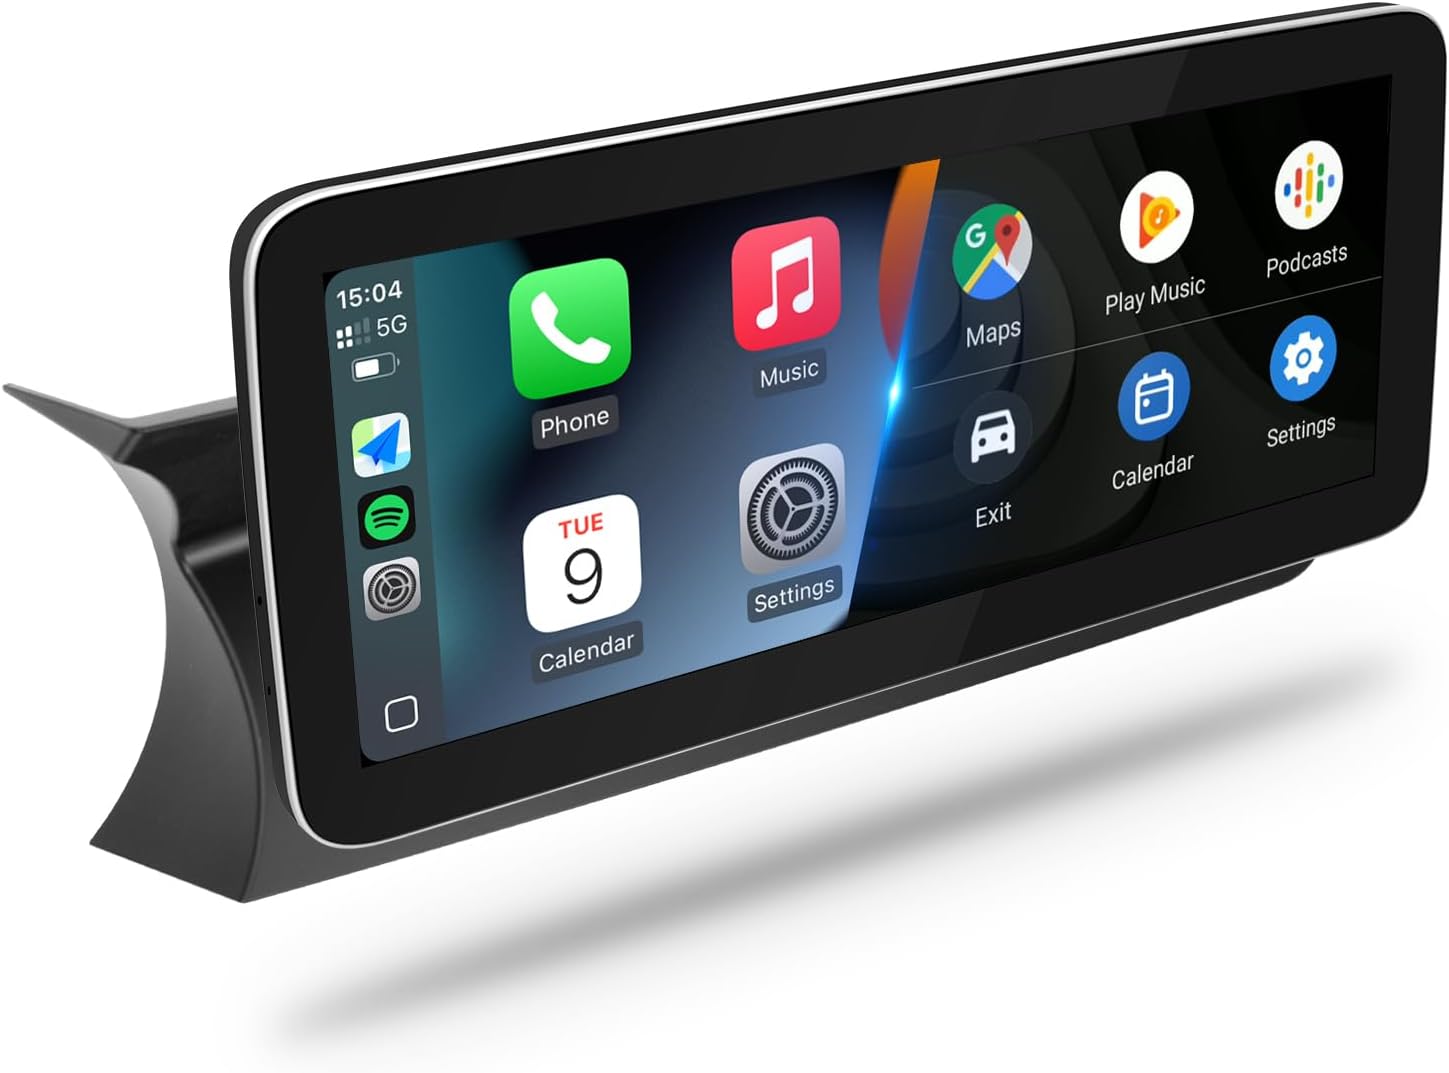
Figure 1: YEEHUNG 12.3 Inch Linux Car Touch Display Screen with CarPlay interface.
The YEEHUNG 12.3 Inch Linux Car Touch Display Screen is designed to upgrade your Mercedes-Benz vehicle's infotainment system. It offers a seamless integration with your car's existing features and introduces new capabilities.
ముఖ్య లక్షణాలు:
- వాహన అనుకూలత: Designed for Mercedes-Benz 2012-2015 C Class (W204), A Class (W176), CLA Class (C117), and GLA Class (X156) with NTG4.5/4.7 OEM systems.
- Linux ఆపరేటింగ్ సిస్టమ్: Provides a stable and responsive user experience.
- Wired & Wireless Connectivity: Supports Apple CarPlay, Android Auto, and Mirror Link (iOS 26).
- OEM System Integration: Retains original car interface and functions, allowing seamless switching between the new Linux system and the OEM system.
- Steering Wheel & Knob Control: Allows control of CarPlay or Android Auto interfaces using the car's original steering wheel buttons and control knob.
- కెమెరా మద్దతు: Displays your car's reversing camera feed and radar information. Compatible with OEM cameras and aftermarket CVBS/720P AHD format cameras.
- USB మీడియా ప్లేబ్యాక్: Enables music and video playback via USB.
- హై-డెఫినిషన్ డిస్ప్లే: Features a 12.3-inch HD IPS touchscreen with 1920x720 resolution.

చిత్రం 2: పైగాview డిస్ప్లే యొక్క ముఖ్య లక్షణాలలో.
3. ఇన్స్టాలేషన్ గైడ్
గమనిక: For Mercedes-Benz A Class W176, CLA Class C117, and GLA Class X156, the supplied base bracket is not needed; the screen mounts directly on the original base bracket.
3.1. Disassembly of Original Components
- Remove Air-Conditioning Trim Panel: Use a rocker tool to carefully pry out the air-conditioning trim panel. Once loose, place it to one side.
- Remove Instrument Panel Trim: Pry out the upper and lower trim panels of the instrument panel with a rocker. Then, pry out the main trim panel of the instrument panel and remove the two visible fixing screws.
- Remove Original Display Screen: Gently pull the original display screen outward. Disconnect and remove the power cord and LVDS plug from the back of the screen.
- Remove Original Host Panel: Remove the fixing screws of the host panel.
- Remove Original Host Unit: Pull the host of the original vehicle outward. Take out the host unit. Hold the buckle of the ISO plug of the host and pull it backward to take out the ISO plug.
- Extract Fiber Optic Cable: Press the small buckle on the original ISO wire head with tweezers and carefully extract the 2P orange optical fiber cable.
Video 1: Detailed installation steps for the YEEHUNG 12.3" Android screen in a Mercedes W204.
3.2. వైరింగ్ మరియు కనెక్షన్లు
- Thread Harnesses: Thread the ISO harness and RCA harness through the center console to the base of the display using threading tools and electrical tape.
- Route 4G/GPS Antennas: Pry open the side cover of the storage box. Thread the plug ends of the 4G antenna and GPS antenna through the storage box to the base of the display screen. Secure them on the dashboard with double-sided adhesive tape. Plug any excess wire into the gap above the storage box and press the exposed harness into the gap with a rocker.
- Route USB Sockets: Pass the two USB sockets through the storage box and place them inside.
- ఫైబర్ ఆప్టిక్ కేబుల్ కనెక్ట్ చేయండి: Plug the 2P orange optical fiber cable (extracted earlier) behind the female head of the Android ISO cable. Connect the ISO plug of the original host to the male of the Android ISO harness.
- Connect Android Device Plugs: Connect the plugs of the Android ISO harness, 4G antenna, GPS antenna, and RCA harness to the back of the Android device.
- Install Front Camera (Optional): If adding a front camera, pull its cable through the air inlet grille to the engine compartment. Fix the front camera with double-sided tape or screws in a suitable place in front of the car. Connect the yellow power cord of the camera with the red power cord of the extension cable and wrap it with electrical tape. Connect the two video connectors of the camera to the connector of the extension cable and wrap it with electrical tape. Sort out surplus wires and bind them into a bundle with ties, then fix them in the engine compartment.
Video 2: Detailed steps for installing the YEEHUNG 12.3" Android screen, including wiring.
Video 3: Instructions on how to relocate fiber optic cables to the Linux harness for Mercedes-Benz vehicles.
Video 4: Guide on connecting the fiber optic cable to the new power cable.
Video 5: Instructions for installing a front camera in a Mercedes C-Class.
Video 6: Guide on properly adapting fiber optic cables for the system.
3.3. తిరిగి కలపడం
- Install New Display Base: Install the base of the Android device in the middle of the dashboard and lock the fixing screw.
- Install New Display Screen: Put the new display screen onto the base.
- Reinstall Original Host: Install the original host unit back to its original position. Confirm it is installed in place, then lock and fix the original host.
- Reinstall Trim Panels: Install the three panels of the instrument cluster back into place. Reinstall the air-conditioning trim panel.
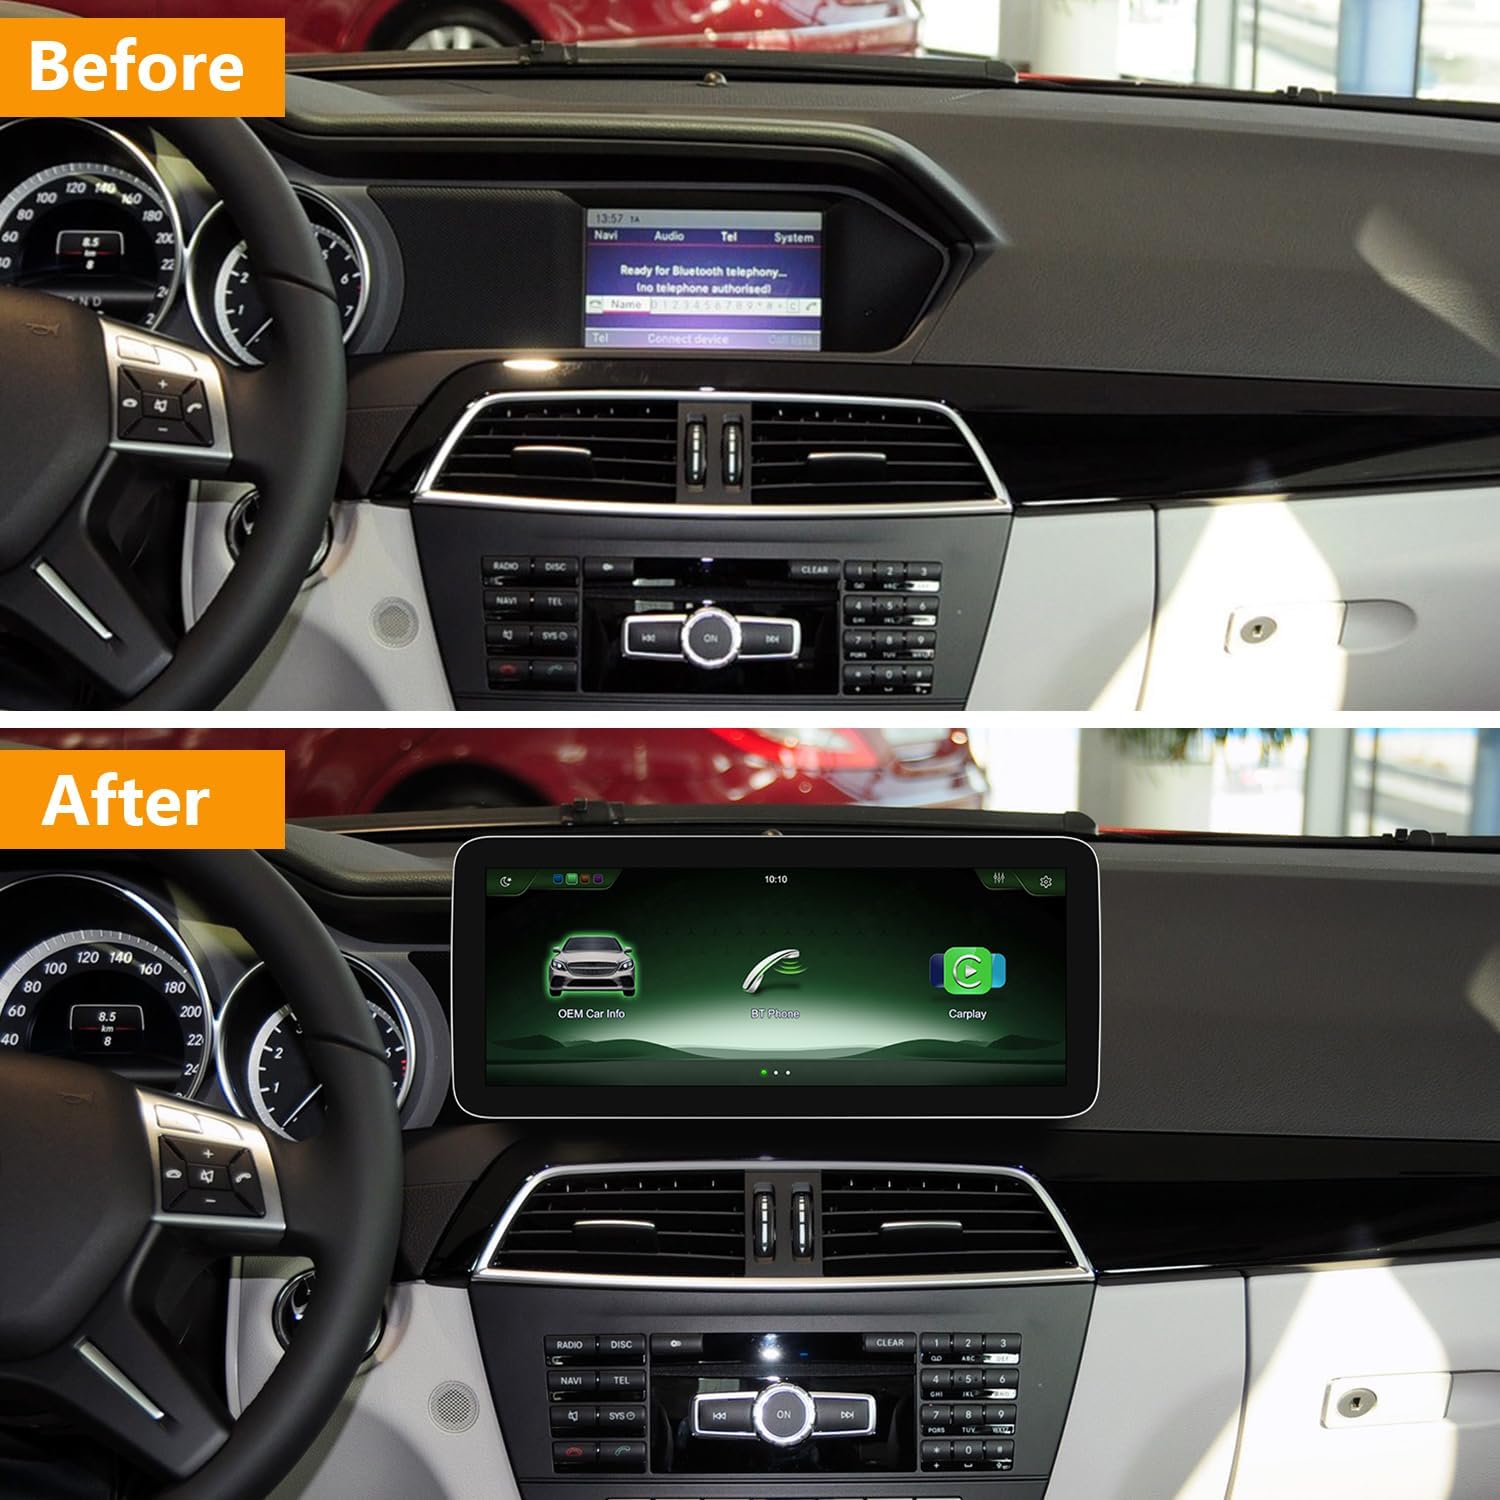
Figure 3: Visual comparison of the dashboard before and after the screen installation.
4. సెటప్ మరియు ప్రారంభ కాన్ఫిగరేషన్
4.1. Power On and Initial Check
- Turn the ignition on and power on the car.
- Check whether the Android device can be started normally.
- Verify that all functions are normal.
4.2. AUX Menu and Sound Setup
If your car with the NTG4.5/4.7 system does not have an AUX menu originally, you must activate it according to the product details instructions. Without AUX menu activation, there will be no sound.
- వైరింగ్ విధానం: Check the car's sound transmission port. Use the AMI connection cable in preference. If there is no AMI port, use the audio output of the ISO connection cable to connect to the car's AUX jack.
- OEM Bluetooth Sound: For wireless CarPlay and Android Auto call and music sound quality, use OEM Bluetooth. Your car must have both OEM Bluetooth and Bluetooth audio to work. Refer to the provided connectivity videos for guidance.

Figure 4: AUX connection methods.
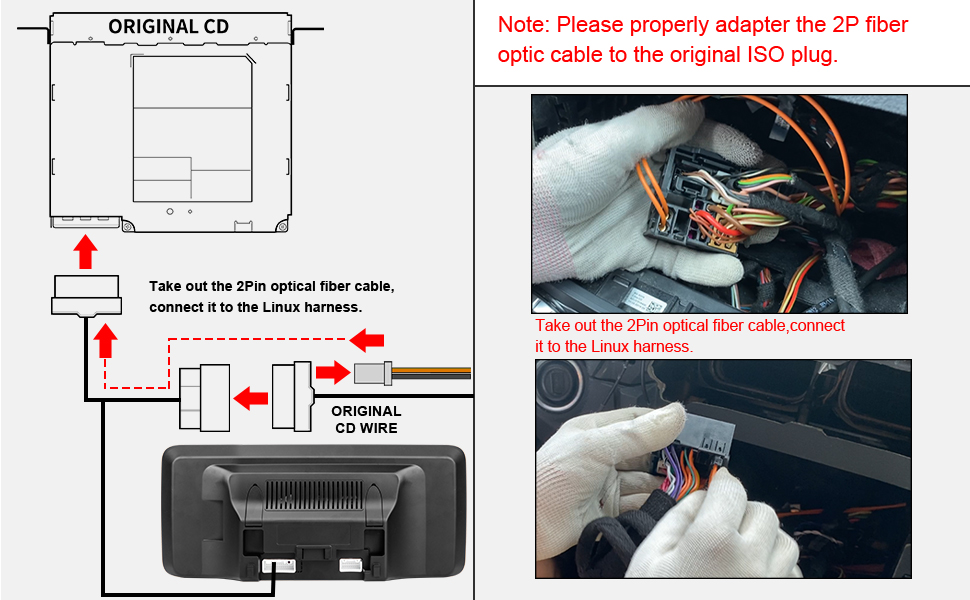
Figure 5: AUX Activation menu.
Video 7: Demonstrates using OEM Bluetooth and CarPlay features together.
Video 8: Connecting NTG4.5 Linux system to OEM Bluetooth.
Video 9: Connecting Linux to OEM Bluetooth for CarPlay functionality.
4.3. రిజల్యూషన్ సెట్టింగ్లు
- Set the resolution according to your original system screen for optimal display.
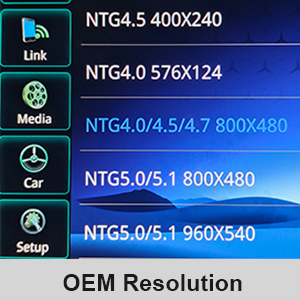
Figure 6: OEM Resolution settings menu.
Video 10: Instructions for setting the original resolution for Mercedes-Benz.
Video 11: Guide on setting the resolution according to the original system screen.
5. ఆపరేటింగ్ సూచనలు
5.1. సిస్టమ్ స్విచింగ్
The device supports switching between the new Linux system and the original car interface. Use the car's original controls or the touchscreen to navigate.

Figure 7: Dual System Switching.
Video 12: Demonstration of dual system switching, using a BMW screen as an example.
5.2. CarPlay, Android Auto, and Mirror Link
The display supports both wired and wireless CarPlay, Android Auto, and Mirror Link (iOS 26). Connect your smartphone to access navigation, music, calls, and other apps directly on the car screen.
- వైర్డు కనెక్షన్: For wired CarPlay/Android Auto, use the USB IN 1 port.
- వైర్లెస్ కనెక్షన్: Ensure your phone's Bluetooth and Wi-Fi are enabled and connected to the device.
- ఎయిర్ప్లే: Refer to the dedicated video for setting up AirPlay.

చిత్రం 8: వైర్లెస్ కార్ప్లే మరియు ఆండ్రాయిడ్ ఆటో ఆపరేషన్లో ఉన్నాయి.
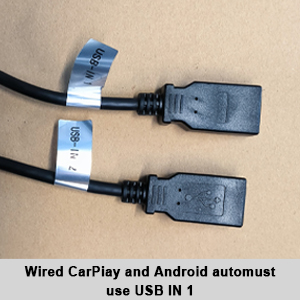
Figure 9: USB IN 1 port for wired CarPlay and Android Auto.
Video 13: Instructions on how to set up AirPlay on Mercedes-Benz.
5.3. Reversing Camera Display
The system automatically displays the reversing camera feed and radar information when engaging reverse gear. It is compatible with both OEM and aftermarket CVBS/720P AHD cameras.

Figure 10: Reversing camera display with radar information.
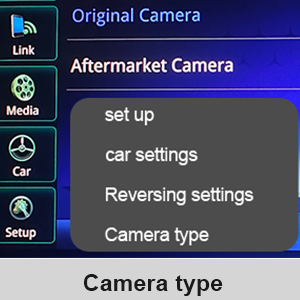
Figure 11: Camera type settings menu.
6. నిర్వహణ
To ensure the longevity and optimal performance of your display screen, follow these maintenance guidelines:
- Clean the screen regularly with a soft, lint-free cloth. Avoid abrasive materials or harsh chemicals.
- పరికరాన్ని దుమ్ము మరియు చెత్త లేకుండా ఉంచండి.
- Avoid exposing the screen to extreme temperatures or direct sunlight for prolonged periods.
7. ట్రబుల్షూటింగ్
If you encounter any issues with your YEEHUNG display screen, please refer to the solutions below or contact customer support.
సాధారణ సమస్యలు మరియు పరిష్కారాలు:
- ధ్వని లేదు లేదా తక్కువ ఆడియో నాణ్యత:
- Ensure the AUX menu is activated in your original car system.
- Verify correct wiring for audio output (AMI cable or ISO to AUX jack).
- If using OEM Bluetooth, confirm your car has both OEM Bluetooth and Bluetooth audio.
- If sound is unstable with Auto AUX, manually switch AUX to get a stable sound.
- Original Screen Distortion/Flicker: Check all connections, especially the LVDS cable, for secure fit. Ensure the correct resolution is selected.
- CarPlay/Android Auto Reconnection Issues: If your phone disconnects, try rebooting the system. Ensure OEM Bluetooth is properly configured for wireless connections.
- Display Resolution Issues (Zoomed In): This may occur occasionally. Try turning the car off and on again. Verify the correct OEM resolution setting.
- Fiber Optic Cable Adaptation: Ensure fiber optic cables are properly adapted to the Linux harness. Refer to installation videos for detailed steps.
- Aftermarket Camera Not Working: The system does not support aftermarket cameras exceeding 720P AHD format. Check camera specifications.
Video 14: Solutions for high current sound or one-sided car speaker sound issues.
8. స్పెసిఫికేషన్లు
| ఫీచర్ | స్పెసిఫికేషన్ |
|---|---|
| ఉత్పత్తి కొలతలు | 12.83 x 0.98 x 5.67 అంగుళాలు |
| వస్తువు బరువు | 4.99 పౌండ్లు |
| ఆపరేటింగ్ సిస్టమ్ | Linux |
| స్క్రీన్ పరిమాణం | 12.3 అంగుళాలు |
| కనెక్టివిటీ టెక్నాలజీ | బ్లూటూత్ |
| ప్రత్యేక లక్షణాలు | బ్లూటూత్, టచ్స్క్రీన్ |
| ఆడియో అవుట్పుట్ మోడ్ | AUX |
| మౌంటు రకం | ప్యానెల్ మౌంట్ |
9. వారంటీ మరియు మద్దతు
YEEHUNG is committed to providing high-quality products and excellent customer service. If you have any questions or encounter issues with your product, please do not hesitate to contact our support team.
- ఉత్పత్తి అమరిక: If you are unsure about compatibility, send us a photo of your car's dashboard and the model year for verification.
- అమ్మకాల తర్వాత సేవ: Our dedicated support team is available to assist you. Please clearly express your problem for quick resolution. We aim to reply within 24 hours.


