1. పరిచయం
The VEDINDUST 8K 2-Port 3-Monitor DisplayPort KVM Switch (Model SW622) is designed to enhance your workspace efficiency by allowing two computers to share three DisplayPort monitors and four USB 3.0 peripheral devices. This device supports high resolutions up to 8K@60Hz and 4K@144Hz, providing a clear and immersive visual experience. It is ideal for users who need to manage multiple computers with a single set of peripherals and displays, supporting both extended and duplicate display modes.
Please read this manual thoroughly before installation and operation to ensure proper usage and optimal performance of your KVM switch.
2. ప్యాకేజీ విషయాలు
క్రింద జాబితా చేయబడిన అన్ని వస్తువులు మీ ప్యాకేజీలో చేర్చబడ్డాయని ధృవీకరించండి:
- 1x VEDINDUST 8K 2-Port 3-Monitor DisplayPort KVM Switch (Model SW622)
- 2x USB 3.0 A-to-A Cables
- 1x Wired Remote Controller
- 1x DC 12V పవర్ అడాప్టర్
- 1x వినియోగదారు మాన్యువల్

Image: Contents of the VEDINDUST KVM Switch package, including the main unit, necessary cables, remote, power adapter, and documentation.
3. ఉత్పత్తి ముగిసిందిview
The KVM switch features a robust design with clearly labeled ports for easy connection. Below is a diagram illustrating the input and output ports:

Image: Detailed connection diagram of the KVM switch, highlighting input ports for two PCs (PC1 IN, PC2 IN) and output ports for three monitors (OUT A, OUT B, OUT C), along with USB 3.0 ports and control interfaces.
ముందు ప్యానెల్:
- USB 3.0 Ports (1-4): Connect your USB peripherals such as keyboard, mouse, printer, USB flash drive, etc.
- PC1/PC2 Switch Button (SW): Press to switch between Computer 1 and Computer 2.
- LED సూచికలు: Show which computer is currently selected.
- కంట్రోల్ పోర్ట్: Connect the wired remote controller for convenient switching.
వెనుక ప్యానెల్:
- DC 12V: Power input port. Connect the provided power adapter.
- PC1 IN (DP1 A, DP1 B, DP1 C, USB3.0): Connect to Computer 1's three DisplayPort outputs and one USB 3.0 port.
- PC2 IN (DP2 A, DP2 B, DP2 C, USB3.0): Connect to Computer 2's three DisplayPort outputs and one USB 3.0 port.
- OUT A, OUT B, OUT C: Connect to your three DisplayPort monitors.
4. సెటప్ సూచనలు
మీ KVM స్విచ్ను సెటప్ చేయడానికి ఈ దశలను అనుసరించండి:
- పవర్ ఆఫ్ పరికరాలు: Ensure both computers and all monitors are powered off before making any connections.
- మానిటర్లను కనెక్ట్ చేయండి: Connect your three DisplayPort monitors to the KVM switch's A నుండి బయటపడండి, బి, మరియు అవుట్ సి ports using DisplayPort cables (not included).
- Connect Computers (PC1):
- Connect Computer 1's three DisplayPort outputs to the KVM switch's DP1 A, DP1 B, మరియు DP1 C ఓడరేవులు.
- Connect Computer 1's USB 3.0 port to the KVM switch's USB3.0 (PC1 IN) port using one of the provided USB 3.0 A-to-A cables.
- Connect Computers (PC2):
- Connect Computer 2's three DisplayPort outputs to the KVM switch's DP2 A, DP2 B, మరియు DP2 C ఓడరేవులు.
- Connect Computer 2's USB 3.0 port to the KVM switch's USB3.0 (PC2 IN) port using the second provided USB 3.0 A-to-A cable.
- USB పెరిఫెరల్స్ కనెక్ట్ చేయండి: Connect your keyboard, mouse, and other USB 3.0 devices to the four USB 3.0 Ports (1-4) on the front panel of the KVM switch.
- Connect Wired Remote (Optional): Plug the wired remote controller into the నియంత్రణ port on the front panel.
- పవర్ ఆన్: Connect the DC 12V power adapter to the KVM switch's DC 12V port and then plug it into a power outlet. Power on the KVM switch, then power on your monitors and computers.
ముఖ్యమైన గమనిక: Ensure that your computers are capable of supporting triple monitor output. To verify, connect your computers directly to three monitors without the KVM switch. If all three monitors display correctly, your computer supports multi-display output.

Image: A visual guide to connecting two personal computers to the KVM switch, which then routes signals to three monitors and allows shared USB peripherals.
5. ఆపరేటింగ్ సూచనలు
The VEDINDUST KVM switch offers two methods for switching between connected computers:
Method 1: Front Panel Button
- గుర్తించండి SW button on the front panel of the KVM switch.
- నొక్కండి SW button to toggle between Computer 1 and Computer 2. The corresponding LED indicator (PC1 or PC2) will illuminate to show the active computer.
Method 2: Wired Remote Controller
- If connected, use the wired remote controller for convenient switching.
- Press the button on the remote controller to switch between Computer 1 and Computer 2. This allows you to place the KVM switch out of sight, keeping your desktop tidy.

Image: An individual utilizing a triple-monitor setup powered by the KVM switch, illustrating an efficient multi-computer workstation.
6. Display Modes (Extended & Duplicate)
The KVM switch supports both extended and duplicate display modes, provided your connected computers support these functionalities.
విస్తరించిన మోడ్:
In extended mode, each of your three monitors displays a different part of your desktop, effectively expanding your workspace. You can drag windows across all three screens.
డూప్లికేట్ మోడ్:
In duplicate mode, all three monitors display the exact same content, mirroring your main screen. This is useful for presentations or sharing content simultaneously.

Image: Visual representation of extended display mode, where each monitor shows unique content, and duplicate display mode, where all monitors mirror the same content.
Configuring Display Modes:
To configure your display mode (Extended or Duplicate) on Windows, press the విండోస్ కీ + పి and select your desired option. For other operating systems, refer to their respective display settings.
7. ట్రబుల్షూటింగ్
If you encounter issues with your KVM switch, please refer to the following common problems and solutions:
- No Display on Monitors:
- Ensure the KVM switch is powered on and the DC 12V adapter is securely connected.
- Verify all DisplayPort cables are correctly and firmly connected between computers, KVM switch, and monitors.
- Confirm that your computers support triple monitor output by connecting them directly to the monitors.
- Try reducing the resolution or refresh rate of your monitors to see if a signal appears.
- మినుకుమినుకుమనే లేదా అస్థిర ప్రదర్శన:
- Check DisplayPort cable quality. Use high-quality, certified DisplayPort 1.4 cables, especially for 8K or high refresh rate resolutions.
- మీ గ్రాఫిక్స్ కార్డ్ డ్రైవర్లు తాజాగా ఉన్నాయని నిర్ధారించుకోండి.
- Reduce the display resolution or refresh rate to see if the issue persists.
- USB పరికరాలు పనిచేయడం లేదు:
- Ensure the USB 3.0 A-to-A cables are securely connected from both computers to the KVM switch.
- Try connecting the USB device directly to the computer to confirm it is functional.
- కొన్ని అధిక-శక్తి USB పరికరాలకు బాహ్య శక్తి లేదా శక్తితో కూడిన USB హబ్ అవసరం కావచ్చు.
- మారడం ఆలస్యం:
- A brief delay during switching is normal as the system re-establishes connections. If the delay is excessive (e.g., 10+ seconds), ensure all cables are properly seated and the KVM switch has stable power.
8. స్పెసిఫికేషన్లు
Below are the technical specifications for the VEDINDUST 8K 2-Port 3-Monitor DisplayPort KVM Switch (Model SW622):
| ఫీచర్ | స్పెసిఫికేషన్ |
|---|---|
| మోడల్ | SW622 |
| బ్రాండ్ | VEDINDUST |
| ఇన్పుట్ పోర్ట్లు | 2 x PC (3x DisplayPort 1.4, 1x USB 3.0 per PC) |
| అవుట్పుట్ పోర్ట్లు | 3 x DisplayPort 1.4 (for monitors), 4 x USB 3.0 (for peripherals) |
| వీడియో రిజల్యూషన్ | Up to 8K@60Hz, 4K@144Hz (backward compatible) |
| USB Transfer Speed | 5Gbps (USB 3.0), backward compatible with USB 2.0/1.1 |
| మారే పద్ధతులు | Front Panel Button, Wired Remote Controller |
| విద్యుత్ సరఫరా | DC 12V/2.5A |
| కొలతలు (L x W x H) | 18 x 5 x 8 సెం.మీ (సుమారుగా) |
| ఉత్పత్తి బరువు | 600 గ్రా |
| ఆపరేటింగ్ మోడ్ | ఆఫ్ |
| మద్దతు ఉన్న OS | Windows 7/8/9/10/11, Vista/XP, macOS, Linux (Plug and Play) |

Image: Visual confirmation of 8K@60Hz and 4K@120Hz resolution support with DisplayPort 1.4.
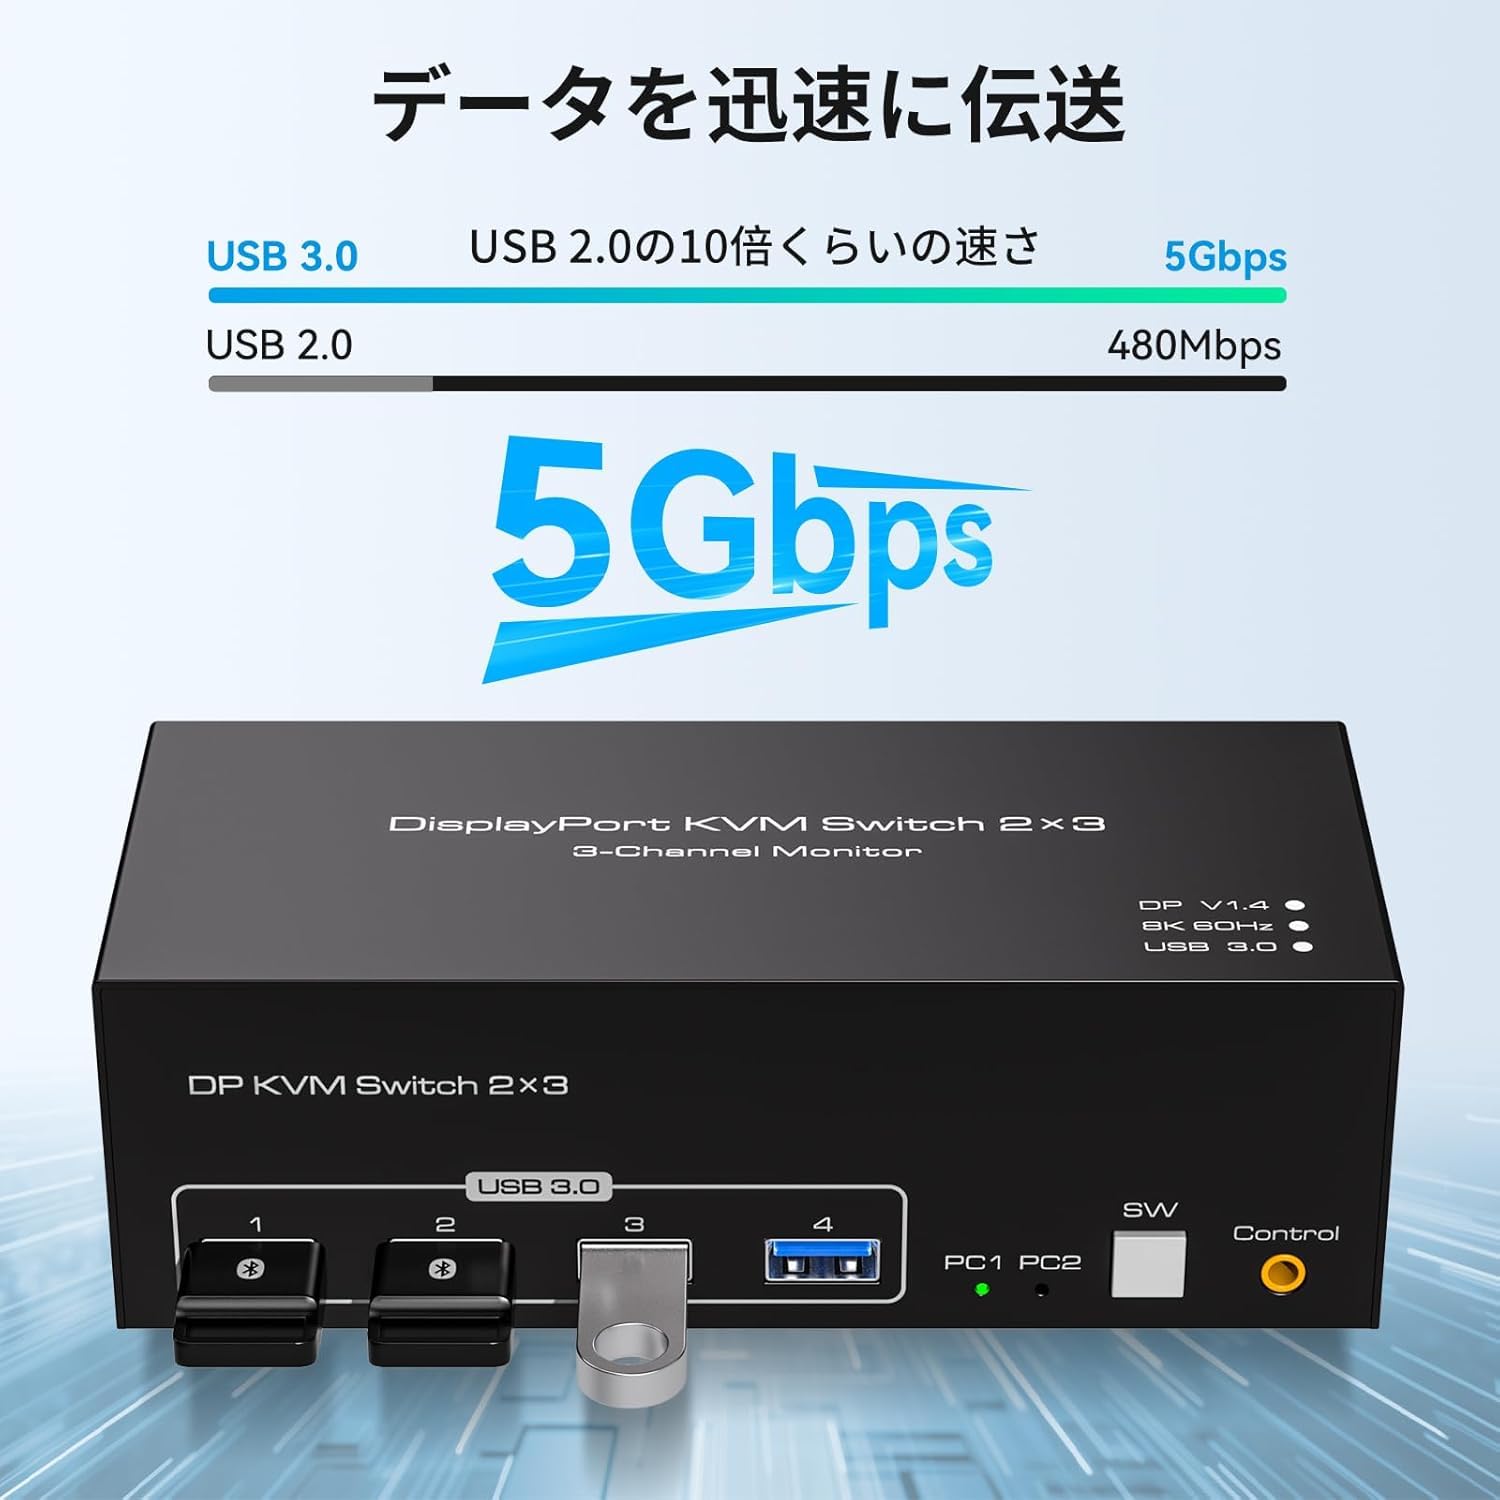
Image: Comparison of USB 3.0 and USB 2.0 data transfer speeds, emphasizing the 5Gbps capability of USB 3.0.
9. నిర్వహణ
మీ KVM స్విచ్ యొక్క దీర్ఘాయువు మరియు సరైన పనితీరును నిర్ధారించడానికి, ఈ నిర్వహణ మార్గదర్శకాలను అనుసరించండి:
- శుభ్రపరచడం: పరికరాన్ని శుభ్రం చేయడానికి మృదువైన, పొడి వస్త్రాన్ని ఉపయోగించండి. ద్రవ క్లీనర్లు లేదా రాపిడి పదార్థాలను ఉపయోగించడం మానుకోండి.
- పర్యావరణం: Keep the KVM switch in a cool, dry place, away from direct sunlight, excessive heat, and moisture.
- కేబుల్ నిర్వహణ: Ensure all cables are neatly organized and not under excessive tension to prevent damage to ports or cables.
- శక్తి: Always use the provided DC 12V power adapter. Using an incorrect adapter may damage the device.
10. వారంటీ మరియు మద్దతు
VEDINDUST products are manufactured with high-quality materials and undergo strict quality control. For any questions, technical support, or warranty claims, please contact VEDINDUST customer service through the platform where you purchased the product. Please provide your order number and product model (SW622) for faster assistance.


