పరిచయం
This manual provides detailed instructions for the installation, operation, and troubleshooting of your J-Tech Digital 4K HDMI Multiviewer Switch (JTECH-MV41AE). Please read this manual thoroughly before using the product to ensure proper functionality and to maximize your experience.

Image: J-Tech Digital 4K HDMI Multiviewer Switch (JTECH-MV41AE) with remote and a display showing multiple video inputs.
భద్రతా సమాచారం
- పరికరం చుట్టూ సరైన వెంటిలేషన్ ఉండేలా చూసుకోండి.
- పరికరాన్ని నీరు లేదా అధిక తేమకు గురిచేయవద్దు.
- అందించిన పవర్ అడాప్టర్ను మాత్రమే ఉపయోగించండి.
- పరికరంలో భారీ వస్తువులను ఉంచడం మానుకోండి.
- పరికరాన్ని వేడి వనరుల నుండి దూరంగా ఉంచండి.
ప్యాకేజీ విషయాలు
మీ ప్యాకేజీలో అన్ని అంశాలు ఉన్నాయని ధృవీకరించండి:
- 1x J-Tech Digital 4K HDMI Multiviewer Switch (JTECH-MV41AE)
- 1x IR రిమోట్ కంట్రోల్
- 1x 5V DC పవర్ అడాప్టర్
- 1x వినియోగదారు మాన్యువల్
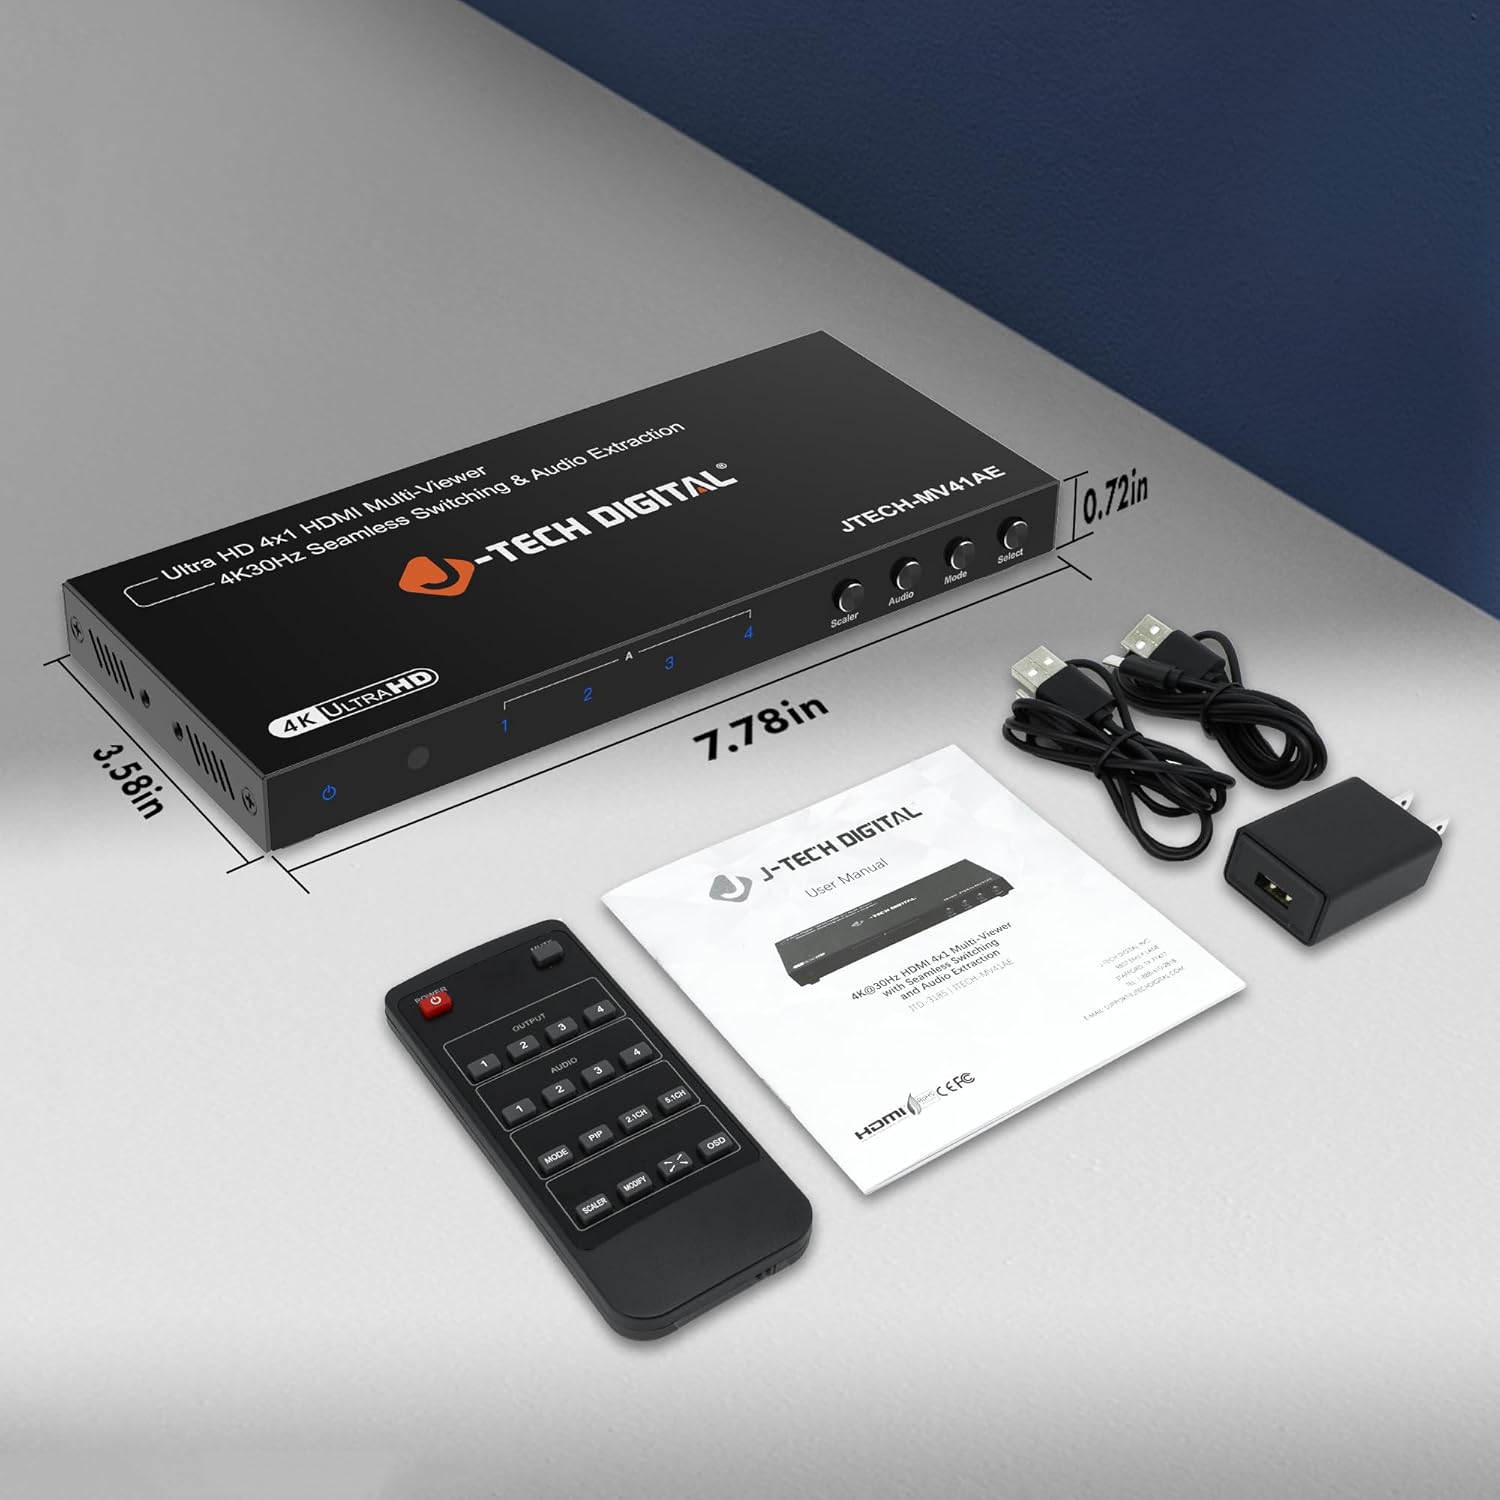
Image: Package contents of the JTECH-MV41AE.
ఉత్పత్తి ముగిసిందిview
Front and Rear Panel Interface

Image: Detailed diagram of the multiviewer switch's front and rear panels.
ముందు ప్యానెల్:
- పవర్ LED: శక్తి స్థితిని సూచిస్తుంది.
- IR రిసీవర్: రిమోట్ కంట్రోల్ సిగ్నల్స్ కోసం.
- HDMI 1-4 Input Indicators: LEDs show active HDMI inputs.
- Input 1-4 Selection Buttons: Select individual HDMI inputs.
- Scaler Button: Adjusts output resolution.
- ఆడియో బటన్: Controls audio output settings.
- మోడ్ బటన్: Cycles through viewing మోడ్లు.
- బటన్ని ఎంచుకోండి: Confirms selections or activates PiP.
వెనుక ప్యానెల్:
- HDMI 1-4 Input: మీ HDMI సోర్స్ పరికరాలను కనెక్ట్ చేయండి.
- HDMI అవుట్పుట్: Connect to your display (TV, monitor, projector).
- Audio Output (Stereo): 3.5mm jack for analog audio extraction.
- Audio Output (TOSLINK): Optical port for digital audio extraction.
- Micro USB (RS-232 Control): For advanced control via PC.
- DC 5V: పవర్ ఇన్పుట్ పోర్ట్.
- స్విచ్ ఆన్/ఆఫ్: Power toggle.
కీ ఫీచర్లు
- Supports up to 4 HDMI sources on a single display.
- Seamless switching between source devices without delay or black screen.
- Supports 4K@30Hz resolution.
- Features 6 different viewing modes, including Picture-in-Picture (PiP) with custom location control.
- Audio extraction via Optical (TOSLINK) and 3.5mm stereo outputs.
- Control via remote control, front panel buttons, or RS232.
సెటప్ మరియు ఇన్స్టాలేషన్
Follow these steps to set up your J-Tech Digital 4K HDMI Multiviewఎర్ స్విచ్:
- HDMI మూలాలను కనెక్ట్ చేయండి: Connect up to four HDMI source devices (e.g., PC, game console, Blu-ray player, STB) to the HDMI Input 1-4 ports on the rear panel of the multiviewఎర్ స్విచ్.
- HDMI డిస్ప్లేను కనెక్ట్ చేయండి: Connect an HDMI cable from the HDMI Output port on the multiviewer switch to the HDMI input of your display (TV, monitor, or projector).
- ఆడియో అవుట్పుట్ను కనెక్ట్ చేయండి (ఐచ్ఛికం): If you wish to extract audio to an external sound system, connect an optical cable to the TOSLINK port or a 3.5mm stereo cable to the Stereo port on the rear panel.
- పవర్ కనెక్ట్ చేయండి: Plug the provided 5V DC power adapter into the DC 5V port on the rear panel, then plug the adapter into a power outlet.
- పవర్ ఆన్: Flip the ON/OFF switch on the rear panel to the 'ON' position. The Power LED on the front panel should illuminate.

Image: Connection diagram for the JTECH-MV41AE.
ఆపరేషన్
పవర్ ఆన్/ఆఫ్
Use the ON/OFF switch on the rear panel to power the device. The front panel Power LED indicates the power status.
ఇన్పుట్ ఎంపిక
You can select the desired HDMI input using the front panel buttons (Input 1-4) or the corresponding number buttons on the IR remote control.
Viewమోడ్లు
బహుళviewer switch offers 6 different viewing modes. Press the మోడ్ button on the front panel or remote to cycle through these modes:
- Single Display Mode
- Dual Side Mode (Side by Side)
- Dual Side Mode (Up and Down)
- 4 Equal Display Mode
- 1 Big, 3 Small Display Mode
- Picture-in-Picture (PiP) Mode (1 Big, 1 Small)

Image: Six display modes supported by the JTECH-MV41AE.
Picture-in-Picture (PiP) Function
In PiP mode, you can customize the location of the small window. Press the PiP button on the remote control to adjust its position on the screen.
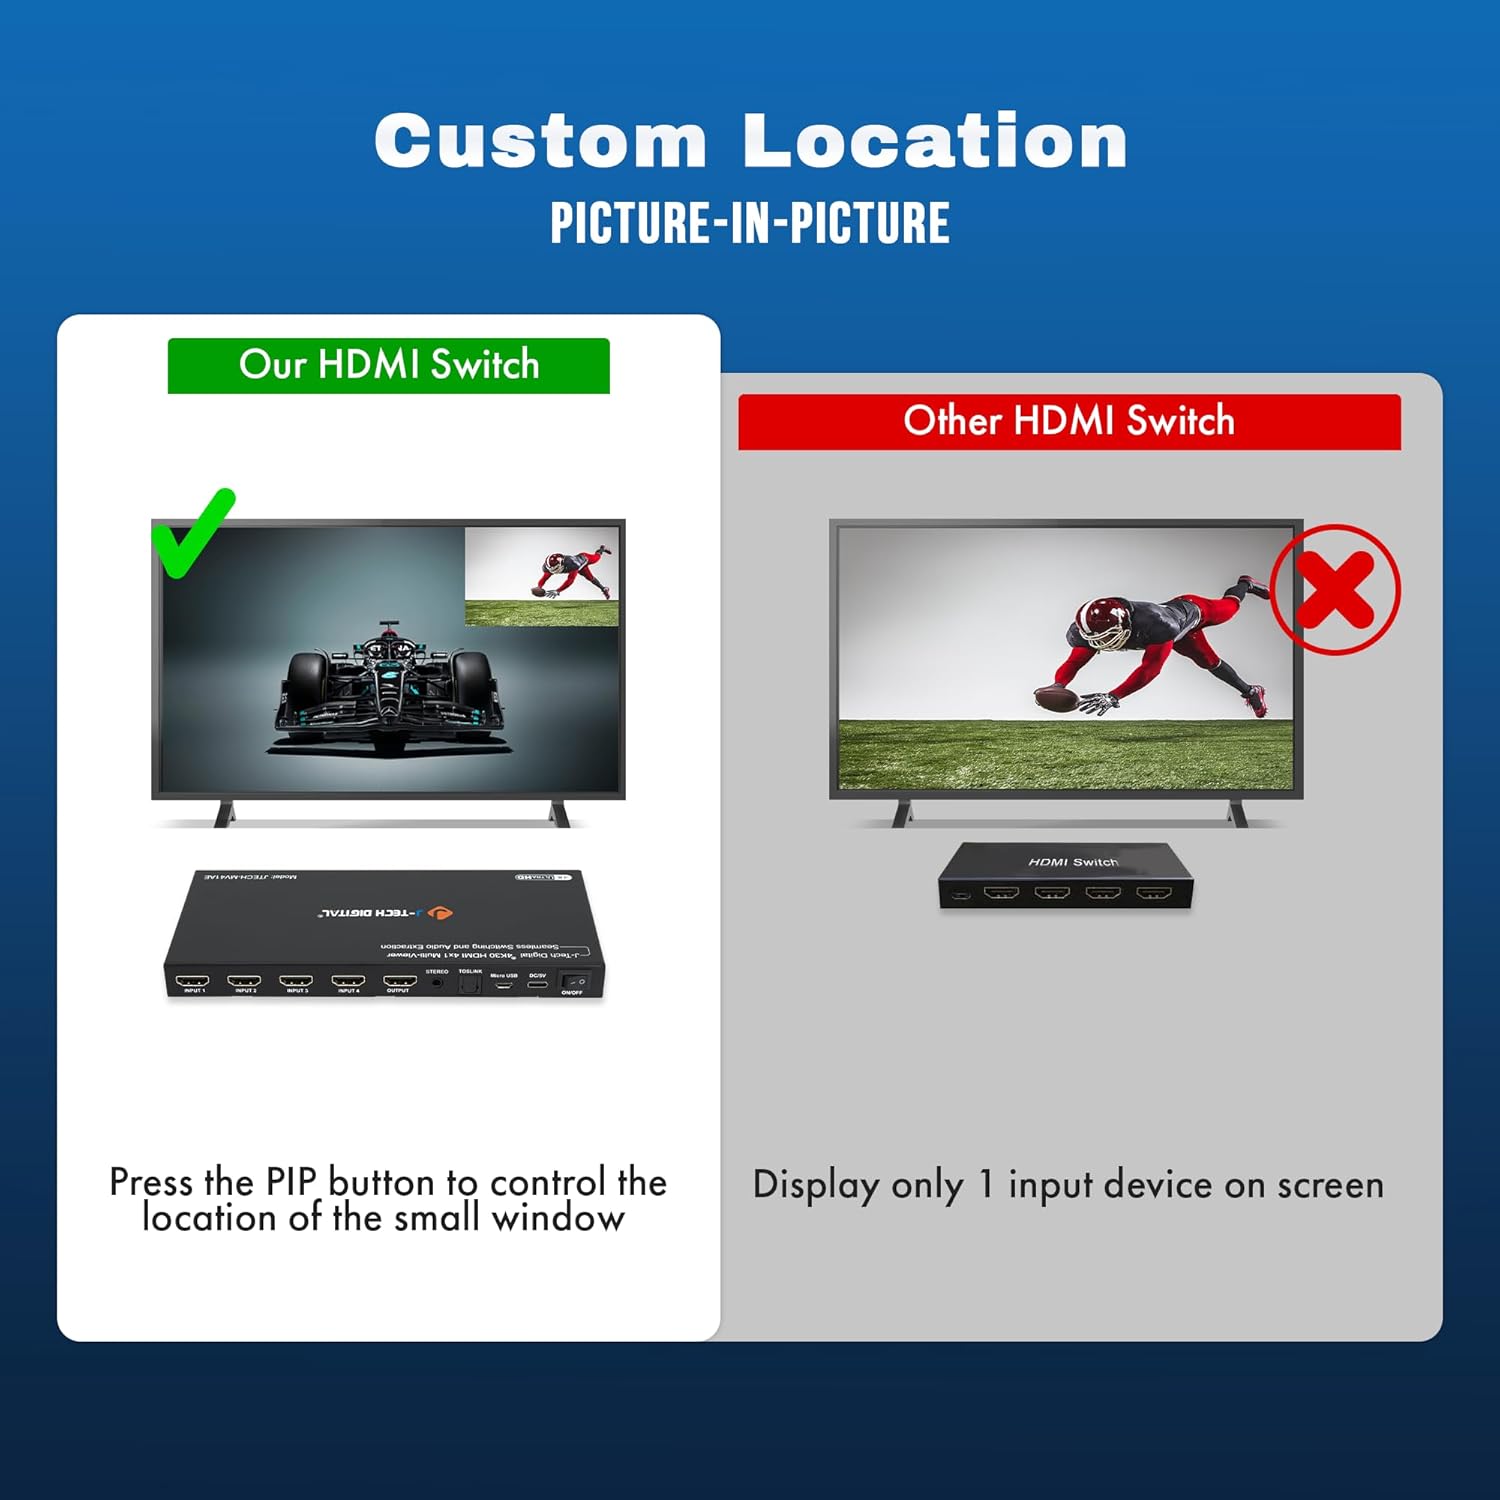
Image: Custom Picture-in-Picture location control feature.
అతుకులు లేని స్విచింగ్
The device features seamless switching, meaning there is no black screen or delay when transitioning between different source devices. This ensures a smooth viewing అనుభవం.

Image: Seamless switching functionality.
ఆడియో వెలికితీత
Audio from any of the incoming HDMI signals can be extracted to an external sound system using the Optical (TOSLINK) or 3.5mm analog audio outputs on the rear panel.
RS232 నియంత్రణ
For advanced control and integration into professional setups, the device can be controlled via RS232 using the Micro USB port and appropriate software.
నిర్వహణ
To ensure the longevity and optimal performance of your J-Tech Digital 4K HDMI Multiviewer Switch, follow these maintenance guidelines:
- శుభ్రపరచడం: Use a soft, dry cloth to clean the exterior of the device. Avoid using harsh chemicals or abrasive cleaners.
- వెంటిలేషన్: వేడెక్కకుండా నిరోధించడానికి వెంటిలేషన్ ఓపెనింగ్స్ నిరోధించబడలేదని నిర్ధారించుకోండి.
- నిల్వ: ఎక్కువసేపు ఉపయోగంలో లేనప్పుడు, పరికరాన్ని ప్రత్యక్ష సూర్యకాంతి మరియు తీవ్రమైన ఉష్ణోగ్రతలకు దూరంగా చల్లని, పొడి ప్రదేశంలో నిల్వ చేయండి.
- కేబుల్ నిర్వహణ: Keep cables neatly organized and avoid sharp bends or excessive tension to prevent damage.
ట్రబుల్షూటింగ్
If you encounter issues with your multiviewer switch, refer to the following common problems and solutions:
| సమస్య | సాధ్యమైన కారణం | పరిష్కారం |
|---|---|---|
| No video output or flickering screen. | Loose cable connections, incompatible resolution, power issue. | Check all HDMI and power cable connections. Ensure they are secure. Try a different HDMI cable. Verify that your display supports the output resolution (4K@30Hz). Cycle power to the device and display. |
| ఆడియో అవుట్పుట్ లేదు. | Incorrect audio settings, loose audio cable, incompatible audio format. | Check audio cable connections (Optical/3.5mm). Ensure your external sound system is correctly configured. Press the 'Audio' button on the device or remote to adjust audio settings. |
| రిమోట్ కంట్రోల్ పనిచేయడం లేదు. | Dead batteries, obstructed IR path. | Replace batteries in the remote. Ensure there are no obstructions between the remote and the device's IR receiver. |
| Device defaults to 2K resolution on startup. | Default setting behavior. | Press the 'Scaler' button multiple times to cycle to the desired 4K resolution. This setting may need to be reapplied after each power cycle. |
| Cannot switch between inputs. | No signal from source, faulty button/remote. | Ensure all source devices are powered on and sending a signal. Try using both the front panel buttons and the remote control. |
స్పెసిఫికేషన్లు
- మోడల్: JTECH-MV41AE
- ఉత్పత్తి కొలతలు: 3.58 x 7.78 x 0.72 అంగుళాలు
- వస్తువు బరువు: 1.4 పౌండ్లు
- రంగు: నలుపు
- కనెక్టర్ రకం: HDMI
- కేబుల్ రకం: HDMI
- ఇన్పుట్ పోర్ట్లు: 4x HDMI
- అవుట్పుట్ పోర్ట్లు: 1x HDMI, 1x Optical (TOSLINK), 1x 3.5mm Stereo
- రిజల్యూషన్ మద్దతు: 4K@30Hz వరకు
- నియంత్రణ పద్ధతులు: IR Remote, Front Panel Buttons, RS232
- అనుకూల పరికరాలు: Blu-Ray Player, Gaming Console, Laptop, Projector, Television

Image: Wide compatibility of the JTECH-MV41AE.
వారంటీ మరియు మద్దతు
All J-Tech Digital products include a one-year manufacturer replacement warranty. Additionally, J-Tech Digital provides free lifetime technical support from their customer support team located in Stafford, TX.
సాంకేతిక మద్దతు గంటలు: Monday – Friday, 9 AM – 6 PM CST.
Contact information is available on the J-Tech Digital seller page or official webసైట్.