1. పరిచయం
This manual provides detailed instructions for the safe and effective use of your KAIWEETS HT118A Digital Multimeter and KET20 Silicone Multimeter Test Leads. The HT118A is a True RMS 6000-count digital multimeter designed for accurate measurement of various electrical parameters. The KET20 test leads are engineered for high safety and durability, complementing the multimeter's capabilities. Please read this manual thoroughly before operation to ensure proper usage and to prevent potential hazards.
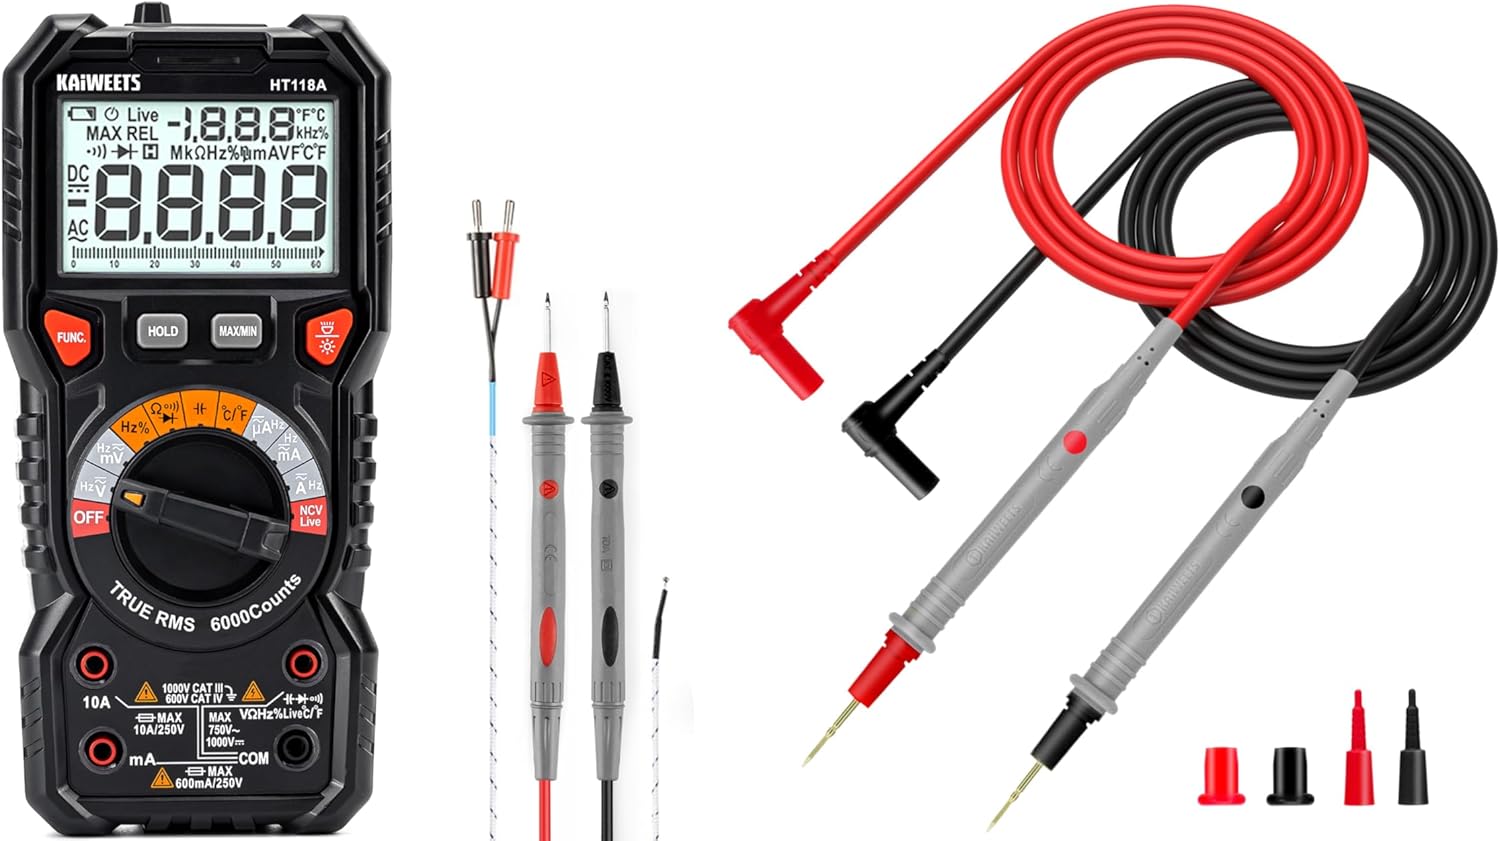
Figure 1: KAIWEETS HT118A Digital Multimeter and KET20 Test Leads. This image displays the HT118A multimeter on the left, featuring its large display and rotary dial, alongside the KET20 silicone test leads on the right, coiled and ready for use.
2. భద్రతా సమాచారం
Always adhere to safety precautions when using electrical testing equipment. Failure to do so may result in electric shock, injury, or damage to the meter or equipment under test.
- Ensure the multimeter and test leads are in good condition before each use. Inspect for any damage to the casing, insulation, or connectors.
- The KET20 test leads are rated for CAT III 1000V and CAT IV 600V. Always use appropriate safety category leads for the measurement task.
- సంపుటిని వర్తింపజేయవద్దుtage or current that exceeds the maximum ratings specified for the multimeter.
- Always disconnect power to the circuit before connecting or disconnecting test leads, especially when measuring current or resistance.
- వాల్యూమ్తో పని చేస్తున్నప్పుడు జాగ్రత్త వహించండిtag30V AC RMS, 42V పీక్ లేదా 60V DC కంటే ఎక్కువ, ఎందుకంటే ఇవి షాక్ ప్రమాదాన్ని కలిగిస్తాయి.
- పేలుడు వాయువు, ఆవిరి లేదా ధూళి వాతావరణంలో మీటర్ను ఆపరేట్ చేయవద్దు.
- ఖచ్చితమైన రీడింగ్లను నిర్ధారించడానికి తక్కువ బ్యాటరీ సూచిక కనిపించినప్పుడు వెంటనే బ్యాటరీలను మార్చండి.
- Refer to the specifications section for detailed safety ratings and measurement limits.
3. ఉత్పత్తి ముగిసిందిview
3.1 KAIWEETS HT118A Digital Multimeter
The HT118A is a versatile digital multimeter featuring True RMS measurement for accurate readings on non-sinusoidal waveforms. It offers a 6000-count resolution on its large 2.9-inch backlit LCD, ensuring clear visibility of measurements.
- కొలత సామర్థ్యాలు: DC/AC వాల్యూమ్లను కొలుస్తుందిtage up to 1000V/750V, DC/AC current up to 10A, resistance up to 60 MOhms, capacitance, frequency, duty cycle, temperature, diodes, and continuity.
- స్వీయ-పరిధి: Simplifies operation by automatically selecting the correct measurement range.
- LED Lightning Jacks: Flashing LED lights guide the user to the correct input jacks for the selected function.
- సంపర్కం కాని సంtage (NCV) గుర్తింపు: For identifying live wires without direct contact.
- లైవ్ వైర్ డిటెక్షన్: Specific function to detect live electrical lines.
- Data Hold and MAX/MIN: Functions to freeze readings and record maximum/minimum values.

Figure 2: LED Lightning Jacks. This image highlights the LED indicators around the input jacks of the HT118A multimeter, which illuminate to guide the user to the correct probe connection for the selected function.

Figure 3: 2.9" HTN Backlit Screen and Auto-ranging. This image shows the multimeter's large, orange-backlit display with dual readings, illustrating its auto-ranging capability for accurate AC/DC measurements.

Figure 4: HT118A Multimeter Functions and Battery Compartment. This image provides an overview of the various measurement functions available on the HT118A, including AC/DC voltage, current, frequency, resistance, temperature, capacitance, diodes, continuity, data retention, non-contact voltage, and live line detection. It also shows the battery compartment and kickstand.

Figure 5: Temperature Measurement. This image demonstrates the HT118A multimeter measuring temperature using the included K-Type thermocouple, shown immersed in a glass of water.
3.2 KAIWEETS KET20 Silicone Multimeter Test Leads
The KET20 test leads are designed for enhanced safety and performance, featuring durable silicone insulation and gold-plated probes.
- భద్రతా రేటింగ్లు: CAT III 1000V and CAT IV 600V, 20A current rating, suitable for professional electrical testing.
- మెటీరియల్: Temperature-resistant soft silicone material ensures flexibility and prevents hardening in various environments. Non-toxic and eco-friendly.
- ప్రోబ్స్: Ultra-sharp 2mm gold-plated probes for precise contact on high-density circuit boards.
- వైర్ నిర్మాణం: 47 strands of 0.12mm copper wire for excellent tensile strength, flexibility, low resistance, and reliable electrical conductivity.
- కనెక్టర్లు: Universal 4mm banana plugs, compatible with most digital multimeters and clamp మీటర్లు.
- పొడవు: 48 inches (120cm) long for extended reach.

Figure 6: KET20 Test Leads Safety and Features. This image illustrates the key features of the KET20 test leads, including their 0.7mm tip, silicone material, 4mm banana plug, and 120cm length, along with their CAT IV 600V and CAT III 1000V safety ratings.

Figure 7: KET20 Test Leads Higher Safety and Durability. This image emphasizes the robust construction of the KET20 test leads, highlighting their durability, high-temperature resistance, safety, convenience, and universal compatibility.

Figure 8: KET20 Test Leads Silicone Material Properties. This image visually demonstrates the heat and cold resistance of the silicone material used in the KET20 test leads, showing them exposed to flame and ice, indicating suitability for extreme environments.

Figure 9: KET20 Test Leads Probe Details. This image provides a close-up view of the test lead probes, highlighting their flexible silicone construction, high-purity copper wire, and gold-plated tips.
4. సెటప్
4.1 బ్యాటరీ ఇన్స్టాలేషన్
- మల్టీమీటర్ ఆఫ్ చేయబడిందని నిర్ధారించుకోండి.
- Locate the battery compartment cover on the back of the multimeter (refer to Figure 4).
- రిటైనింగ్ స్క్రూ(లు) విప్పు మరియు కవర్ తొలగించండి.
- Insert the required batteries, observing correct polarity (+ and -).
- బ్యాటరీ కంపార్ట్మెంట్ కవర్ను మార్చి, దానిని స్క్రూ(లు)తో భద్రపరచండి.
4.2 టెస్ట్ లీడ్లను కనెక్ట్ చేయడం
- చాలా కొలతలకు (వాల్యూమ్tage, resistance, continuity, diode, capacitance, frequency, temperature), insert the red test lead into the "VΩHz" jack and the black test lead into the "COM" jack.
- For current measurements (mA/µA), insert the red test lead into the "mAµA" jack and the black test lead into the "COM" jack.
- For high current measurements (10A), insert the red test lead into the "10A" jack and the black test lead into the "COM" jack.
- The LED lightning jacks will illuminate to indicate the correct connection points for the selected function.
5. ఆపరేటింగ్ సూచనలు
The HT118A features auto-ranging for most functions, simplifying operation. Turn the rotary dial to the desired measurement function.
5.1 కొలిచే వాల్యూమ్tagఇ (AC/DC)
- రోటరీ డయల్ని తిరగండి V~ (AC వాల్యూమ్tagఇ) లేదా V- (DC వాల్యూమ్tagఇ) స్థానం.
- Connect the red test lead to the "VΩHz" jack and the black test lead to the "COM" jack.
- కొలవవలసిన భాగం లేదా సర్క్యూట్ అంతటా పరీక్ష ప్రోబ్లను సమాంతరంగా కనెక్ట్ చేయండి.
- సంపుటాన్ని చదవండిtagడిస్ప్లేలో ఇ విలువ.
5.2 కొలిచే కరెంట్ (AC/DC)
- హెచ్చరిక: Always disconnect power to the circuit before connecting the multimeter for current measurement.
- రోటరీ డయల్ని తిరగండి A~ (AC కరెంట్) లేదా A- (DC కరెంట్) స్థానం.
- For mA/µA measurements, connect the red test lead to the "mAµA" jack and the black test lead to the "COM" jack.
- For 10A measurements, connect the red test lead to the "10A" jack and the black test lead to the "COM" jack.
- Connect the test probes in series with the circuit to be measured.
- సర్క్యూట్కు విద్యుత్తును వర్తింపజేసి, డిస్ప్లేపై కరెంట్ విలువను చదవండి.
5.3 కొలిచే ప్రతిఘటన
- హెచ్చరిక: నిరోధకతను కొలిచే ముందు సర్క్యూట్ డి-ఎనర్జైజ్ చేయబడిందని మరియు అన్ని కెపాసిటర్లు డిశ్చార్జ్ అయ్యాయని నిర్ధారించుకోండి.
- రోటరీ డయల్ని తిరగండి Ω (నిరోధకత) స్థానం.
- Connect the red test lead to the "VΩHz" jack and the black test lead to the "COM" jack.
- కొలవవలసిన భాగం అంతటా పరీక్ష ప్రోబ్లను కనెక్ట్ చేయండి.
- ప్రదర్శనలో నిరోధక విలువను చదవండి.
5.4 కొనసాగింపు పరీక్ష
- హెచ్చరిక: Ensure the circuit is de-energized before performing a continuity test.
- రోటరీ డయల్ని తిరగండి ))) (Continuity) position.
- Connect the red test lead to the "VΩHz" jack and the black test lead to the "COM" jack.
- Touch the test probes to the two points of the circuit to be tested.
- If continuity exists (low resistance), the meter will emit an audible beep.
5.5 డయోడ్ టెస్ట్
- హెచ్చరిక: Ensure the circuit is de-energized before performing a diode test.
- రోటరీ డయల్ని తిరగండి ->| (Diode) position.
- Connect the red test lead to the "VΩHz" jack and the black test lead to the "COM" jack.
- ఎరుపు ప్రోబ్ను ఆనోడ్కు మరియు నల్ల ప్రోబ్ను డయోడ్ యొక్క కాథోడ్కు కనెక్ట్ చేయండి. డిస్ప్లే ఫార్వర్డ్ వాల్యూమ్ను చూపుతుందిtagఇ డ్రాప్.
- ప్రోబ్స్ ని రివర్స్ చేయండి. మంచి డయోడ్ కోసం డిస్ప్లే "OL" (ఓపెన్ లూప్) ని చూపించాలి.
5.6 కెపాసిటెన్స్ కొలత
- హెచ్చరిక: Ensure the capacitor is fully discharged before measurement to prevent damage to the meter.
- రోటరీ డయల్ని తిరగండి -||- (కెపాసిటెన్స్) స్థానం.
- Connect the red test lead to the "VΩHz" jack and the black test lead to the "COM" jack.
- Connect the test probes across the capacitor terminals.
- డిస్ప్లేలో కెపాసిటెన్స్ విలువను చదవండి.
5.7 Frequency and Duty Cycle Measurement
- రోటరీ డయల్ని తిరగండి Hz% (Frequency/Duty Cycle) position.
- Connect the red test lead to the "VΩHz" jack and the black test lead to the "COM" jack.
- Connect the test probes across the signal source.
- Press the "FUNC" button to toggle between frequency (Hz) and duty cycle (%).
5.8 ఉష్ణోగ్రత కొలత
- రోటరీ డయల్ని తిరగండి ° C / ° F. (Temperature) position.
- Connect the K-Type thermocouple (included) to the appropriate input jacks (usually marked for temperature).
- ఉష్ణోగ్రతను కొలవవలసిన బిందువు వద్ద థర్మోకపుల్ ప్రోబ్ను ఉంచండి.
- Read the temperature value on the display. Press "FUNC" to switch between Celsius and Fahrenheit.
5.9 నాన్-కాంటాక్ట్ వాల్యూమ్tage (NCV) and Live Wire Detection
- రోటరీ డయల్ని తిరగండి NCV లైవ్ స్థానం.
- Bring the top of the multimeter near the conductor to be tested.
- For NCV, the meter will beep and the NCV indicator will light up if AC voltagఇ గుర్తించబడింది.
- For Live wire detection, press the "FUNC" button to switch to Live mode. Place the red probe into the live wire socket. The meter will indicate if it's a live wire.
5.10 ప్రత్యేక విధులు
- పట్టుకోండి: డిస్ప్లేపై ప్రస్తుత రీడింగ్ను స్తంభింపజేయడానికి "హోల్డ్" బటన్ను నొక్కండి. విడుదల చేయడానికి మళ్ళీ నొక్కండి.
- గరిష్టం/నిమి: Press the "MAX/MIN" button to enter MAX/MIN recording mode. The meter will display the maximum or minimum value recorded since activation. Press again to cycle through MAX, MIN, and current readings.
- బ్యాక్లైట్: డిస్ప్లే బ్యాక్లైట్ను ఆన్ లేదా ఆఫ్ చేయడానికి బ్యాక్లైట్ బటన్ను (తరచుగా లైట్ బల్బ్ ఐకాన్ ద్వారా సూచించబడుతుంది) నొక్కండి.
6. నిర్వహణ
6.1 శుభ్రపరచడం
- మీటర్ను తుడవండి casinప్రకటనతో గ్రాamp వస్త్రం మరియు తేలికపాటి డిటర్జెంట్. అబ్రాసివ్లు లేదా ద్రావకాలను ఉపయోగించవద్దు.
- Keep the test leads clean and free from dirt or grease to ensure good electrical contact.
6.2 బ్యాటరీ భర్తీ
When the low battery indicator appears on the display, replace the batteries as described in Section 4.1. Remove batteries if the meter is not used for an extended period to prevent leakage.
6.3 టెస్ట్ లీడ్ తనిఖీ
Regularly inspect the KET20 test leads for any signs of damage, such as cuts, cracks, or exposed wiring. Damaged leads must be replaced immediately to ensure safety and accurate measurements.
7. ట్రబుల్షూటింగ్
- Meter does not turn on: బ్యాటరీ ఇన్స్టాలేషన్ను తనిఖీ చేయండి మరియు బ్యాటరీలు అయిపోకుండా చూసుకోండి.
- "OL" ప్రదర్శించబడింది: This typically means "Over Limit" or "Open Loop." The measured value is outside the meter's range, or there is an open circuit (e.g., when measuring resistance on an open wire).
- సరికాని రీడింగ్లు:
- బ్యాటరీ స్థాయిని తనిఖీ చేయండి.
- Ensure test leads are properly connected to the correct jacks.
- Verify the rotary dial is set to the appropriate function.
- Clean test probes and connection points.
- కంటిన్యుటీ బీప్ లేదు: Ensure the circuit is de-energized and the probes are making good contact.
8. స్పెసిఫికేషన్లు
| ఫీచర్ | స్పెసిఫికేషన్ |
|---|---|
| బ్రాండ్ | కైవీట్స్ |
| మోడల్ | HT118A |
| ప్రదర్శించు | 6000 కౌంట్లు, 2.9" HTN బ్యాక్లిట్ LCD |
| కొలత రకం | నిజమైన RMS |
| DC సంtagఇ పరిధి | 1000V వరకు |
| AC వాల్యూమ్tagఇ పరిధి | 750V వరకు |
| DC/AC Current Range | 10A వరకు |
| ప్రతిఘటన పరిధి | 60 మోమ్స్ వరకు |
| కెపాసిటెన్స్ | అవును |
| ఫ్రీక్వెన్సీ / డ్యూటీ సైకిల్ | అవును |
| ఉష్ణోగ్రత కొలత | Yes, with K-Type Thermocouple |
| డయోడ్ టెస్ట్ | అవును |
| కంటిన్యుటీ టెస్ట్ | అవును |
| NCV/Live Detection | అవును |
| Safety Rating (Test Leads) | CAT III 1000V, CAT IV 600V (20A) |
| Test Lead Material | సిలికాన్ |
| Test Lead Probe Type | 2mm Ultra-Fine Gold-Plated |
| శక్తి మూలం | బ్యాటరీ ఆధారితమైనది |
| రంగు | నలుపు |
గమనిక: నోటీసు లేకుండా లక్షణాలు మారతాయి.
9. వారంటీ మరియు మద్దతు
KAIWEETS products are designed for reliability and performance. For warranty information, technical support, or service inquiries, please refer to the official KAIWEETS webసైట్లో లేదా వారి కస్టమర్ సర్వీస్ విభాగాన్ని సంప్రదించండి. వారంటీ క్లెయిమ్ల కోసం కొనుగోలు రుజువుగా మీ కొనుగోలు రసీదును ఉంచండి.
Official KAIWEETS Store: KAIWEETS Store on Amazon


